This article was co-authored by Amy Guerrero. Amy Guerrero is an Arts and Crafts Specialist and the Owner of Sunshine Craft Co., a crafting studio based in Phoenix, Arizona. Amy specializes in macrame, DIY crafting, and teaching fiber arts. She offers monthly in-person and online workshops along with having developed a range of DIY craft kits for at-home projects. Amy holds a BS in Industrial Design from Philadelphia University. She worked as a graphic designer before starting her own business. Sunshine Craft Co. is a creative hub that offers a wide range of workshops, tools, and resources for any craft project to inspire creativity and community engagement.
This article has been viewed 2,689,383 times.
For most people, bows are synonymous with ribbons. Bows made from ribbon can be made in several ways, depending on what use you intend putting them to. Ribbon bows can be used for such things as hair accessories, gift wrapping, dressmaking, craft and the like.
Steps
Tying a Basic Bow
-
1Cut a length of ribbon. Make sure it's long enough for making the bow. Always allow extra for easing the bow into shape and leaving a long enough tail.[1]
- Lay the ribbon length down on a flat surface.
-
2Bring both tail ends of the bow to the middle. Overlap them and you'll have created two loops and two tails. Shape the loops if they're not evident.[2]Advertisement
-
3Adjust the proportions. This means checking that both the loops and the tails are the size/length that you want them to be and that they are symmetrical.
-
4Fold the left loop over the right loop. Take it around the back and through the center hole. Pull tightly at the center.[3]
-
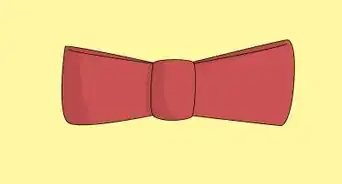
5Finished!


Creating a Grosgrain Ribbon Bow
-
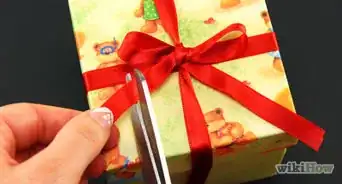
1Measure and wrap the ribbon. Cut 6 1/2 feet (2 meters) of grosgrain ribbon. Wrap the ribbon lengthwise around the box. Use glue or tape to join to the box and to join the ribbon but leave the ribbon uncut (you'll continue to work with the long end of the ribbon to make the loops).[4]
- This bow is ideal for adding to a gift box!
-
2Make a loop with the ribbon. Bring the loop back to the center join. Hold the ribbon in place with a finger. Crease the ribbon length at the loop fold. Fold back to make another loop. Glue/tape in place, if you want. Make one more loop this way.[5]
-
3Create more loops. Shift to the other side of the center. Repeat three more loops in the same way, bringing them back to the center and gluing them in place.[6]
-
4Finished!

Making a Wire-Bound Ribbon Bow
-
1Cut a piece of ribbon. This can be used for gift wrapping, floral arrangements, hair accessories and party decorations. Lay the ribbon length down on a flat surface.
-
2Create two loops of ribbon. Bring both halves of the ribbon to the middle and overlap them in the center. There should also be tails at the ends.[7]
- Hold the ribbon in the center to keep it secure.
-
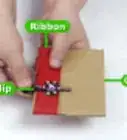
3Wrap and conceal the wire. Wrap a fine piece of wire tightly around the middle (neck) of the bow. Wrap ribbon or tape around the wire to conceal it. Use the same color as the bow or a complementary color. Either glue or stitch the wound ribbon piece in place.[8]
-
4Adjust the loops and tails. Adjust the loops and tails as needed to ensure symmetry. Cut the tails for increased protection from fraying. Add the wired bow to your next gift or wreath.
-
5Finished!

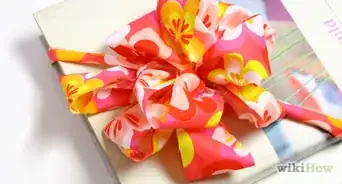
Making a Floral Ribbon Bow
-
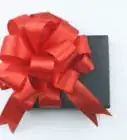
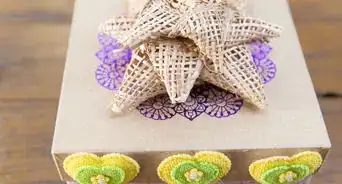
1Cut a length of ribbon. Measure a length of 115cm/45 inches. This bow has the appearance of a large flower in bloom. It can be used for decoration, gift wrapping or accessories.
-
2Measure your loops. Make a loop measuring 2.5cm/1 inch 20cm/8 inches in from the end of the ribbon. Pinch it between your thumb and forefinger to hold in place.[9]
-
3Fold the loop. Bring the long end of the ribbon up to make a 2.5cm/1 inch loop on the left of the pinched loop. Keep secure between your thumb and forefinger.[10]
-
4Alternate sides. Make the same loop, only on the right side this time. Continue in this same fashion of making loops, alternating each time to create pairs. Make about three to five paired loops to complete.[11]
-
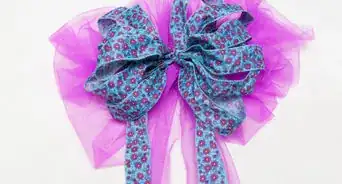
5Secure the bow. Wrap thin gauge wire around the center of the bow. Twist tightly to secure and trim off excess wire. Conceal the wire. Wrap ribbon over the wire to cover it. Glue or stitch in place.[12]
-
6Fan out the loops. They should be shaped in a rounded fashion, to give off the appearance of a flower.
Shaping the Tails of Ribbons
-
1Remember the tails. Along with loops, tails are a distinctive part of how a bow turns out. Not all bow designs have tails, but for those that do, making them appear neat and sharp is important.
-
2Form tails as long as possible. Make sure that the tails are as long as possible when making bows. You can always cut them shorter but it's near impossible to make them longer without ruining the loops of the bow.[13]
-
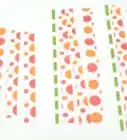
3Cut the tails. Cutting the tails prevents fraying of the ribbon and neatens the final look. Use a sharp pair of scissors suitable for cutting fabric. The ends of tails can be cut into distinctive ways:
- Diagonally: This is a cut along a diagonal line along the tail fabric.
- Chevron: Choose a center point at the end of the ribbon's tail. Cut diagonally to this point from the left and then the right side. Meet the two in the middle at the chosen point. Carefully remove the cut piece if it hasn't already fallen away.[14]


Choosing the Ribbon
-
1Decide what the bow is for. This will help you choose the ribbon by texture and color. For example: if the bow is to be added to a garment you're sewing or it's part of the accessories accompanying an outfit, match the ribbon to the colors or textures of the clothes.
-
2Choose by quality. Satin is a standard type of ribbon used for making bows from but it can be slippery for the novice bow maker. Grosgrain can be an easier beginner ribbon. Prints, velvet, Lurex, cotton, sheers and other varieties of ribbon are all suitable too. Ribbons with wire edges are great for gifts and bouquets.[15]
- At its most basic, if you can tie the ribbon into a tight knot, then it can be tied into a bow by hand.
- Some ribbons are too stiff to make into bows without additional help, such as wiring or stitching.
-
3Experiment. Try experiment with different types or ribbons, including different widths, to find the exact style you're after.
- Always keep in mind that you need a lot of ribbon to make a bow. All the folding and tying consumes a lot of the ribbon.


Community Q&A
-
QuestionMake a big satin bow to put on presents or fancy box, which type of ribbon will I need?
 Ashlyn DerbyCommunity AnswerYou should use satin if you are more skilled, and grosgrain if you are a beginner. You can try different ones too, like velvet.
 -
QuestionHow do I put a hair elastic in the bow?
 Community AnswerWhen you create a bow that requires you wrapping the middle with wire, you can tie it around a hair elastic while doing so. Then you can conceal the wire and continue as instructed.
 -
QuestionHow do I tie a ribbon bow to a Christmas tree?
 Community AnswerWrap the ribbon all the way around the tree, creating a circle. Then tie the bow.
Things You'll Need
- Ribbon
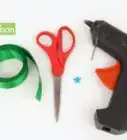
- Florist wire (thin gauge)
- Scissors
- Glue
References
- ↑ http://www.bhg.com/christmas/gift-wrapping/festive-bows/
- ↑ http://www.bhg.com/christmas/gift-wrapping/festive-bows/
- ↑ http://www.bhg.com/christmas/gift-wrapping/festive-bows/
- ↑ http://thinkbowtique.com/blog/how-to-make-twisted-bowtique-bow-with-16mm-grosgrain-ribbon/
- ↑ http://thinkbowtique.com/blog/how-to-make-twisted-bowtique-bow-with-16mm-grosgrain-ribbon/
- ↑ http://thinkbowtique.com/blog/how-to-make-twisted-bowtique-bow-with-16mm-grosgrain-ribbon/
- ↑ http://www.marthastewart.com/269394/bow-how-tos-continued
- ↑ http://www.marthastewart.com/269394/bow-how-tos-continued
- ↑ http://www.dummies.com/how-to/content/how-to-make-floralribbon-bows.html
- ↑ http://www.dummies.com/how-to/content/how-to-make-floralribbon-bows.html
- ↑ http://www.dummies.com/how-to/content/how-to-make-floralribbon-bows.html
- ↑ http://www.dummies.com/how-to/content/how-to-make-floralribbon-bows.html
- ↑ http://www.theribbonretreat.com/blog/how-to-make-a-tails-down-boutique-bow-2.html
- ↑ http://www.theribbonretreat.com/blog/how-to-make-a-tails-down-boutique-bow-2.html
- ↑ Amy Guerrero. Arts & Crafts Specialist. Expert Interview. 9 October 2020.
About This Article

If you’re trying to make a bow out of ribbon, first cut a length of ribbon and lay it out flat. Then make loops on both ends of the ribbon and overlap them, like you do when you tie your shoes the "bunny ears" way, so you have 2 loops and 2 tails. Take a second to adjust the loops and tails so they’re symmetrical and as big or small as you want them. Finally, fold the left loop over the right loop, taking it around the back and through the center hole, and pulling it tightly at the center. To learn how to make a grosgrain or floral bow from your ribbon, keep reading the article!