This article was co-authored by wikiHow Staff. Our trained team of editors and researchers validate articles for accuracy and comprehensiveness. wikiHow's Content Management Team carefully monitors the work from our editorial staff to ensure that each article is backed by trusted research and meets our high quality standards.
This article has been viewed 291,390 times.
Learn more...
Torches can be used to light your way, to provide light and ambiance on outdoor patios, or even while camping to help keep your campfire lit. However, if you're going to light your torches, you must be very careful, and exercise all the safety precautions for working with fire. There are a few different types of torches you can make, depending on the materials you have available to you.
Steps
Making a Minimalistic Torch
-
1Find your supplies. A minimalistic torch is ideal when you don’t have access to many resources, such as when you're in the woods without the right equipment. To make this kind of fast-burning torch in an emergency, you'll need:[1]
- Green stick or branch that’s at least 2 feet (61 cm) long and 2 inches (5 cm) thick
- Cotton cloth or birch bark
- Fuel, such as kerosene, naphtha-based camp fuel, lighter fluid, or rendered animal or vegetable fat
- Matches or lighter
-
2Cut the cloth. A torch needs a wick, just like a candle does. You can use strips of cotton to make the wick, such as from an old cotton t-shirt. Cut or tear the fabric into strips that are 1 foot (30 cm) wide and 2 feet (61 cm) long.
- Alternatively, you can use a strip of birch bark if you don’t have fabric. Find a birch tree and peel a strip that’s about 6 inches (15 cm) wide and 2 feet (61 cm) long.
- If you're using bark, you'll also need twine, rope, string, or some reeds to tie it in place.
Advertisement -
3Attach the wick to the torch. Position the widthwise end of the cotton strip at the top of the green branch. Wrap the strip snugly around the top of the torch, wrapping in the same place to form a thick bulge. When you reach the end of the fabric, tuck the end underneath the wrapped fabric to secure it in place.[2]
- For birch bark, wrap the bark snugly around the end of the torch. When you get to the end of the bark, hold the bark in place and tie a string or reed around the top and bottom of the wick to hold the bark in place.
-
4Soak the cotton wick with flammable liquid. A cotton wick needs to be soaked in a flammable liquid before you can light the torch, because it’s actually the fluid that will burn and not the fabric. Place the wick end of the torch into the fuel and let it soak for a few minutes to ensure the fabric is saturated.
- With a birch wick, you don’t have to soak the wick because the bark contains natural resins that will burn.
-
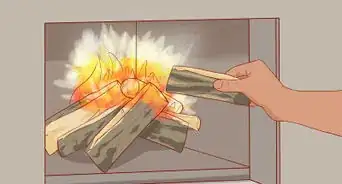
5Light the torch. Use a light, matches, or a campfire. Hold the torch upright and hold the flame to the base of the wick until the wick ignites. This may take about a minute. Once lit, the torch should last at least 20 minutes, and could burn as long as an hour.[3] A birch wick may only burn for about 15 minutes.
- Don’t burn your torch in dry, heavily wooded areas, as you could set the surrounding wood on fire.
- Don’t burn the torch inside houses or buildings.
- Hold the torch at arm’s length to avoid burning yourself. Be mindful of any falling sparks and embers, too, as these could ignite your clothes or other surroundings.


Using Cattail to Make a Torch
-
1Gather your supplies. A cattail torch is another type of minimalistic torch that requires only a few simple items. With this type of torch, the spike on the end of the plant will be soaked in flammable fluid. Along with the cattail, you'll also need:
- Hollow reed, stick, cane, or bamboo piece
- Fuel
- Matches or lighter
-
2Find a cattail. The best place to look for cattails is around the perimeter of lakes, ponds, marshes, and other wetland areas. You may also know this plant by the names reedmace, cumbungi, or bulrush.
- Because cattails are rather flimsy, you'll also need to find a hollow stick or cane that you can insert the cattail into. The stick will act as a holder. Make sure it’s at least 2 feet (61 cm) long.
-
3Soak the cattail with flammable liquid. Place the cattail into your flammable liquid or oil. Let the cattail soak for at least an hour. This will give the spike time to absorb lots of oil, which means a longer burning torch.
- Good fuels for this purpose include diesel fuel, naphtha-based camp fuel, lighter fluid, or rendered animal or vegetable fat.
-
4Assemble and light the torch. When the cattail is done soaking, insert the bottom of the cattail into your hollow stick so the oil-soaked spike is protruding from the top of the stick. With a lighter or matches, hold a flame to the bottom of the spike until it ignites.
- A cattail torch could give you up to six hours of flame.
- Don’t burn these torches inside or near other flammable objects.
- Hold the torch away from your body to avoid burns.


Making a Long-Burning Kevlar Torch
-
1Gather your supplies. This type of torch requires more tools and specialized equipment than the other types. This is not a minimalistic torch that you can make in an emergency. To make this type of torch, you'll need:[4]
- Aluminum pole that’s at least an inch (2.5 cm) thick and 2 feet (61 cm) long
- Kevlar fabric
- Kevlar twine
- Scissors
- 2 quarter-inch (6 mm) self-drilling aluminum screws
- Drill or screwdriver
- Bucket
- Naphtha-based camp fuel
- Old towel
- Matches or lighter
-
2Cut the Kevlar fabric into a strip. Use the scissors to cut a strip of Kevlar fabric that’s about 4 inches (10 cm) wide and 2 feet (61 cm) long. You can buy Kevlar fabric at some home stores, department and hardware stores, fabric stores, or online.
- Kevlar is a durable synthetic fabric that’s made from plastic. However, it’s flame-resistant and doesn’t melt, making it ideal for torches.[5]
- Kevlar is often used by fire jugglers and fire poi performers.
-
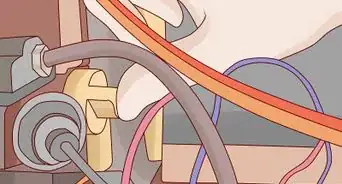
3Attach the Kevlar to the pole. Place the widthwise end of the fabric strip at the top of the pole. Drill or screw a self-drilling screw through the fabric and into the pole at the top and bottom edges of the fabric. Position the screws a half-inch (13 mm) from the top and bottom edges.[6]
- Aluminum has a smooth surface, and to prevent the Kevlar wick from sliding down the torch, you have to secure it in place with screws.
- It’s important to use aluminum for the pole and screws, because aluminum won’t conduct the heat from the torch.
-
4Wrap and secure the fabric. Once the fabric is screwed to the pole, wrap the Kevlar wick around the end of the pole. Pull on the fabric as you wrap so it’s nice and snug. When you reach the end of the fabric, tie it in place with lengths of Kevlar twine.[7]
- Use two pieces of twine to tie the fabric, one near the top and bottom of the wick.
-
5Dip the wick in fuel. Fill a bucket with at least 4 inches (10 cm) of camp fuel. Dip the wick into the fuel and let it sit for a couple minutes to soak. Remove the torch from the bucket and let the excess fuel drip onto an old towel.
-
6Light the torch. With matches or a lighter, hold a flame to the bottom of the wick until it ignites. This Kevlar torch will burn for several hours. You can also put the flame out and reuse the torch later.[8]
- To put out the flame before it burns out, cover the top with a metal container, such as a soda can with the top cut off. Hold the can there to smother the flame until the torch goes out.


Community Q&A
-
QuestionDoes it have to be a green stick? Will it blow up if I use a blue one?
 Community AnswerNo, it does not have to be a green stick, and no, it will not blow up if you use a blue one.
 -
QuestionFor how long will this torch burn?
 Community AnswerBefore European contact, Alaska Natives used animal oil with carved rock lamps. On Kodiak Island, these lamps used seal oil and a wick of twisted moss or cotton grass. Lamps were preferred over torches, because torches burned too quickly. A seal-oil lamp can burn for several hours; a burning torch lasts an hour or less, and create high flames that are dangerous in wood/sod homes.
 -
QuestionDoes the fuel need to be kerosene when making torches?Community AnswerAs it says in the article, if it can soak into the wick and is flammable, then it will work.
Warnings
- Never let children play with fire.⧼thumbs_response⧽
- Always keep a fire extinguisher on hand around open flames.⧼thumbs_response⧽


References
- ↑ http://www.artofmanliness.com/2014/03/05/how-to-make-a-torch-an-illustrated-guide/
- ↑ http://www.artofmanliness.com/2014/03/05/how-to-make-a-torch-an-illustrated-guide/
- ↑ http://www.artofmanliness.com/2014/03/05/how-to-make-a-torch-an-illustrated-guide/
- ↑ https://www.youtube.com/watch?v=Cdmy2uZUnkk
- ↑ http://www.explainthatstuff.com/kevlar.html
- ↑ https://www.youtube.com/watch?v=Cdmy2uZUnkk
- ↑ https://www.youtube.com/watch?v=Cdmy2uZUnkk
- ↑ http://www.secretsofsurvival.com/survival-tips/ultimate-primitive-torch.html
About This Article

To make a torch, start by cutting a cotton cloth into long strips and wrapping it around a branch or stick that's at least 2 feet long. Secure the cloth by tucking the end under the wrapped fabric. Then, dunk the cloth-wrapped end into a flammable liquid, such as Kerosene, and light the torch with a lighter, match, or campfire. To learn how to make torches out of cattails or Kevlar, read on!