wikiHow is a “wiki,” similar to Wikipedia, which means that many of our articles are co-written by multiple authors. To create this article, 20 people, some anonymous, worked to edit and improve it over time.
The wikiHow Culinary Team also followed the article's instructions and verified that they work.
This article has been viewed 39,723 times.
Learn more...
While the ice in your drink might seem basic, making and shaving ice is pretty innovative idea. While ice was once made and shaved in 300 pound blocks, it is now available in most domestic freezers, to a smaller degree. It is true the process of making it is not difficult, but you can learn how to make ice properly, and make different kinds of ice, if you're interested. Even the hot kind.
Steps
Making Plain Ice
-
1Remove any remaining ice in the tray before refilling it. Have you ever had the experience of cracked, uneven ice cubes when you try to remove them? That usually happens when room temperature water gets poured over already-frozen cubes. If you want all your ice to be even and consistent, only fill the tray when it's completely empty.
- Rinse the tray out beforehand, to remove freezer sediment and little chunks. This also helps to warm up the tray slightly, resulting in more even cubes. Cubes will be easier to get out later if you do this.
- If you you need to, empty the ice cubes into a Ziplock freezer bag, or store them in a bowl in the freezer. Easy fix.
-
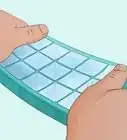
2Fill the tray up just below the rim. When the water freezes, it expands. This is why the ice in your drink floats, even in a glass of water. When you make ice, try to account for the fact that the cubes will get a little bigger as they freeze, and don't overfill.[1]
- Pro tip: If you want perfectly clear ice, instead of cloudy, boil the water first. When it cools, freeze it normally. The more times you boil, the more clear the ice when it freezes.
Advertisement -
3Place flat in the freezer. For the best ice cubes, place your ice cube tray flat and even. Clear out any freezer bags or other items that might be in the freezer, and set the trays on a flat surface.
- Don't stack ice cube trays on top of one another, if you can help it. Sometimes, you'll get weird cubes, or spill the water on the bottom of the freezer.
- Freezers are usually set at 32 degrees F (0 C) or below.
- In most freezers, water should freeze in about one to three hours, depending on the size of the cubes and the temperature of the freezer.
-
4Twist the tray gently to pop the cubes out. After your cubes are frozen, turn the tray to make sure they're not liquid on the inside. To pop them out, you can usually just pry one up and out, or twist the tray very slightly to loosen them from the sides, then pull them out.
- Sometimes, it takes some work to get the cubes loose from the sides of the tray. Don't start banging it around, though, or you'll crack the tray. Instead, run a bit of warm water in the tap and wet a cloth. Sit the ice cube tray on the cloth to melt the underside slightly. They'll pop right out.
-
5Consider upgrading your ice tray. Ice cube trays come in a variety of shapes, sizes, and features. You can get an ice cube tray with a cover, to prevent freezer burn and crystals from forming on the top. You can get big cocktail ice trays and individual ice cube trays shaped like the Death Star from Star Wars. Get creative!
- If you don't want to buy a tray, don't. Look around your kitchen from strangely-shaped objects you could fill with water. That lobster-shaped pan? Make a big lobster cube. Make a coffee-cup-shaped ice cube. Why not?


Making Flavored Ice
-
1Make coffee cubes. Iced coffee is great with regular ice, but it's even better with coffee cubes. Next time you let a pot of morning brew sit too long, pour it into a clean ice cube tray and let it freeze. Next time you want to have iced coffee, drop a few of those into it. Delicious.
- These also go great in mixed drinks and cocktails, or as an addition to chocolate milk.
- If you don't like coffee, try freezing herbal tea, lemonade, or any drink you prefer.
-
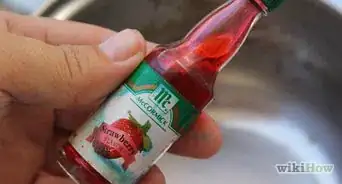
2Freeze your favorite fruit juice. Another delicious addition to a fruity cocktail or mixed drink is a fruit-juice ice cube. Freeze cranberry cocktail cubes and add it to your iced tea. Freeze pineapple-mango juice to pop into your next smoothie. This is a great way to spice up any drink.
- Generally, citrus juices don't work quite as well as other fruit juices and cocktails. Anything based in apple or grape juice works really well.
-
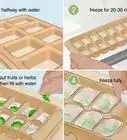
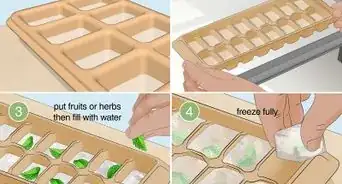
3Make your own popsicles. In the summer time, a good way to save money is to make popsicles in the fridge yourself. Mix up a batch of you favorite Kool-Aid flavor or other fruit drink and pop it not the ice cube tray. About halfway through, stick toothpicks into the centers, or just pop them out and let the kids eat them outside.
- You can also get molds made specifically for making popsicles, which have plastic holders that you can reuse. They're a lot of fun for kids.
-
4Add berries or other fruit. One great visual treat is to add a single blueberry, raspberry, blackberry, or grape to each section of the ice cube tray and then cover them with water. Squeeze a little lemon juice or lemonade onto the fruit, then cover with water, or the fruit juice of your choice. These make great little additions to any mixed drink, or just a plain glass of water.
-
5Freeze chopped mint, basil, or other herbs. If your garden goes crazy with herbs, a great way to save them for later in the season is to chop up the herbs finely, then pack them into an empty ice cube tray and cover with a small amount of water. When they freeze up, pop them out and keep them in a freezer bag.
- These are great for cooking later in the season. You can toss a cube of basil into a soup pot, or toss a cube or mint into a big pitcher of fresh iced tea.
- You could also do this with sage, thyme, parsley, cilantro, or any combination of herbs you regularly use.
-
6Add food coloring for fun. While it won't really add any flavor to the cubes, it can be fun to add a drop of food coloring to individual sections on the ice cube tray and let them freeze. It's a fun project for kids, and makes a plain water glass a lot more fun.

Maintaining an Ice Maker
-
1Understand the basic components of an ice maker. If your refrigerator automatically makes ice, your job is a whole lot easier. It's still good to understand how to maintain the components, though, to keep it in good working order. All refrigerators are slightly different, but most of them have the same basic components:
- The Dispenser. This is where the ice comes from, and is usually operated by pressing a button, or pushing a glass against a lever. Some refrigerators have different settings.
- The Freezer. Ice is frozen by cooling coils in the freezer, then routed through the dispenser. Maintaining your freezer and setting it at the proper temperature is important for the life of the ice maker.
- The Ice Maker. Usually, ice makers are just small freezing units in the freezer, sometimes with a little metal control arm you can put up or down, to control whether or not ice is made. These typically have water filters that you can change every couple months.
-
2Be gentle with the dispenser arm. Jamming your glass into it can make the dispenser malfunction. If you notice the water or ice coming out seems to be erratic, check the dispenser port for signs of buildup and clean it with a clean cloth, if necessary.
- If you have very hard water, mineral deposits will often form around the dispenser. This is normal, and can be cleaned off gently with a brush and some vinegar.
-
3Change the settings every so often. If you have an ice dispenser that makes cubed ice, crushed ice, and all sorts of other options, it's important to toggle between them a few times a week, to keep the machine in good order.
- If you're not using it, frost and ice particles can build up and make the dispenser malfunction.
-
4Keep your freezer above -20 F (-4 C). Any colder that that, and ice will start to build up on the components of the ice maker, increasing the chance that something will malfunction.
- If you see ice forming in your freezer, it could be because water is leaking from the freezing unit, and you need to check to make sure the ice maker is sealed and installed properly. Make sure the water lines are straight and connected properly, and that your freezer isn't too full of items.
- Most newer ice makers will defrost regularly, but if you've got an older one, you may need to defrost your freezer every couple of months to keep the ice maker functioning properly. Ideally, twice a year is perfect.
-
5Clean the ice bin. Every now and then, it's a good idea to remove the ice from the ice bin in the freezer, and turn off the ice maker. With a clean towel, wipe out the inside of the tray, and check the feeler arm to make sure everything is still working properly. This should help eliminate sediment and other little particles from your ice cubes.
- Don't store anything in the ice bin. Some people like to toss things directly into the ice that the maker creates, which can mess up the levels of the device.
-
6Finished.


Warnings
- If you make ice in something plastic the plastic might bust open.⧼thumbs_response⧽


About This Article
To make ice cubes, start by filling a clean ice cube tray with water to just below the rim to allow for expansion. Then, place the tray flat in the freezer and let it freeze for 1 to 3 hours. To serve the ice, gently twist the tray until the cubes pop out. For flavored ice, simply replace water with another liquid, like coffee or juice. If your freezer makes ice automatically, maintain your ice maker by being gentle when pushing the dispenser arm, and keeping the temperature above -20°F. For more tips on making ice, like how to freeze herbs in an ice cube tray, read on!