This article was co-authored by David Bitan. David Bitan is a roofing professional, licensed contractor, and the owner and founder of Bumble Roofing based in Southern California. With over 12 years of construction industry experience, David specializes in restoring, repairing, and maintaining residential, commercial, and industrial roofs. With over 60 years of combined experience, Bumble Roofing provides easy, friendly services to structures including residential, commercial, industrial, multi-family, and government buildings along with hospitals, hotels, and churches.
wikiHow marks an article as reader-approved once it receives enough positive feedback. In this case, several readers have written to tell us that this article was helpful to them, earning it our reader-approved status.
This article has been viewed 699,582 times.
Shingles protect sloping rooftops from the effects of rain, snow and hail while providing an attractive crown for the house. Keeping a solid roofing layer of shingles is an important way to avoid water damage and leaks. Doing it properly will keep you without problems for 20 or 40 years. Laying shingles can be hard and hot work, but the reward of an attractive, watertight roof can be worth it.
Steps
Laying Shingles
-
1Size your shingles appropriately. Depending on how you're going to organize your rows and courses, some roofers like to cut five variable sizes of shingles when using the basic three-tab variety. Basically, you'll cut off one-half tab-width of the first tab to start the first course, changing the necessary area to fill with each row, shifting the "slots." Usually, the following cuts are useful:
- A half tab off for your first course shingles,
- A full tab for your second course shingles
- 1.5 tabs off of your third course shingles,
- 2 tabs off your fourth course shingles
- For your fifth course, cut off half of the final tab
- Keep your sixth course tabs intact
-
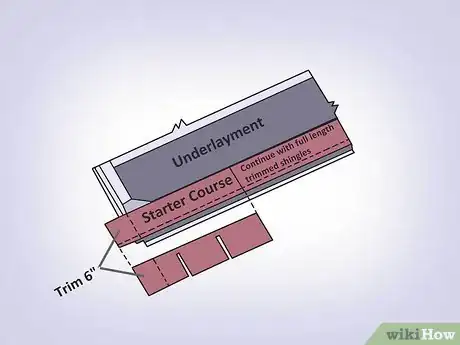
2Lay a starting row at the bottom of the roof along the edge.[1] Place nails in the three tab shingles about 3/4 inch (1.8 centimeters) above the cutouts, near where the tab meets the upper part of the shingle. However, make sure that you do not nail into the tar strip. Also place a nail 2 inches from each end of the shingle, in line with the other two. In all, use four nails per 3-tab shingle.
- Nailing here will cause the next shingle to cover the nail heads and allow the next and subsequent rows of nails in shingles to always penetrate and hold the top edge of the lower row (this allows 8 nails to hold each shingle).
- If the nail gun is firing too deeply, almost mashing through the shingles, then the nails will soon pull through and come loose. Set the air compressor and gun depth setting lower.
Advertisement -
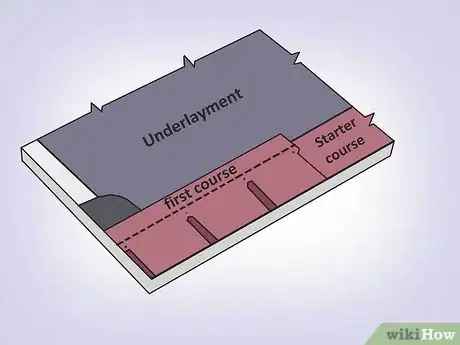
3Lay the first row of shingles directly covering the narrow starter row. Snap a horizontal chalk line over the starting row to use as a guide.[2] Cut six inches off the length of the first starter shingle nailed on, then use the rest of them full size. Shifting them in this way will join the ends of the first regular row of shingles placed over the starter shingles. This is the basic, sometimes called "straight up" way of laying shingles.
- For the kind of shingles you purchase there may be a special starter row of shingles or a roll of strip material that you cut to the length of your roof.
- Alternatively, you can use a starting row of full-sized shingles by turning them with the tabs pointing upward.
-
4Lay the second row of shingles. Set the first shingle of the second row back a half tab, 6 inches (17 centimeters), from the edge of first shingle on the first row and so that the bottom of its tabs just touches the tops of the cutout slots on the shingle below. This 1/2 tab has to be cut off where it hangs off the left edge of the gable roof.
- Snap a vertical chalk line from the inside edge of the first shingle on the second row to the top of the roof, and from the inside edge of the first shingle to the top of the roof. These chalk lines will serve as a guide for subsequent even-numbered rows of shingles, and odd-numbered rows, respectively. Continue working horizontally up the roof until you reach the peaks.
-
5Shingle around stacks, vents and chimneys as necessary. Nail pieces of aluminum sheeting over holes that you can stick your finger through to protect roofing over holes from sagging, dimpling, cracking and leaking.
- Stack pipes, vents and chimneys are surrounded with metal flashing laid over tar. Shingles should be interlaced with this flashing, which is usually cemented and nailed-down under upper shingles, but over the shingles on the sides. This is so water will run down the roof but not under the interlacing. For stacks and vents, have the bottom 2 or 3 rows that meet the flashing go under it, while the upper rows go over the flashing.
-
6Interlace the flashing around the chimney with the rows of shingles. Cement a sheet metal flashing apron over the upper edge of the chimney flange before laying shingles over it and cement another flashing apron over the lower half. Then cover the lower apron on each cemented side layer of flashing that tucks under the top apron using asphalt roofing cement.
-
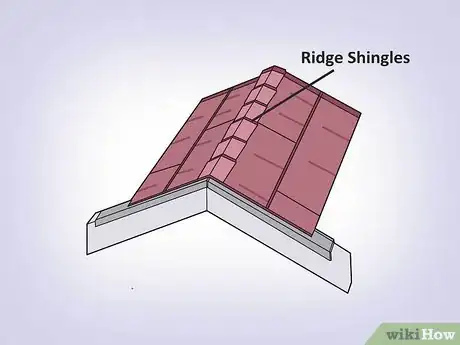
7Bring the ridge edges together with a ridge-capping layer. You can either use special shingles called ridge shingles or cut a number of regular shingles into 3 tabbed, equal pieces and bend each so they fit snugly on the roof peak and nail them into place. You'll need longer nails for this part, as you're driving through more layers of shingles.
Using Alternate Patterns
-
1Understand the basic patterns. You'll get the most life out of your shingles and your roof by laying them in a smart pattern. The basic straight up pattern already described is perhaps the easiest and most commonly used, but professional roofers have different opinions about the most proper and efficient method of laying the shingles to get the most life out of them, which differ slightly in the amount of overlap and the pattern in which you install them. The basic patterns include:
- the straight-up pattern
- the half pattern
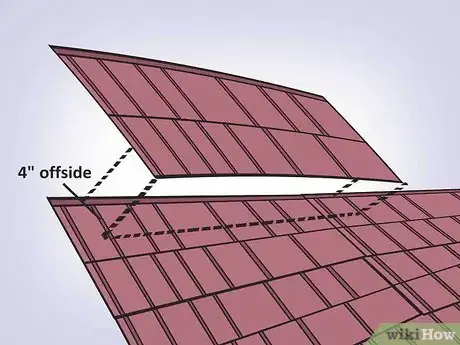
- 4-inch offset
- 5-inch offset
-
2Stagger each course to achieve the half pattern. All the other patterns work in essentially the same way, offsetting the courses by a particular amount. For the 6-inch or "half" offset, you can protect butt joints and horizontally-moving water by starting a new course 6-inches in every row. Every seventh course, the butt joints will realign and offer stability and protection.[3]
-
3Consider four and five inch offsets for added protection. The method is exactly the same, though the measurement of the offset is slightly different. In an offset of four inches, standard shingles will realign every ten courses, while the five inch offsets will realign every eight. Understanding the benefits of each will help you decide which method to use for your roof:
- The short overlap of the four inch offset is somewhat easier, allowing you to use cutouts to overlap every two courses, making less work for you. Unfortunately, because of this, the pattern is less desirable for extremely cold climates or very wet places.
- For most DIY roofers, the five-inch offset is the most desirable pattern. It offers the most protection per shingle, making it much less likely that runoff will cut through the in-betweens, hiding shingle irregularities, and getting the most bang for your buck.
-
4Consider "racking" shingles until you reach the top on each side. The racking technique uses two sizes of the first shingle of each row, the regular 3 tab pieces and shortened pieces for each end, working vertically rather than horizontally. It goes much faster, allowing you to keep your tools next to you as you work and avoiding having to constantly reposition. [4]
- Racking shingles sometimes also may create a condition called "pattern curling," where the shingles curl and blow in the wind, at the places where the racked columns join, because of lifting the end of a shingle to place the next shingle and lifting the end high enough to nail the next shingle underneath each of the overlapping shingles. This curling may lead to water getting under shingles, leaking at the places where racked columns meet.
- In some cases, racking may void the manufacturer's warranty on the expected leak-proofing quality and useful life of some brands of shingles. It's a common practice among contractors.
How Can I Extend the Lifespan of My Shingles?
Expert Q&A
-
QuestionDo I need to underlay before installing shingles?
 David BitanDavid Bitan is a roofing professional, licensed contractor, and the owner and founder of Bumble Roofing based in Southern California. With over 12 years of construction industry experience, David specializes in restoring, repairing, and maintaining residential, commercial, and industrial roofs. With over 60 years of combined experience, Bumble Roofing provides easy, friendly services to structures including residential, commercial, industrial, multi-family, and government buildings along with hospitals, hotels, and churches.
Roofing Contractor & Maintenance Professional Underlayments help prevent leaks from getting through to the wood underneath, so you should install it just in case.
 -
QuestionWhat is the lowest air temperature for roof shingles?
 Mark SpelmanMark Spelman is a General Contractor based in Austin, Texas. With over 30 years of construction experience, Mark specializes in constructing interiors, project management, and project estimation. He has been a construction professional since 1987.
Construction Professional You want to wait till temperatures are averaging 55 degrees before installing shingles. The shingles are suitable for cold and warm climates.
 -
QuestionDoes my first row of starter shingles extend over the edge to cover the drip edge?
 Mark SpelmanMark Spelman is a General Contractor based in Austin, Texas. With over 30 years of construction experience, Mark specializes in constructing interiors, project management, and project estimation. He has been a construction professional since 1987.
Construction Professional This starter strip should line up with your drip edge. The drip edge is installed to create a straight roof line.
Warnings
- If you don't feel comfortable working on the sloped roof yourself, hire someone else to do it.[6] Climbing about on a high-sloped, angled roof requires caution with safety harness, straps, cables, scaffolding, specialized equipment and methods to avoid slipping, falling, or dropping tools or materials sliding off.⧼thumbs_response⧽
Things You'll Need
- Bundles of shingles
- Roofing nails
- Nailing-discs, for securing paper
- Hammers
- Pneumatic (air) nail gun (optional)
- Felt paper or other "underlayment" material for the shingles
- Tar or roofing cement
- Metal flashing
- Sheet metal
- Roofing blade. (They have a claw shape that makes it easier to cut through the shingles.)
- Chalk line
- Roof harness, brackets, toe boards, jacks (similar to shelves) or scaffolding system -- if the angle of the roof is high-pitched
- Fork or square shovel, for tear-off
- Drip edge
- Nails, coil nails
- Slap stapler
- Staples
- Tape measure
- Straight edge for cutting evenly
References
- ↑ David Bitan. Roofing Contractor & Maintenance Professional. Expert Interview. 14 July 2020.
- ↑ https://www.thisoldhouse.com/how-to/how-to-install-roof-shingles
- ↑ http://www.remodeling.hw.net/business/shingle-offset
- ↑ http://www.familyhandyman.com/roof/how-to-install-shingles/view-all
- ↑ David Bitan. Roofing Contractor & Maintenance Professional. Expert Interview. 14 July 2020.
- ↑ David Bitan. Roofing Contractor & Maintenance Professional. Expert Interview. 14 July 2020.
About This Article
When installing shingles, start by laying a narrow row of shingles at the bottom of the roof along the edge. Next, lay the first full row of shingles so they're directly covering the starter row. Continue laying your shingles horizontally up the roof. If you hit a stack, vent, or chimney, interlace the shingles with the flashing to allow water to run down the roof. When you reach the peak, either bring the ridge edges together with a ridge-capping layer or cut regular shingles into 3 tabbed, equal pieces and bend them so they fit on the roof peak. For more tips about how to lay shingles from our General Contractor reviewer, including how to use an alternating pattern, keep reading!

