This article was co-authored by Josh Goldenberg. Josh Goldenberg is a Residential Remodeling Expert and the Co-Founder of 5blox, based in the Greater Los Angeles area. With more than seven years of experience, Josh and his team specialize in luxurious and sustainable home renovations. 5blox is fully licensed and bonded.
This article has been viewed 69,394 times.
A valance is a great way to add dimension and style to your windows. It usually hangs 4 to 6 inches (10 to 15 cm) over the curtains. You can hang a valance over blackout curtains to block out light in a room or put a valance over sheer curtains to keep the room bright and open. Start by measuring the window properly for the valance. Then, install the brackets to hold up the valance and put up the valance with a few tools.
Things You Should Know
- A valance should traditionally cover the top 2–6 inches (5.1–15.2 cm) of your window frame with the rest of the fabric covering the wall above.
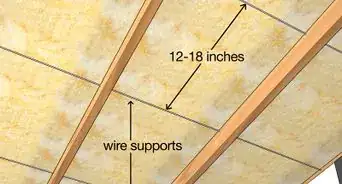
- If there isn’t a huge gap between the top of the window and the ceiling, hang the valance 1–2 inches (2.5–5.1 cm) from the top of the ceiling.
- Use a pencil and spirit level to mark off the location for the brackets you’re going to use for the valance rod.
- Use a drill to screw the brackets into place and thread the valance over the rod before hanging it.
Steps
Measuring for the Valance
-
1Measure the spots for the curtain rod brackets first. This will make measuring the height for the valance easier. Make sure you put the spots for the curtain brackets at least 2 inches (5.1 cm) from the edge of the window on either side.[1]
- Put the curtain bracket markings at least 4 inches (10 cm) from the top of the window, as this will ensure they hang properly and make the windows look long.
- Use a red pen to mark the spots for the curtain rod brackets so you do not confuse them with the markings for the valance brackets.
- Check that the valance brackets are double the length of the curtain rod brackets. So if your curtain rod brackets are 2 inches (5.1 cm) long, make sure you use valance brackets that are 4 inches (10 cm) long.
- Make sure the center of the rod is directly above the center of the window upon installing. The center of the rod will be where the center of the valance hangs.
-
2Mark the location for the first valance bracket. Place the first bracket for the valance outside of the curtain rod marking, about 1 inch (2.5 cm) from the curtain rod marking. Use a blue pen or pencil to mark the location.Advertisement
-
3Mark the location for the second valance bracket. Measure from the first marking to the other side of the window. Place the marking for the second bracket 1 inch (2.5 cm) outside of the curtain rod marking.
- The length between the two markings should be the same length as the valance you are using. Measure the valance and then measure the distance between the two markings to ensure they match.
-
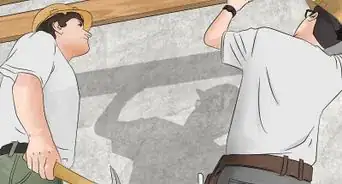
4Use a level to confirm the two markings line up. Hold the level between your hands and place it horizontally at the level of the two markings. The bubble in the middle of the level should appear centered. This is how you know the two markings are at the same height.


Installing the Valance Brackets
-
1Install the curtain rod brackets. Use the drill to screw in the brackets for the curtain rod. Work one bracket at a time, lining up the screws for the bracket with the marking you made on the wall. Put the curtain rod brackets up first so you can use them as a guide when you put up the valance brackets.[2]
- If you already have curtains up over the window, you can skip this step.
-
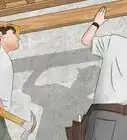
2Use the power drill to screw one of the valance brackets into the wall. Line up the bracket with the markings on the wall. Hold the bracket in place with one hand and drill the screw into the holes on the bracket with the other hand.[3]
- The valance brackets will require screws, rather than nails. You will need to use a power drill to secure the screws into the wall properly.
-
3Drill in the other valance bracket. Once you put in the first valance bracket, drill in the second bracket. Line up the bracket with the markings on the wall and secure the screws with the drill.[4]
- The brackets should appear level and at the same height, on the outside of the curtain rod brackets.


Putting up the Valance
-
1Hang the curtains. Thread the curtain onto the rod and then hang the rod in the brackets. Adjust the curtain so it is distributed evenly across the rod.[5]
- Put up the curtains first so they can hang behind the valance.
-
2Slide the valance onto its rod. Hold the valance in one hand and slide the rod through it. The valance should hang flat off the rod.[6]
-
3Put the rod onto the brackets and hang the valance. Place the rod on the brackets for the valance. The brackets should be sturdy enough to hold the valance. The valance should hang down straight, just outside the curtain rod.
-
4Use a steamer to smooth out wrinkles on the valance. If you notice any creases or wrinkles in the valance, run a clothing steamer over them to remove them. The valance should lay flat and even over the curtains so it can add style and detail to the window.[7]


Things You'll Need
- Tape measure
- Pencil or pen
- Level
- Power drill
- Wall-mounting brackets
- Screws
- Valance


-Step-14.webp)
References
- ↑ https://www.overstock.com/guides/how-to-hang-a-valance-and-curtains
- ↑ https://www.hunker.com/13413686/how-to-hang-curtains-with-a-valance
- ↑ https://www.overstock.com/guides/how-to-hang-a-valance-and-curtains
- ↑ https://www.overstock.com/guides/how-to-hang-a-valance-and-curtains
- ↑ https://www.hunker.com/13413686/how-to-hang-curtains-with-a-valance
- ↑ https://www.overstock.com/guides/how-to-hang-a-valance-and-curtains
- ↑ http://www.ebay.com/gds/How-to-Hang-a-Valance-/10000000207036743/g.html
About This Article