X
This article was co-authored by Josh Goldenberg. Josh Goldenberg is a Residential Remodeling Expert and the Co-Founder of 5blox, based in the Greater Los Angeles area. With more than seven years of experience, Josh and his team specialize in luxurious and sustainable home renovations. 5blox is fully licensed and bonded.
This article has been viewed 74,457 times.
Corbels make great decorative features, and they offer support to structures like arches, balconies, and shelving units. If you want to use them as accessories, use wood glue to attach your corbels. For a secure hold, hammer nails into the wall, and slide your corbels over top. With some basic tools and supplies, you can easily hang your corbels!
Steps
Method 1
Method 1 of 2:
Using Wood Glue
-
1Hold your corbels up to the wall to decide where to install them. Arrange your corbels in your desired location. If you'd like, use a pencil to mark your placement, so you can easily install them when you are ready.
- This ensures you don't misplace your corbels.
-
2Lay the corbels face down on a clean, flat surface. If you want to use the floor, lay down a drop cloth or piece of cardboard so dirt and debris do not get on your corbels. Lay the corbels down so the back edge faces you. This way, you can easily apply the glue.[1]
- Place your corbels down gently so they don't get damaged.
Advertisement -
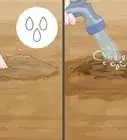
3Apply wood glue to the back the corbel about every 1⁄2 in (1.3 cm). Apply your glue in dime-sized beads, working from top to bottom. Evenly space out your beads of glue, and apply glue around the edges if you want extra stability.[2]
- Purchase wood glue from a home supply store.
-
4Hold the wood glue up to your surface for 60-90 seconds. After you’ve applied your wood glue, hold your corbel up to the wall. Push the corbel against the wall with moderate pressure for about a minute. Then, let your glue dry for 2-3 hours. [3]
- Your corbel should easily stay in place. If it starts to slide, apply more wood glue to the back.[4]
-
5Hang your second corbel with wood glue after the first is secured. After you’ve installed the first corbel, repeat the process for your other corbel. It is best to work 1 corbel at a time so your glue doesn’t dry out.[5]
-
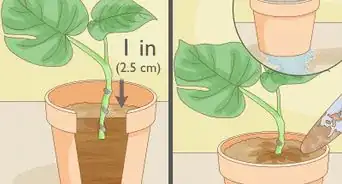
6Hammer in 1 nail at the bottom of your corbel for a more secure hold. Pick a spot towards the bottom of your corbel, and hold a nail up to the corbel. Use a hammer to attach the nail to your corbel and wall. Be sure to use a nail thick enough to reach through both surfaces. This way, your corbel will stay put with confidence. You can do this right after you secure the corbel. The wood glue can dry after you install the nail.[6]
- If your corbels are painted, you can use a bit of putty to cover up the nail if you’d like. Place the putty over top the nail head to hide it.
- Alternatively, you can use a nail gun.


Advertisement
Method 2
Method 2 of 2:
Mounting Corbels on Nails
-
1Use a stud finder to determine where to hang your corbels. Slide the stud finder across the wall where you want to hang the corbels. Listen for a beep, or look for the light to flash, depending on your model. When the finder locates your stud, make a mark with a pencil so you can position your corbels.[7]
- If you don’t have a stud finder, that’s okay. Use heavy-duty wall anchors and screws instead. They can still support the weight of your corbels.
- Make sure your screw holes are as centered to the stud as possible.
-
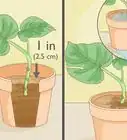
2Drill 2 holes into the back of each corbel if they do not have slots. Oftentimes, corbels have keyhole slots on the back so you can easily hang them on the wall. If your corbels do not have slots already installed, create 2 holes about 2–4 in (5.1–10.2 cm) from the top using your drill. Ensure your holes are parallel, so you don't hang your corbels unevenly.[8]
-
3Ensure your nail is the appropriate size for your keyhole or drilled hole. Place the nail inside the slot or hole before you hang up the corbel. If the nail fits securely, it is an adequate size. Most keyhole slots are 3⁄16 in (0.48 cm), so you want to use a nail with a 3⁄16 in (0.48 cm) head.
- If you use the wrong size nail, your corbel may fall off the wall.
-
4Use a pencil to mark the placement of each hole. Line your corbels up with your guidelines, and make a mark on either side approximately where the hole or slot is located. Do this for both corbels so you can easily hammer in your nails.
-
5Hammer 4 nails into the wall at a 45-degree angle. Hold 1 nail up to 1 of the markings you made, and tilt the top slightly upwards so it is at an angle. Then, use a hammer to attach it to the wall. Continue hammering until about 1⁄4 in (0.64 cm) of your nail sticks out of the wall.[9]
- Hammer in a nail for each of your markings. You should have 2 nails installed for each corbel.
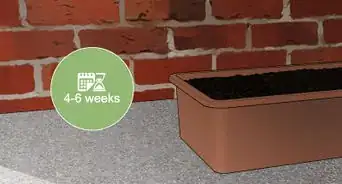
- Use a drill, masonry drill bit, and a tapcon screw if installing corbels over brick.
-
6Hang your corbels from the nails. Once all of your nails are in place, line up the keyhole slot or drilled hole with the tip of the nail. To use keyhole slots, place the nail inside the larger, circular section and slide the nail into place. To use drilled holes, secure 1 hole on the nail, then gently lift up on the other side to align the nail. Do this for both corbels, and you’ll add support or a decorative touch to your walls.[10]


Advertisement
Warnings
- Wear safety goggles when using power tools or hammers.⧼thumbs_response⧽
- Do not use corbels to support electrical fixtures.⧼thumbs_response⧽
- If you have never installed corbels, you may want to hire a professional. Do this especially if you are using corbels for added support to existing structures.⧼thumbs_response⧽
Advertisement
Things You’ll Need
- Corbels
- Wood glue
- Nail and screws
- Pencil
- Drill
- Hammer
- Masonry drill bit and tapcon screw (optional)


References
- ↑ https://youtu.be/8rXXoFwlTws?t=3s
- ↑ https://youtu.be/8rXXoFwlTws?t=7s
- ↑ https://youtu.be/8rXXoFwlTws?t=23s
- ↑ https://youtu.be/8rXXoFwlTws?t=7s
- ↑ https://youtu.be/8rXXoFwlTws?t=7s
- ↑ https://youtu.be/8rXXoFwlTws?t=44s
- ↑ https://www.prettyhandygirl.com/install-shelving-corbel-brackets-tile-wall/
- ↑ https://www.vintagewoodworks.com/howtoinco1.html
- ↑ https://www.vintagewoodworks.com/howtoinco1.html
About This Article

Josh Goldenberg
Residential Remodeling Expert
This article was co-authored by Josh Goldenberg. Josh Goldenberg is a Residential Remodeling Expert and the Co-Founder of 5blox, based in the Greater Los Angeles area. With more than seven years of experience, Josh and his team specialize in luxurious and sustainable home renovations. 5blox is fully licensed and bonded. This article has been viewed 74,457 times.
Co-authors: 3
Updated: August 23, 2022
Views: 74,457
Categories: Home and Garden
Advertisement