This article was co-authored by Maggie Moran. Maggie Moran is a Professional Gardener in Pennsylvania.
This article has been viewed 23,956 times.
Microgreens or “vegetable confetti” are greens that are harvested just a few weeks after propagation. Like sprouts, microgreens are easy to grow in your kitchen or beside a sunny window in your home. Unlike sprouts, microgreens are grown in soil. You can grow herbs, salad greens, vegetables and edible flowers as microgreens. Some microgreens can be harvested in just a couple of weeks, whereas others will take a month to grow. If you are looking to add some nutrition or earthy spice to your diet, microgreens are a great way to go.
Steps
Getting Your Seeds and Materials
-
1Find an old takeout, pie or salad container. You will need a container that is two inches deep and has enough surface area for the amount of greens you want to grow. To save money, keep your old takeout containers for this purpose. You could also use one an old plastic salad container. Make sure the container has holes at the bottom for drainage.[1]
- If you prefer, you could pick up some propagation trays from your local garden center, which are designed for this purpose.[2]
-
2Get your soil. Purchase some quality potting soil from your local home and garden center so that your microgreens have a nutritious environment to grow in. Buy enough soil to completely fill your containers or trays with.[3]
- You can also buy some coconut coir to add to the potting mix if you want to improve water retention and air flow. Coconut coir is optional, but can be very beneficial for seed propagation. If using coconut coir, fill each container with three quarters potting soil and one quarter coconut coir.
- You can also pick up some vermiculite to use at the planting stage. Vermiculite is a mineral that also helps with seed propagation.
Advertisement -
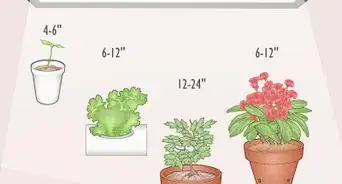
3Set up your light source. If you are growing in a warm climate and have lots of light in your house, simply place your tray of microgreens beside a sunny window. However, if you are growing microgreens indoors and do not have much light in your house, you will need a grow light. If you use artificial light, you should place the light four inches above your tray of microgreens. You can use a cheap fluorescent shop light with fluorescent bulbs.[4]
-
4Choose organic seeds. Since microgreens are harvested early, all of the nutrients and any of the pesticides that may be on the seed will be highly concentrated. If your seeds are not organic, they could contain a higher amount of toxins than regular greens. So, you should always purchase organic seeds for microgreens.[7]
-
5Try spicy microgreens. If you are looking to spice up a salad or sandwich, you may be interested in growing some of the spicy microgreens. For example, try growing one of the following spicy microgreens:
- Purple delight basil grows in four weeks, has purple leaves and a sweet, spicy flavor.
- Red giant mustard has red veins and is spicy. It grows in four weeks.
- Lemon basil has bright green leaves and a spicy lemon taste. It grows in four weeks.
- Ruby streaks mustard grows in two weeks. It has a sweet and spicy flavor.
- Green wave mustard grows in two weeks. It has a spicy flavor and ruffled leaves.
- Daikon radish grows in two weeks and has a spicy taste.
-
6Pick earthy and mild microgreens. If you want something a bit more on the mild side for certain dishes, there are a number of celery, beet and other microgreens to choose from. For instance, you might be interested in growing one of the following microgreens:
- Celery microgreens have a mild flavor and mature in four weeks.
- Bull’s blood beet has a spinachy, earthy taste, growing in four weeks.
- Dark purple mizuna grows in two weeks and has a mild mustard flavor.
- Hong vit radish grows in two weeks and has a mild radish flavor.


Planting Your Microgreens
-
1Put the soil in your container. You should cover the container with two inches of soil, in a ratio of three quarters potting soil and one quarter coconut coir. Lightly pat down the soil to make a flat seeding surface but without compressing it too much.[8]
-
2Look at the instructions on the seed packet. The seed packet may give you specific instructions for propagating the microgreens, such as how deep to plant the seed and the time to maturation. If there are specific tips or instructions for the type of microgreen, you should follow them.[9]
-
3Sprinkle the seeds over the surface of the soil. Place a handful of seeds in one hand. Place your hand palm upwards, at a slight angle towards the surface of the soil. Use your thumb, index and middle finger to gradually spread the seeds as they fall from your hand. Try to spread the seeds evenly.[10]
-
4Add a thin layer of soil or vermiculite. If you have any vermiculite, you can use it instead of the soil. Vermiculite is a mineral that is used for seed propagation. After applying the thin layer of soil or vermiculite, you should still be able to see some of the seeds. You don’t want to bury them completely.[13]
-
5Spray the seeds with a mister. You should mist your greens once per day. If you are not sure whether they need water, stick your finger a half inch into the soil. If the soil is dry, they need to be watered. If it is damp, the seeds should be happy. If it is extremely wet or marshy, you may be drowning your microgreens.[14]
-
6Cover the microgreens to create a small greenhouse. If you are using propagation tray, simply place another tray on top of the one you are using. If you are using a takeout or other container, you could cover it with a plastic bag. Make sure you put a few holes in the plastic bag so that the seeds don’t suffocate.[15]
-
7Wait for your seeds to germinate. It should take about a week for the seeds to germinate. A couple days after germination, take off the cover to expose the seeds to more light. Let them grow for two to four weeks before harvesting, depending on the type of microgreen.


Harvesting and Enjoying Microgreens
-
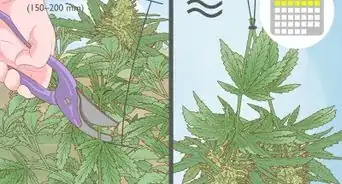
1Cut the base of the microgreens with kitchen scissors. You know they are ready to harvest when they are one to three inches in height. At harvest time, cut the base of the microgreens, just above the soil. Since they are tiny and grow close together, you should be able to cut a whole bunch at once. One or two clippings should be enough for a salad or sandwich.
- It will take anywhere from two to four weeks for your microgreens to mature.
-
2Wash the microgreens. You can wash your microgreens under tap water. Dry them in a salad spinner or with a clean towel.
-
3Add the microgreens to your sandwiches or burgers. A handful of microgreens such as spring onion or radish microgreens tastes great on a burger. Once you have all of your usual ingredients on the burger or sandwich, simply throw on a handful of microgreens.[16]
- For instance, salmon burgers taste great with microgreens.
- You could also throw some microgreens on your tacos.
-
4Put some microgreens in your salad. The next time you are making a green salad, throw some microgreens on top for some extra flavor. Swiss chard, beet and radish microgreens are among the most flavorful in salads.[17]
- For instance, you could make a rainbow beet and pistachio salad with microgreens.[18]
-
5
-
6Store the remaining microgreens in a glass of water. If you have any remaining microgreens after your harvest, you can put them in a glass of water in the fridge. Place a quarter inch of water in a cup and then add your leftover greens. They will stay fresh a little longer if you store them in a cup of water. The next time you are craving greens, grab your leftovers instead of harvesting more microgreens.[21]
- You should not fully submerge the microgreens in the water. Rather, you just want the roots and the bottom of the stems to be submerged in the water.
- Monitor your greens closely for any sign of decay or rot. Throw out any greens that are showing these signs.


Expert Q&A
-
QuestionWhat are the best microgreens to grow?
 Maggie MoranMaggie Moran is a Professional Gardener in Pennsylvania.
Home & Garden SpecialistThe easiest microgreens to start growing are the seeds of broccoli, cauliflower, cabbage, and sunflowers. -
QuestionCan you regrow microgreens?Maggie MoranMaggie Moran is a Professional Gardener in Pennsylvania.
Home & Garden SpecialistYes, you can regrow microgreens. However, not all types will regrow once harvested. -
QuestionHow long will microgreens keep in the fridge?Maggie MoranMaggie Moran is a Professional Gardener in Pennsylvania.
Home & Garden SpecialistIf kept refrigerated, most of the types of microgreens can be kept safely for 5-8 days.


References
- ↑ http://www.gardeners.com/how-to/how-to-grow-microgreens/7987.html
- ↑ https://university.upstartfarmers.com/blog/how-to-grow-microgreens-beginners-guide
- ↑ https://university.upstartfarmers.com/blog/how-to-grow-microgreens-beginners-guide
- ↑ https://wholefully.com/how-to-grow-microgreens-indoors/
- ↑ https://wholefully.com/how-to-grow-microgreens-indoors/
- ↑ http://www.epicgardening.com/how-to-grow-amaranth-microgreens/
- ↑ http://modernfarmer.com/2016/07/microgreens/
- ↑ http://www.gardeners.com/how-to/how-to-grow-microgreens/7987.html
- ↑ http://www.gardeners.com/how-to/how-to-grow-microgreens/7987.html
- ↑ http://www.gardeners.com/how-to/how-to-grow-microgreens/7987.html
- ↑ http://modernfarmer.com/2016/07/microgreens/
- ↑ http://modernfarmer.com/2016/07/microgreens/
- ↑ https://university.upstartfarmers.com/blog/how-to-grow-microgreens-beginners-guide
- ↑ https://university.upstartfarmers.com/blog/how-to-grow-microgreens-beginners-guide
- ↑ http://www.gardeners.com/how-to/how-to-grow-microgreens/7987.html
- ↑ https://www.brit.co/microgreen-recipes/
- ↑ https://www.brit.co/microgreen-recipes/
- ↑ https://www.brit.co/microgreen-recipes/
- ↑ https://www.brit.co/microgreen-recipes/
- ↑ https://www.brit.co/microgreen-recipes/
- ↑ http://www.gardeners.com/how-to/how-to-grow-microgreens/7987.html
About This Article

To grow microgreens, start by filling a container with 2 inches of soil. Then, spread the seeds evenly by placing them in your hand and angling your palm so they slowly fall onto the soil. Cover the seeds with a thin layer of soil, cover the container with another tray, and spray the microgreens with mist daily. After your microgreens germinate, uncover your tray to let them have more light, and allow them to grow for 2-4 weeks before harvesting. You will know the microgreens are ready when they are between 1 to 3 inches tall. For more tips from our Horticulturist reviewer, including how to harvest your microgreens, read on!