This article was co-authored by wikiHow Staff. Our trained team of editors and researchers validate articles for accuracy and comprehensiveness. wikiHow's Content Management Team carefully monitors the work from our editorial staff to ensure that each article is backed by trusted research and meets our high quality standards.
This article has been viewed 39,177 times.
Learn more...
A clearance from the NBI (the National Bureau of Investigation) confirms that you have no criminal cases stated against you in the Philippines. This can be a vital document whether you are looking to start your own business, travel abroad, go back to school or find a new job. Luckily, the NBI has recently made it possible to go through the initial application process entirely online. After filling out your online application, all you have to do is show up to a local NBI office and get verified. The entire procedure should cost you less than 200 Philippine pesos.
Steps
Setting up an Account on the Website
-
1Go to the NBI website to find the clearance application. You can find the application at: https://clearance.nbi.gov.ph.
-
2Enter your information in the website to register an account. If you do not already have an account, you will need to register. Put in your first and last names and date of birth. If you have applied for an NBI clearance in the past, you should enter your old NBI I.D. number.[1]
- If you already have an account on the NBI website, you can log in with your existing account information.
Advertisement -
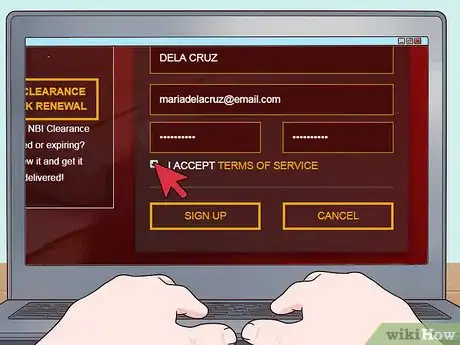
3Accept the terms of service. Click on the checkbox to indicate that you accept. Then there will be a pop-out window that gives a description of the service and the terms of privacy. If you consent to these terms, hit the agree button.[2]
-
4Double check your information before continuing. A reminder window will appear for you to confirm that your registration information is correct. If it is, you can click the yes button.[3]
- Write down your log in information and save it somewhere so that you can log in at a later time.
Filling out the Application Form
-
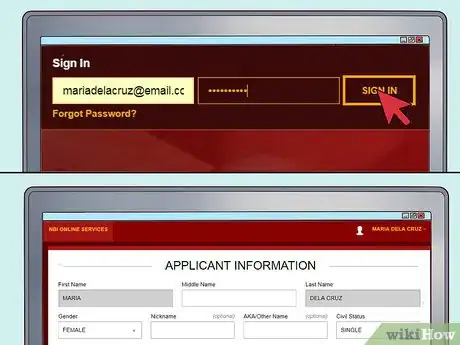
1Log in to your account and locate the application form. Using the email address and password you just registered, sign in to your new account. Once logged in, you can go to the application tab on the left side menu.[4]
-
2Provide your basic information. You will have to give your full name, gender, civil status, birthdate, birthplace, and status of citizenship.[5]
- You can also fill in your nickname, if you want.
-
3Enter your contact details. The form requests that you provide your home address, phone number and email address.
-
4Provide data about your family background. You are asked to enter the name and birthplace of your mother and father.
-
5Fill out the form for the other information. The last section of the form is for you to give other relevant facts about yourself, such as your education, occupation, religion, height, weight, complexion, and any identifying marks.[6] This is important information for the government to be able to clear you of any criminal records.
-
6Save your information. Double check to make sure every detail you entered is correct. Then you can click the ¨save information¨ button.
- There is an option to "edit information" if you need to make changes later on.
-
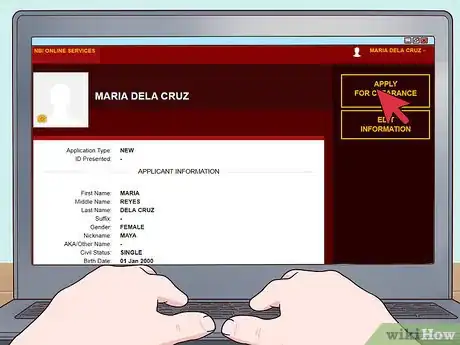
7Start the application for the NBI clearance. Now you are ready to start your application! Click the button that says "APPLY FOR CLEARANCE."
- This button can be found on the top right of the page. It is above the "EDIT INFORMATION" button.
Scheduling an Appointment
-
1Indicate which form of I.D. you will be using at your appointment. There are several types of I.D. that are accepted for getting an NBI clearance, including a passport, voter I.D, driver's license, or birth certificate. Agree to the terms by clicking on the "I Agree" button.
- A pop-up will appear that explains how your registration code will be provided after payment. Once you close that window, you will be redirected to a page for scheduling your appointment.
-
2Choose which NBI branch you would like to visit for your appointment. There should be a dropdown menu with a list of different locations for the meeting.
-
3Pick a date and time for your appointment. You will be shown a calendar with available time slots. Choose a time that is convenient for you. A day when your schedule is completely clear is best. You want to avoid any extra stress!
- Indicate whether you prefer the AM or PM slot to meet. Sometimes only just one is available.
Making the Payment
-
1Select the bank over-the-counter option to pay at your bank branch. Once you have chosen this option from the dropdown menu, a reminder pop-up window will appear. Click the "proceed" button. You will be shown your transaction summary, including the price of the clearance and the date of your appointment. You can click "proceed to payment."[7]
- Select your bank from the menu. You will be given a reference number and a total transaction amount, which includes both the clearance fee and the service charge.
- You will be given the option to view and save the instructions online. The instructions list the amount to be paid, the reference number, your account number and your account name. These instructions will come in handy when you go to pay at the bank.
- Go to your bank and pay the fee before the deadline indicated in the online instructions.
- After you complete your payment, the status of your online application will go from "pending" to "paid."
-
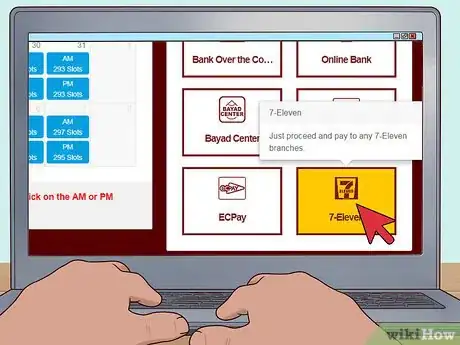
2Select the 7-11 option to pay at a 7-11 store instead of a bank. You will be able to pay at any 7-11 branch. After choosing this option from the dropdown menu, a reminder pop-up window will appear and you can click the "proceed" button. A transaction summary with the clearance fee and the service charges will be displayed. You can click "proceed to payment," after which you will be given a reference number.
- You will have to go to your local 7-11 store to pay. Bring the reference number and ask a cashier for assistance. You can also pay at a CLiQQ Kiosk.[8]
- After making your payment, the status of your online application will change from "pending" to "paid."
-
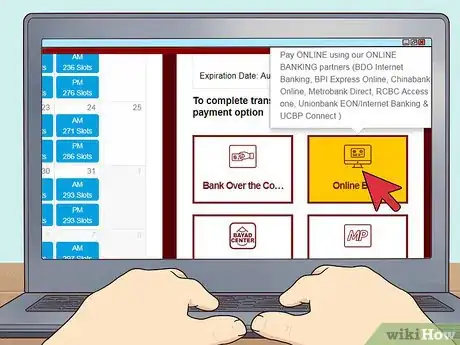
3Choose online banking if you rather make the payment from home. This is another option for payment that you can do on your computer or mobile device. Follow the steps to enter your bank account information.
- There will be a service charge with online payment, just like the other payment options.
Going to Your Appointment
-
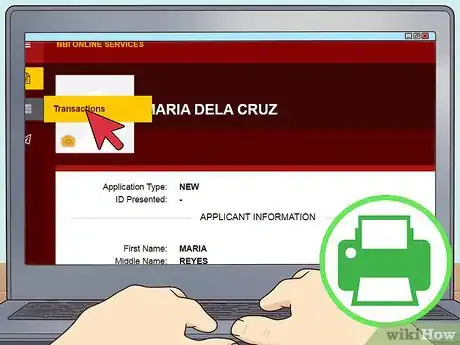
1Print the application form from the website. Before going to your appointment, you will need to have the application form printed.
- Log back into the NBI clearance application website and look for the transactions tab on the left-side menu.
- Click on the blue DETAILS button that accompanies your transaction. A new window will appear that cues you to print the application form.
-
2Show up for your appointment at the place and time you designated. Make sure to bring your application form and two forms of valid I.D.
- Be punctual for your appointment and dress appropriately so there will be no problem for you to enter the office.[9] Remember, this is an important occasion for you!
-
3Ask for assistance from NBI personnel. Once at the NBI office, let the officers know that you are there for your appointment. They will direct you on what to do next.[10]
-
4Provide your biometrics and get verified. Typically, you will have your photo taken and your fingerprints scanned. Then you can go to the window where you will receive your clearance form.
- If you have already made your payment beforehand, this should be a pretty fast, hassle-free appointment.[11]
References
- ↑ https://www.nbiclearance.org/how-to-apply-nbi-clearance-online/
- ↑ https://www.nbiclearance.org/how-to-apply-nbi-clearance-online/
- ↑ https://www.nbiclearance.org/how-to-apply-nbi-clearance-online/
- ↑ https://www.nbiclearance.org/how-to-apply-nbi-clearance-online/
- ↑ https://www.nbiclearance.org/how-to-apply-nbi-clearance-online/
- ↑ https://www.nbiclearance.org/how-to-apply-nbi-clearance-online/
- ↑ https://www.nbiclearance.org/how-to-apply-nbi-clearance-online/
- ↑ https://www.nbiclearance.org/how-to-pay-your-nbi-clearance-application-7-eleven/
- ↑ https://www.nbiclearance.org/how-to-apply-nbi-clearance-online/
About This Article
To get a clearance from the NBI, go to the NBI website to find the clearance application, then enter your full name and date of birth. If you have an old NBI clearance, enter your old NBI I.D. number. After you accept the terms of service and select "Sign Up," sign in to your account and locate the application form. Once you find it, begin filling it out by providing your name, gender, civil status, birthdate, birthplace, and citizenship status. You'll also need to enter your contact details, information about your family background, and other relevant facts about yourself, like your education and occupation. When you're finished, save your information and click "APPLY FOR CLEARANCE." From here, you'll need to schedule an appointment with an NBI agent and pay the application fee. For more advice, like how to ensure your NBI clearance appointment goes well, scroll down!


