This article was co-authored by April Ferri. April Ferri is a Professional Hair Stylist and the Co-Owner of Widows Peak Salon, a hair salon based in Los Angeles, California. With over ten years of experience, April specializes in hair coloring and enhancing and transforming natural tones into vibrant shades for beautiful and low maintenance hair. Her work has been featured in Voyage LA Magazine, and she has worked as a stylist for LA Fashion Week.
There are 8 references cited in this article, which can be found at the bottom of the page.
This article has been viewed 34,784 times.
People may bleach their roots for various reasons, whether it is for a trendy look, touching up an existing bleaching job, or in preparation for adding a lighter color. Blonds have it easy; unfortunately brunettes and those with darker hair usually end up with the dreaded orange. If your roots ended up brassy, don't worry; there are lots of ways to fix them!
Steps
Using a Hair Toner
-
1Get a hair toner. This is often sold as a kit, much like a boxed hair dye, with color and a 10 or 20 volume developer. You can also get it as toning shampoo—look for something called "Purple Shampoo." If you can't find anything, you can mix your own using purple hair dye and white-colored conditioner.
- If your hair is really orange, try a dark-blue/indigo toner, shampoo, or dye instead.[1]
- The best time to use toner is immediately after bleaching.
-
2Put on a pair of plastic gloves. You don't absolutely have to do this, but it would be a good idea to do so, especially if you are mixing your own toner. The dye in the toner is light enough that it shouldn't stain your hands, however.Advertisement
-
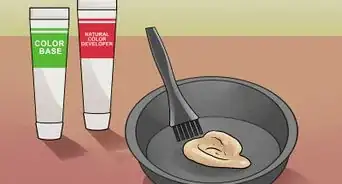
3Prepare your toner, if needed. If you are using "Purple Shampoo," no preparation is necessary. If you are using a kit, you should mix it according to the instructions on the box. Typically, you will need to add the color to the developer, then mix it together. If you are making your own, do the following:[2]
- Squeeze out enough white-colored conditioner into a bowl to cover your roots.
- Add some purple hair dye; it is usually sold in little jars. If your dye came with developer, use just the dye.
- Stir the two together until the color is consistent. You want a light to medium shade of purple.
-
4Apply the toner to your hair. If you are happy with the tone of the rest of your hair, apply the toner to just your roots with a tinting brush. Alternatively, you can apply the toner to all your hair. This is easier and less time-consuming, but it will also tone the rest of your hair and make it look more ashy or cool.
-
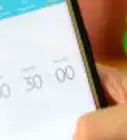
5Leave the toner on for 10 to 15 minutes. Most toners can be used like regular shampoo--applied, lathered, and rinsed off. They are more effective if they are left on as a mask, however, especially if your hair is really orange.[3]
-
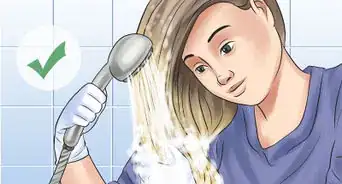
6Rinse the toner out. There is no need to shampoo your hair again after this, especially if you used "Purple Shampoo" or made your own. If you used a kit, you can wash you hair with some conditioner (no shampoo!), but only if it feel dry.
-
7Dry and style your hair as desired. It would be best if you let your hair dry on its own, but you can use a hair dryer too. Skip the heat-styling, at least for a couple of days, so that your hair can recover from the treatment.


Re-Bleaching Your Roots
-
1Make sure that your hair is healthy. One of the reasons dark hair turns brassy is because it was not bleached enough. Leaving bleach in your hair longer than the recommended time is a bad idea and could destroy your hair. Luckily, it is possible to bleach your hair a second time to get the desired level of lightness. Your hair must be healthy, however; if it is damaged, this method will only make it worse.[4]
-
2Set up your work station. Even though you will be work with a small amount of bleach, you still have to take the necessary precautions. Put on a pair of plastic gloves and drape a dyeing cape around your shoulders. You can also use an old towel or put on an old shirt.
-
3Prepare the bleach using a 20 volume developer. Use the same technique as you did when preparing your original batch. Make sure that you are using a 20 volume developer; your hair is already light, so it doesn't need that high of a developer. Because you are only bleaching your root, you can use half or even a quarter of the amount.[7]
- Make sure that you are mixing the bleach in a non-metal bowl.
-
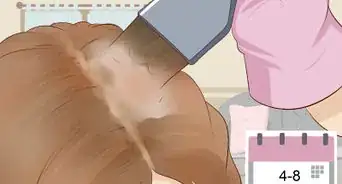
4Apply the bleach to either side of your roots with a tinting brush. Part your hair down the center first. Use a tinting brush to apply the bleach to you roots to either side of the par. Make sure that you extend the bleach all the way down the brassy color.[8]
-
5Create a shallow side part, and apply more bleach to your roots. Use the long, skinny handle of the brush to flip the hair to the left of the part, creating a shallow side part. Apply the bleach to the roots to either side of the new part, then flip over another layer.[9]
-
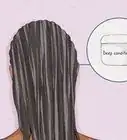
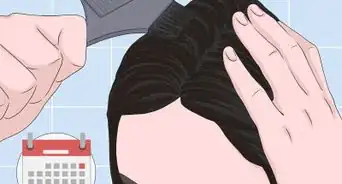
6Continue creating side parts and applying bleach to your roots. When you reach your hairline, flip your hair back over to the center part, then do the other side. Work your way down to your hairline, then return to the center part.[10]
-
7Apply bleach to your hairline and back. Use the tinting brush to apply bleach to your hairline—be sure to get the hairs along your forehead, temples, sides, and nape. Lastly, apply the bleach to the roots at the back of your head by lifting up layers of hair, and applying the bleach to the root.[11]
-
8Watch the bleach as it develops. Use the shortest recommended time as a guide. Keep in mind that because of the heat generated by your head, the bleach will develop much faster. It would be a really good idea to sit or stand in front of a mirror and keeping an eye on your roots. It should be done in about 10 minutes.[12]
-
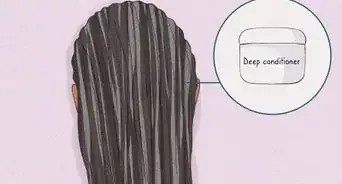
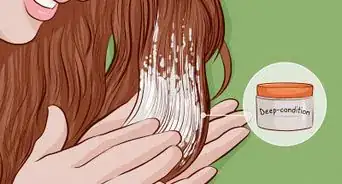
9Wash the bleach out with cool water and shampoo. If you do not plan on dyeing your hair afterwards, you can follow up with a conditioner. A deep-conditioning mask would be an even better idea.


Trying Other Solutions
-
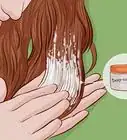
1Try a honey and conditioner mask. Mix together equal amounts of honey and conditioner. Apply it to your roots, then tuck your hair under a shower cap. Wait eight hours, then wash the mask out. This mask is a good alternative to bleach; it takes much longer, but it is also far gentler on your hair.[13]
-
2Use liquid food coloring and white vinegar. Mix 2½ cups (595 milliliters) of white vinegar with 10 drop of blue food coloring and 3 to 4 drops of red food coloring. Shampoo and condition your hair as normal. After rinsing your hair, tilt your head back, and pour the solution over your head. Wait 10 seconds, then rinse the solution out.[14]
- You can also try neon purple food coloring.
- Make sure that you are using the liquid kind and not the gel.
- Be careful not to get the solution in your eyes.
-
3Use a color-blending product for a quick fix. If the rest of your hair is dark, you could get a root cover-up to hide the brassy tones. Root cover-up comes in many forms, from eyeshadow-like powder to mascara-like color.[15]
-
4Dye your hair back to its original color as a last resort. This is the quickest and easiest way to get rid of brassy roots. Unfortunately, it will undo all of your hard work, including any bleaching or highlighting you did on the rest of your hair.[16]
- Alternatively, you can dye jut the roots darker, then feather the dye into the rest of your hair with a tinting brush, sort of like balayage.[17]
-
5Have a skilled colorist blend your roots to the rest of your hair. If you don't think you have the skills necessary to do this, consider going to a salon, and having a skilled colorist do it for you.[18] He or she may bleach your roots again, if needed, then blend the color to the rest of your hair with dye.[19]
-
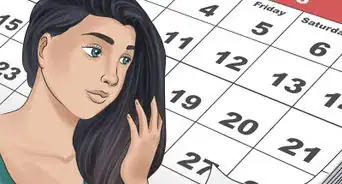
6Take care to prevent the brassy tones from coming back. Brassiness often occurs when you try to bleach dark hair. It can also occur to your bleached hair over time if you don't take care of it properly. To ensure that your hair doesn't turn brassy, do the following:[20]
- Avoid using shampoos, conditioners, and other hair products containing sulfates, silicones, and parabens. [21]
- Limit your hair's exposure to sunlight. Wear a hat, hood, or scarf when stepping out.
- Protect your hair against ocean water and chlorinated water. Don't get it wet when swimming or wear a swim cap.


Things You'll Need
Using a Hair Toner
- Hair toner kit
- Non-metal mixing bowl
- Non-metal stirring utensil
- Plastic gloves (optional)
Re-Bleaching Your Roots
- 20 volume bleaching kit
- Non-metal mixing bowl
- Non-metal stirring utensil
- Plastic gloves
- Dyeing cape, old towel, or old shirt


References
- ↑ http://www.cosmopolitan.com/uk/beauty-hair/hair/a9603063/how-to-fix-hair-dye-gone-wrong/
- ↑ https://www.thewonderforest.com/2016/01/brass-banishing-diy-hair-toner-for-blondes.html
- ↑ http://www.cosmopolitan.com/uk/beauty-hair/hair/a9603063/how-to-fix-hair-dye-gone-wrong/
- ↑ https://bellatory.com/hair/How-to-Fix-Accidental-Orange-Roots-from-Bleaching-Hair-Blonde
- ↑ https://bellatory.com/hair/How-to-Fix-Accidental-Orange-Roots-from-Bleaching-Hair-Blonde
- ↑ https://bellatory.com/hair/How-to-Fix-Accidental-Orange-Roots-from-Bleaching-Hair-Blonde
- ↑ https://www.youtube.com/watch?v=E-eHMQybxbQ
- ↑ https://www.youtube.com/watch?v=E-eHMQybxbQ
- ↑ https://www.youtube.com/watch?v=E-eHMQybxbQ
- ↑ https://www.youtube.com/watch?v=E-eHMQybxbQ
- ↑ https://www.youtube.com/watch?v=E-eHMQybxbQ
- ↑ https://www.youtube.com/watch?v=E-eHMQybxbQ
- ↑ https://bellatory.com/hair/How-to-Fix-Accidental-Orange-Roots-from-Bleaching-Hair-Blonde
- ↑ http://stylecaster.com/beauty/how-to-get-rid-of-brassy-hair-food-coloring-vinegar/
- ↑ http://www.cosmopolitan.com/uk/beauty-hair/hair/a9603063/how-to-fix-hair-dye-gone-wrong/
- ↑ https://bellatory.com/hair/How-to-Fix-Accidental-Orange-Roots-from-Bleaching-Hair-Blonde
- ↑ https://www.youtube.com/watch?v=ufJ0Vg1JdF4
- ↑ April Ferri. Professional Hair Stylist. Expert Interview. 8 December 2020.
- ↑ http://www.cosmopolitan.com/uk/beauty-hair/hair/a9603063/how-to-fix-hair-dye-gone-wrong/
- ↑ https://www.naturallycurly.com/curlreading/hair_color/this-is-why-bleached-hair-turns-orange-and-how-to-stop-it-bi/
- ↑ April Ferri. Professional Hair Stylist. Expert Interview. 8 December 2020.
About This Article