This article was co-authored by Patrick Johns and by wikiHow staff writer, Hunter Rising. Patrick Johns is a Home Improvement Specialist and the Owner of CatchAll Handyman Services. With more than 28 years of experience, he has worked on a variety of home improvement projects, such as carpentry, plumbing, and door and window installations in both commercial and residential properties.
There are 40 references cited in this article, which can be found at the bottom of the page.
This article has been viewed 31,089 times.
Your water heater takes cold water from the supply line and provides hot water throughout your home. When you start noticing that your water heater doesn't provide enough hot water, you may need to check the heating elements or replace the thermostat. If you notice the water heater leaking a lot from the run-off tubes, it's time to replace the pressure-relief valve. When you're done working on your water heater, you should have hot water in your home again!
Steps
Cleaning the Heating Element on an Electric Water Heater
-
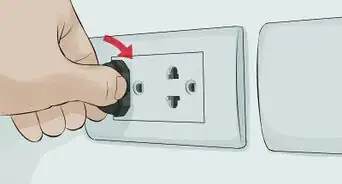
1Turn the power off going to your water heater. Check the electrical breaker box in your home and find the 2 circuits that control your water heater. Flip the switches to the off position so you don't get shocked when you're working.[1]
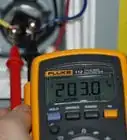
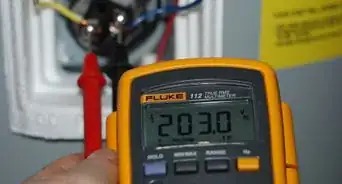
- If you're unsure which circuits control the water heater, try turning off the circuits and testing the ports on your water heater with a multimeter. The readout should be 0 V.
- You don't want electricity powering the heating element in the water heater while you're working.
-
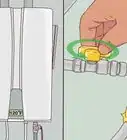
2Shut off the water supply on your water heater. The valve controlling the water going into your heater should be on a pipe above or next to the unit. Turn the valve so the lever is perpendicular to the pipe. This prevents any water from entering the tank while you work on it.[2]Advertisement
-
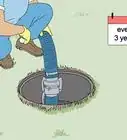
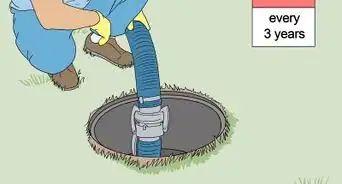
3Drain the water heater completely. Locate the drain valve on at the bottom of your tank and secure the end of a garden hose to it. Put the other end of the hose next to a drain, such as one in your basement floor or in a bathtub. Open the drain valve on the bottom of your water heater with a screwdriver or channel lock pliers and let the tank drain completely.[3]
- Most water heaters should have a drain next to them to catch any run-off.
Warning: The water coming out of the hose could be very hot. Do not touch it or else you could get scalded by it.
-
4Open the access panel leading to the heating element. The access panel covers the thermostat and the heating element inside your water heater, and it is usually located on the side or near the bottom of the unit. Use a screwdriver to remove the access panel and set it aside.[4]
- Some electric water heaters have 2 access panels on the top and the bottom each with their own heating element.
-
5Disconnect and label the wires connected to the heating element. The heating element is usually on the lower part of the access panel and will have 2 screws with red and black wires connecting to it. Loosen the screws with your screwdriver and pull the wires out. As you pull the wires, label which screws they were attached to with a piece of masking tape.[5]
-
6Unscrew the heating element from the water heater. Secure a pair of channel lock pliers on the hexagonal nut behind the screws. Turn the heating element counterclockwise to loosen it. Continue unscrewing the heating element by hand until you can easily pull it out from your tank.[6]
- Do not remove the heating element if you haven't drained the water from your tank. Water will come out and could burn you otherwise.
-
7Scrub the heating element with a wire brush. Over time, your heating element may collect calcium deposits from the water and make the unit less efficient. Set the heating element on a flat surface and scrape the coil with a stiff wire brush. Try to clean as much of the residue off as can. When you have one side of the coil clean, flip it over and scrub the other side.[7]
- If you cannot get the heating element clean, you can order a replacement from the water heater's manufacturer. They usually cost around $35 USD.
-
8Reattach the heating element to your tank. Feed the coil back into the tank and start screwing the element back on by hand. Once the heating element is hand-tight, use your channel lock pliers to tighten the unit in place. Loop the wires around their matching screws before tightening them with a screwdriver.[8]
- Your heating element should already have a seal on the threading to prevent leaks. If it doesn't wrap 5-6 layers of Teflon or plumber's tape around the threading.
-
9Turn on the power and water supply to use your tank again. Once the heating unit is back in place, flip the breakers to the on position so the water heater has power. Then, turn the water valve on so the lever points the same direction as the pipes. Once the tank is filled again, you should have hot water.[9]
- If the water still isn't hot, check the wire connections to the heating element. If they're correct, then you may have a problem with the unit's thermostat.


Replacing the Thermostat on an Electric Heater
-
1Turn off the power running to your water heater. Go to your home's electrical box and find the 2 breakers that control your water heater. Turn them to the off position so you don't accidentally shock yourself while you're replacing the thermostat.[10]
-
2Open the access panel on the tank. The access panel is usually located on the side or near the bottom of your water heater. Use a screwdriver to remove the access panel's cover and set it aside. You should see the thermostat on the top of the access panel and the heating element near the bottom.[11]
- Some electric water heaters have 2 access panels. Each of the access panels will have their own thermostat.
-
3Remove and label the wires connected to the thermostat. The thermostat looks like a black box with 2 black wires connecting to it. Use a screwdriver to loosen the screws on the thermostat and release the wires. When you get the wires loose, wrap a piece of masking tape around each one and label which screw they were attached to.[12]
- If your wires are reattached to the wrong screws on your new thermostat, then your water heater will not work.
-
4Pull the thermostat out of the brackets. Hold the top of the thermostat with your dominant hand. Locate the retaining bracket on the bottom of the thermostat that holds it in place. Slide the end of a screwdriver behind the tab on the side of the bracket and gently pry it up to release the thermostat. Lift the tab on the other side of the thermostat so you can pull the unit out of the access panel.[13]
- Be careful not to break the bracket that holds the thermostat in place since you cannot replace that component individually.
-
5Place an identical thermostat in its place. Make sure the thermostat is the exact same model as your old one or else it will not be compatible. Slide the thermostat into the access panel so it's behind the retaining bracket. Push the thermostat into place until it clicks.[14]
- Order an identical thermostat from the water heater's manufacturer. They usually cost around $20 USD.
Tip: If your water heater has 2 thermostats, make sure you get matching replacements for each of them.
-
6Reattach the wires to the matching screws. Once the thermostat is securely in place, bend hook shapes into the ends of each wire. Wrap the wire hook underneath the screw head that matches the wire's label. Tighten the screws so they have a firm connection with the wires.[15]
- You can leave the labels on your wires if you want or you can remove them.
-
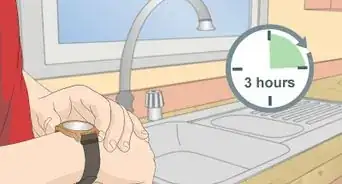
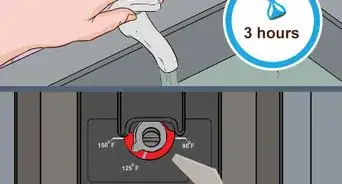
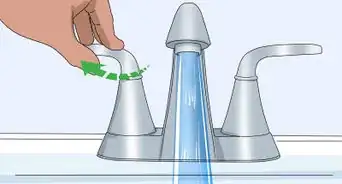
7Adjust the new thermostat to 120 °F (49 °C). The temperature is usually controlled with a screw or dial on the bottom of the thermostat. If it's a screw, use your screwdriver so the slit on the screw head points to 120 °F (49 °C). If your thermostat has a dial, turn it by hand to the right temperature. When you're finished, all you need to do is turn your power back on so your water heater works again![16]
- Avoid turning the thermostat higher than 120 °F (49 °C) since it could cause scalding water temperatures from your fixtures.


Igniting a Pilot Light on a Gas Water Heater
-
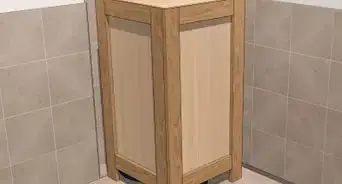
1Remove the bottom panel on your water heater. The access panel on your gas water heater is found at the bottom of the tank. Use a screwdriver to remove the panel and set it aside while you're working.[17]
- If the pilot light is out and you smell natural gas around your water heater, leave and call your utility company immediately since you may have a gas leak. Do not attempt to light the pilot light if you smell gas.
-
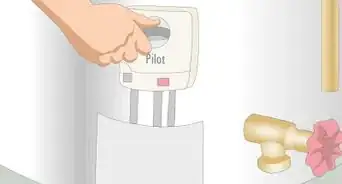
2Turn the dial on top to the thermostat to the PILOT position. The topmost dial on your water heater controls the power on your unit and should have the labels ON, OFF, and PILOT. Twist the dial by hand so it's on the PILOT position so the burner inside your water heater is turned off.[18]
- Don't attempt to relight the pilot light while your water heater is still on.
-
3Reduce the heat as low as it can go. The large dial on the front of your thermostat controls the unit's temperature. Turn the dial clockwise to reduce your heat to the lowest temperature it can go. This help ensures you stay safe while you ignite your pilot light.[19]
-
4Press the dial down and light the pilot with a safety lighter. Hold a safety lighter inside the bottom access panel so it lines up with the thin tube that connects to your thermostat. With the dial in the pilot position, press down on top of the dial until you hear it click. When the dial is pressed down, ignite your lighter to start your pilot light. Keep the dial held down for 30 seconds after the pilot is lit.[20]
- Some water heaters have an ignitor button next to the dial. If your water heater has a pilot light button, you do not need to use a lighter.
-
5Switch the dial to the ON position. Release the dial so it clicks back up into place. Once the dial pops up, turn it toward the ON position to activate the burner. This will turn your water heater on so you have hot water throughout your home.[21]
Tip: If the dial doesn't pop up when you let go of it, turn off the unit for 5 minutes and try again.
-
6Adjust the water heater's temperature to 120 °F (49 °C). Turn the large dial in the front of your thermostat so it points at 120 °F (49 °C). The burner will activate and heat the water inside your tank.[22]
- Don't turn the thermostat higher than 120 °F (49 °C) or else the water coming out of your fixtures may scald you.


Changing the Thermostat on a Gas Heater
-
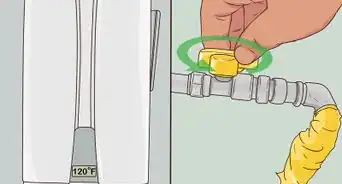
1Turn off the gas and water running to your water heater. The gas hose connects to the left side of your thermostat and the valve to turn it off will be located along the gas line. Turn the lever so it's perpendicular to the gas line. Then, locate the water valve on the pipe above or next to the heater and turn the lever so it's also perpendicular to the pipe.[23]
- You don't need to turn off any power while working on a gas water heater.
-
2Drain the water from your water heater. Locate the drain valve on the bottom of your water heater's tank. Screw a garden hose onto the drain valve and feed the other end into a drain in the floor or to your bathtub. Open the drain valve with a screwdriver or channel lock pliers so the water empties from your tank.[24]
- The water coming out of your hose will be very hot and could cause scalding-hot burns.
-
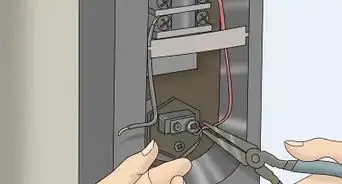
3Unscrew the lines attached to your thermostat. There should be 3 or 4 pipes that connect to the bottom of your thermostat. Use a pair of channel lock pliers to loosen the lines from your thermostat. Lightly pull the pipes away from the thermostat so they don't deform.[25]
- The hose on the left side of your thermostat controls the gas intake.
- The pipes and lines on the bottom of the thermostat lead to the pilot and burner inside the unit.
- You can remove the lines while your water heater is still draining.
-
4Use a pipe wrench to remove the old thermostat. Grip the sides of your thermostat between the jaws of a pipe wrench. Turn the wrench counterclockwise to loosen the thermostat from the tank. Keep rotating the thermostat by hand until it's free from the tank.[26]
- Don't unscrew the thermostat while there's still water inside since it could spill out.
-
5Seal the threading on your new thermostat with Teflon tape. Locate the threading on the back side of the thermostat that attaches to your tank. Wrap 5-6 layers of Teflon tape around the threading to seal it. Make sure you wrap your tape in the same direction as the way it's screwed in.[27]
- Replacement thermostats can be bought online or directly from the water heater manufacturer, and they usually cost around $85-$90 USD.
- Teflon tape may also be called thread-seal or plumber's tape.
-
6Screw the new thermostat in its place. Once the thermostat is sealed, place the threading into the hole on your tank where the old thermostat used to be. Turn the thermostat clockwise to tighten it in place. When you can't tighten it by hand anymore, use your pipe wrench to secure it in place.[28]
- Make sure the thermostat is right-side up when you're finished or else the dial will be upside down.
-
7Reattach the lines and pipes to the new thermostat. Use your channel lock pliers to secure the gas hose back onto the side of your thermostat. Then match the pilot and burner lines to the ports on the bottom of your thermostat and tighten them with your pliers.[29]
- You do not need to seal the connections from the lines to your thermostat.
-
8Open the valves and start your thermostat. Reopen the gas and water valves leading to your water heater so it can start filling and warming up again. Relight the pilot light and turn your thermostat to 120 °F (49 °C) so you have hot water throughout your home.[30]
Warning: Don't turn your thermostat past 120 °F (49 °C) since it will cause scalding hot water to come out of your fixtures.


Fixing a Leaky Pressure-Relief Valve
-
1Turn off the water supply to your water heater. Locate the water supply pipe above or next to your water heater. Turn the lever on the valve so it's perpendicular to the pipes. This prevents any more water from entering the tank while you're working on it.[31]
-
2Drain 10 US gal (38 L) from your water heater. Attach a garden hose the drain valve on the bottom of your water heater's tank. Place the other end of the hose next to bath or floor drain. Open the valve with a screwdriver or pair of pliers and let it drain for about 15-30 minutes. Once about 10 US gal (38 L) are drained from the tank, close the drain valve and disconnect the hose.[32]
- Many water heaters have a drain in the floor next to them.
-
3Detach the run-off pipe from the pressure-relief valve. The pressure-relief valve is located on top of your unit in the center. The valve should be attached to a pipe that leads down the side of your tank. Use a pair of channel lock pliers where the pipe connects to the valve. Rotate it counterclockwise to loosen it from the valve and remove it.[33]
- Set the run-off pipe aside since you'll need to attach it to the new valve.
-
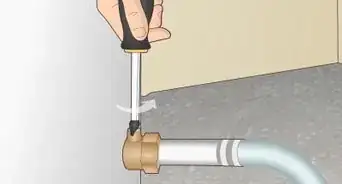
4Use channel lock pliers to unscrew the pressure-relief valve. Grip the base of the pressure-relief valve between the jaws of your channel lock pliers. Rotate the valve counterclockwise to loosen it, and then spin the valve by hand. Pull the valve out from the tank to remove it.[34]
- The valve may release steam as you unscrew it. Keep your head away from the valve and wear work gloves while handling it.
-
5Seal the threads on a new pressure-relief valve with Teflon tape. Sealing the valve helps prevent any unwanted leaks through the threading. Wrap 5-6 layers of Teflon tape around the threading on your new valve in the same direction that it screws in. When you're finished wrapping it, cut the piece of tape.[35]
- Pressure-relief valves can be purchased online or directly from the water heater's manufacturer for about $20 USD.
- Teflon tape may be called thread-seal or plumber's tape. Any of these will work for sealing your valve.
-
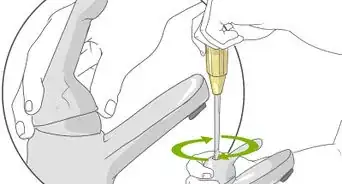
6Screw the new valve into your water heater. Place the threading of the valve in the hole where the old one used to be. Screw the valve in by hand as far as you can. Then, use your channel lock pliers to tighten the valve until you can't rotate it anymore.[36]
- Keep the lever on top of your valve is horizontal when it's installed.
Tip: Make sure the valve points in a direction where you can easily attach your run-off pipe.
-
7Reattach the run-off pipe to the valve. Fit the threading of the run-off pipe into the side of the valve so the pipe hangs over the edge of the water heater's tank. Turn the pipe clockwise to tighten it onto your valve. Use your channel lock pliers when you can't tighten the piper by hand any further.[37]
- You may need to seal the run-off pipe with Teflon tape as well if it hasn't already been sealed.
-
8Turn on your water heater's water supply. Turn the lever on your water supply so that it's pointing the same direction as your pipe. The water supply will start to fill your tank so you can use hot water in your home again.[38]
-
9Open a hot water faucet somewhere in your home. Pick any sink or fixture in your home and set it so the hot water is running. Nothing will come out of the faucet yet, but it will relive the pressure inside your tank so the valve is installed properly.[39]
-
10Pull the lever open on the valve. After a faucet's been opened, pull the lever on top of your valve up to alleviate more pressure from inside the tank. Once the lever is open, you may notice some water going down the run-off pipe.[40]
-
11Close the lever once a steady stream of water flows through the run-off pipe. As your water heats up, the pressure inside the tank will increase and water will be forced out of the pressure-relief valve. When you notice the stream coming out from your run-off pipe, close the valve so the lever is horizontal again.[41]
- You can also turn off your water faucet once the stream is steady.


Warnings
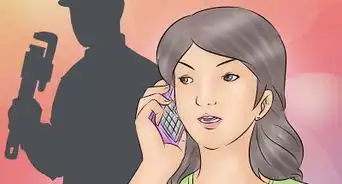
- If there's a strong natural gas smell around your water heater, leave immediately to call your utility company.⧼thumbs_response⧽
- Be careful draining and venting your water heater since the water and steam could scald you.⧼thumbs_response⧽
Things You'll Need
Cleaning the Heating Element on an Electric Water Heater
- Screwdriver
- Garden hose
- Channel lock pliers
- Masking tape
- Wire brush
Replacing the Thermostat on an Electric Heater
- Screwdriver
- Masking tape
- Water heater thermostat
Igniting a Pilot Light on a Gas Water Heater
- Screwdriver
- Safety lighter
Changing the Thermostat on a Gas Heater
- Garden hose
- Channel lock pliers
- Pipe wrench
- Replacement thermostat
- Teflon tape
- Safety lighter
Fixing a Leaky Pressure-Relief Valve
- Garden hose
- Channel lock pliers
- Work gloves
- Teflon tape
References
- ↑ https://youtu.be/1VSq237U8xE?t=70
- ↑ https://youtu.be/6TVZjCxYxeU?t=93
- ↑ https://youtu.be/6TVZjCxYxeU?t=127
- ↑ https://youtu.be/6TVZjCxYxeU?t=185
- ↑ https://youtu.be/6TVZjCxYxeU?t=233
- ↑ https://youtu.be/6TVZjCxYxeU?t=332
- ↑ https://youtu.be/6TVZjCxYxeU?t=619
- ↑ https://youtu.be/6TVZjCxYxeU?t=651
- ↑ https://youtu.be/6TVZjCxYxeU?t=760
- ↑ https://youtu.be/6TH3mSVbEmc?t=59
- ↑ https://youtu.be/6TH3mSVbEmc?t=63
- ↑ https://youtu.be/6TH3mSVbEmc?t=96
- ↑ https://youtu.be/6TH3mSVbEmc?t=118
- ↑ https://youtu.be/6TH3mSVbEmc?t=130
- ↑ https://youtu.be/6TH3mSVbEmc?t=141
- ↑ https://youtu.be/6TH3mSVbEmc?t=156
- ↑ https://youtu.be/t5gJRU-20a0?t=44
- ↑ https://youtu.be/t5gJRU-20a0?t=107
- ↑ https://youtu.be/t5gJRU-20a0?t=101
- ↑ https://youtu.be/t5gJRU-20a0?t=277
- ↑ https://youtu.be/t5gJRU-20a0?t=171
- ↑ https://youtu.be/t5gJRU-20a0?t=192
- ↑ https://youtu.be/jE9c2xPcoz8?t=13
- ↑ https://youtu.be/jE9c2xPcoz8?t=53
- ↑ https://youtu.be/jE9c2xPcoz8?t=106
- ↑ https://youtu.be/jE9c2xPcoz8?t=176
- ↑ https://youtu.be/jE9c2xPcoz8?t=398
- ↑ https://youtu.be/jE9c2xPcoz8?t=357
- ↑ https://youtu.be/jE9c2xPcoz8?t=357
- ↑ https://youtu.be/jE9c2xPcoz8?t=402
- ↑ https://youtu.be/nG8R9_bNAmw?t=72
- ↑ https://youtu.be/nG8R9_bNAmw?t=84
- ↑ https://youtu.be/nG8R9_bNAmw?t=100
- ↑ https://youtu.be/nG8R9_bNAmw?t=107
- ↑ https://youtu.be/nG8R9_bNAmw?t=122
- ↑ https://youtu.be/nG8R9_bNAmw?t=131
- ↑ https://youtu.be/nG8R9_bNAmw?t=154
- ↑ https://youtu.be/nG8R9_bNAmw?t=167
- ↑ https://youtu.be/nG8R9_bNAmw?t=163
- ↑ https://youtu.be/nG8R9_bNAmw?t=173
- ↑ https://youtu.be/nG8R9_bNAmw?t=180
About This Article

If your electric water heater isn’t providing enough hot water, you may need to replace the thermostat. To do this, first turn off the power connected to your heater so you don’t get shocked while working. Once the power is off, open the tank’s access panel and remove the wires connected to the thermostat using a screwdriver. You also might want to use some masking tape to label which wires were connected to which screws. After you’ve taken out the thermostat, put another one that’s the exact same model in its place. You can order an identical thermostat right from your water heater’s manufacturer. When the thermostat is clicked into place, reattach the wires. To finish up, change the thermostat temperature to 120 degrees Fahrenheit. When you turn your power back on, your water should work again! For more help, including how to change the thermostat on a gas heater, read on.