This article was co-authored by wikiHow Staff. Our trained team of editors and researchers validate articles for accuracy and comprehensiveness. wikiHow's Content Management Team carefully monitors the work from our editorial staff to ensure that each article is backed by trusted research and meets our high quality standards.
There are 12 references cited in this article, which can be found at the bottom of the page.
This article has been viewed 23,031 times.
Learn more...
If you are the kind of person who likes getting the most out of their car, a Racechip is perfect for you. A Racechip is an electric monitor that optimizes engine performance, giving your car more power while also saving fuel. It fits between the motor controls and sensors on your engine. Install it by detaching the existing plugs from the engine and hooking them to the monitor instead. For most cars, the installation takes about 15 minutes and doesn’t require any tools or mechanical expertise. A Racechip is perfectly safe and can make driving a more enjoyable experience.[1]
Steps
Accessing the Engine
-
1Wait about 10 minutes for the engine to cool if the car has been driven recently. The engine gets very hot and won’t be safe to touch until then. Keep your car off in the meantime. Once you’re ready to begin the installation, place your hand near the engine first. If you feel any heat coming off of it, give it a little more time to cool down.[2]
- The wait time varies depending on how recently you have driven the car. If you just drove a long distance, give it at least 30 minutes to cool down.
-
2Open the hood to access the engine bay. Pull the hood opening lever inside your car. It is located on the driver’s side, typically below the dashboard and near the door. After popping the hood, get out of the car and lock the doors. Prop up the hood so you have a clear view of the engine.[3]
- Locking the doors is useful to prevent anyone from accidentally turning on the car while you’re working. If you have an electronic engine starter, set it in a secure spot away from the car as well.
Advertisement -
3Remove the clips or bolts to detach the engine cover. The engine is covered by a piece of black plastic in most vehicles. It is usually pinned in place with small plastic clips. Find the clips along the top surface of the lid, then pull them up to remove them. If your cover has bolts instead, use a 4 mm (0.16 in) socket wrench instead.[4]
- On some vehicles, removing the cover is a little more complicated. You may have to detach the sensors and intake valve due to them being connected to the cover. Check the owner’s manual for more information.
- Some vehicles have a cover without attachments that can simply be pulled up by hand. Others may not have a cover at all.


Connecting to the Turbo Boost Sensor
-
1Locate the turbo boost pressure sensor on top of the engine. Look along the rear part of the engine for a big, black plug. The plug is usually near the upper right corner of the engine. The plug has a round, flexible, black cord as well.[5]
- When you order a Racechip, the manufacturer asks what car you have. If you give them the make and model, they include directions with full images showing where the sensor plugs are. It’s very useful if you’re having trouble finding them on your own.
-
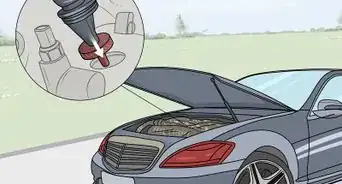
2Pull the turbo sensor plug out from its connector. Check the top edge of the plug for a small tab. Grip the back end of the plug while holding the tab down with one finger. Then, pull the plug away from the connector. The tab disengages the plug, so it will slide straight off the connector.[6]
- Be gentle with the plug to ensure the tab doesn’t break. If it feels stuck, don’t force it. Make sure you have the tab pressed down, then pull out with firm pressure.
- If the plug is unreachable, you may need to disconnect some other parts first. Sometimes the air filter and intake tube are in the way, for instance, and can be unscrewed with a socket wrench.
-
3Insert the Racechip plug marked A into the connector if you have a gas engine. Take the Racechip’s wiring harness out of the box, then inspect the different plugs for letter markings. The end marked A will have a plug and socket attached. Line up the plug with the turbo boost pressure sensor outlet, then push it in until you hear it snap into place.[7]
- The plug only fits one way, so you can’t inadvertently install it the wrong way. If it isn’t lined up with the sensor, it won’t fit.
- Note that diesel engines are a little different. If you have a diesel car, the plug marked B is meant to fit into the turbo boost pressure sensor.
-
4Fit the old turbo boost connector into the Racechip’s socket. Use the socket on the end of the wiring harness marked A. It’s the one right next to the plug you placed into the connector. Snap the two together to finish installing the first end of the harness.[8]
- Listen for the snap indicating that the plug and harness are well-connected. It's pretty loud, so, if you don't hear it, it could mean that the plug is still loose. Push it in with a little more pressure while holding down its tab.
- If it doesn’t fit, you may be using the wrong end of the cable. Double-check the letter label.


Completing the Wire Harness Installation
-
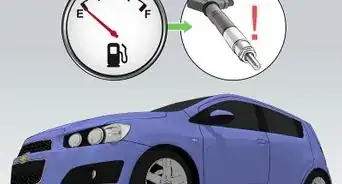
1Find the manifold absolute pressure sensor if you have a gas engine. This sensor is on the upper left part of the engine near the passenger side of your car. It is a little smaller than the turbo sensor, but it’s not too tough to find. It also has a black plug and cord connecting it to the rest of the vehicle.[9]
- Check the instructions that came with the Racechip. The manufacturer includes an image showing exactly where the sensor is on your vehicle.
-
2Locate the common rail sensor if you have a diesel engine. Every diesel engine has a metal tube in its center. The tube is known as the common rail and is easy to spot when you’re looking down from above. One end of the rail will have a round plug on it, which is where the Racechip’s connector is meant to fit. For some cars, the plug will be in the center instead, so check there if you don’t see it on the ends of the rail.[10]
- One way to find the sensor is by following the fuel injection line running from the fuel tank to the engine. The rail will have a large, plastic ring called a union nut nearby. The nut allows you to easily pull the plug off the sensor.
- Consult the manufacturer’s instructions for more information. It will have a picture showing where the sensor is on your specific vehicle model.
-
3Disconnect the plug from the sensor by pressing its tab. Look along the length of the pug for a small tab. Grasp the end of the plug while keeping one finger on the tab. Then, pull the tab back from the sensor to disconnect it.[11]
- The manifold absolute pressure sensor on a gas engine is identical to the turbo boost pressure sensor. You can refer to one to find the unlocking tab on the other.
-
4Slot the remaining Racechip plug into the sensor. Pick up the opposite end of the wiring harness. It will have a plug and a socket. To fit the plug, align it with the sensor outlet, then push it onto the sensor until you hear it click into place.[12]
- If you’re working on a gas engine car, use the end of the wiring harness marked B. For a diesel plug, use the one marked A instead.
- The plug is made to specifically fit the sensor, so there is no way to install it incorrectly. If it won’t fit, double-check its alignment with the sensor outlet.
-
5Attach the sensor plug to the wiring harness’ outlet. Connecting the rest of the wiring harness leaves you with one last outlet. Take the old plug you detached from the sensor and slot it into the harness. It will fit perfectly, wiring the Racechip into the vehicle’s system.[13]
- Make sure you’re using the outlet next to the plug you used, not the one at the opposite end of the wiring harness. That one is meant for the turbo sensor.
- The Racechip should stay off at this point. If it comes on, then your car is still on. Turn off the car and unplug the Racechip to reset it.


Installing and Activating the Racechip
-
1Remove the deactivation plug from the wiring harness. Now you are ready to connect the Racechip to the wiring harness. The wiring harness has an extra plug in the center, but it will be covered with a blocker. Locate the purple clip on the side and pull it away from the harness. With the clip out, you can pull the blocker off of the plug.[14]
- If you're unable to remove the plug, check the removal clip or tab on the side. Make sure it has been pulled all the way out or held down.
- Save the deactivation plug in your car’s glove box. When you need to deactivate the Racechip, fit the plug back onto it.
-
2Connect the Racechip to the wiring harness. Take the Racechip out of the box and line it up with the plug on the wiring harness. Note the white sticker on the plug as well as the brand logo on the Racechip. Make sure they are all facing the same side. Then, slot the Racechip onto the plug until it clicks into place.[15]
- The Racechip won’t fit unless it is turned the correct way. Align it properly with the plug before attempting to install it.
- The Racechip should not light up yet. If it does, you will get an error message. Unplug the Racechip and double-check that your car is off.
-
3Secure the mounting clips and cable ties to the Racechip. The Racechip comes with 4 mounting clips and a couple of cable ties you can use to hang it inside your car. Snap the mounting clips into the small openings on the back of the Racechip, positioning them in the corners. Slide a large cable tie through the upper and lower clips on the left, then do the same with the right side.[16]
- The clips are detachable. If you need to move the Racechip, pull the clips off of the car instead of cutting the cable ties. You can then rehang the Racechip with the old ties.
-
4Select a stable spot along the side of the engine bay for the Racechip. Look around the edges of the engine bay for a clear spot to hang the Racechip. Find a spot where you can use the cable ties. Many vehicles have exposed metal bars on the frame, or holes you can slide the cable ties through. Tighten the cable ties so that the Racechip won’t move while you’re driving.[17]
- Remember to keep an eye on the wiring harness. Make sure you are able to safely route it through the engine bay and keep it out of the way of any moving parts.
-
5Use cable ties to secure the wiring harness in the engine bay. Try resting the wire harness on top of the connecting cables along the back of the engine. Bind it to the other cables using the smaller wire ties included with the Racechip. Test the cable afterward to ensure it is well-secured and out of the way of the engine components. Then, trim excess length off the ties with wire cutters.[18]
- Be careful to avoid stretching the cable too tightly. Too much tension could cause it to snap.
-
6Turn on the ignition to test the Racechip. Turn the key in the ignition to activate the car without starting the engine. The electrical systems, such as the lights and radio, will come on. Check the Racechip as well to make sure that it is receiving power. If it is working as intended, reinstall the engine cover and close the hood. Then, take your car out for a test drive to see how it handles with the new chip![19]
- If the chip doesn’t seem to be working, turn off the car and check the plugs. Make sure the wiring harness is well-connected to the sensors.
- If you need assistance, contact customer support. They can walk you through the installation process.


Warnings
- Fitting a Racechip involves getting close to the engine, and it can cause serious burns if you touch it while it’s hot. Always let the engine cool before opening the hood!⧼thumbs_response⧽
Things You’ll Need
- Wire cutters
- Cable ties
- Socket wrench (optional)


References
- ↑ https://www.racechip.com/service-support/faq.html
- ↑ https://www.racechip.us/downloads/EBA_ALLG_GTS_TB_K2_ENG_V1.pdf
- ↑ https://www.racechip.us/downloads/EBA_ALLG_GTS_CR_K2_ENG_V1.pdf
- ↑ https://www.racechip.us/downloads/EBA_ALLG_GTS_TB_K2_ENG_V1.pdf
- ↑ https://www.racechip.com/service-support/installation.html
- ↑ https://www.youtube.com/watch?v=AT5dbdYM6_0&feature=youtu.be&t=163
- ↑ https://www.youtube.com/watch?v=Ye9GACukLTU&feature=youtu.be&t=108
- ↑ https://www.racechip.us/downloads/EBA_ALLG_GTS_TB_K2_ENG_V1.pdf
- ↑ https://www.racechip.us/downloads/EBA_ALLG_GTS_TB_K2_ENG_V1.pdf
- ↑ https://www.youtube.com/watch?v=37TrBA-0B08&feature=youtu.be&t=235
- ↑ https://www.youtube.com/watch?v=fLKodMAjz7s&feature=youtu.be&t=98
- ↑ https://www.youtube.com/watch?v=TksgaCRlMis&feature=youtu.be&t=197
- ↑ https://www.racechip.us/downloads/EBA_ALLG_GTS_CR_K2_ENG_V1.pdf
- ↑ https://www.youtube.com/watch?v=Ye9GACukLTU&feature=youtu.be&t=215
- ↑ https://www.youtube.com/watch?v=TksgaCRlMis&feature=youtu.be&t=333
- ↑ https://www.youtube.com/watch?v=ZzC2YODnqLg&feature=youtu.be&t=610
- ↑ https://www.racechip.us/downloads/EBA_ALLG_GTS_CR_K2_ENG_V1.pdf
- ↑ https://www.racechip.us/downloads/EBA_ALLG_GTS_TB_K2_ENG_V1.pdf
- ↑ https://www.racechip.us/downloads/EBA_ALLG_GTS_CR_K2_ENG_V1.pdf
- ↑ https://www.racechip.com/service-support/faq.html
About This Article