This article was co-authored by wikiHow Staff. Our trained team of editors and researchers validate articles for accuracy and comprehensiveness. wikiHow's Content Management Team carefully monitors the work from our editorial staff to ensure that each article is backed by trusted research and meets our high quality standards.
There are 9 references cited in this article, which can be found at the bottom of the page.
The wikiHow Video Team also followed the article's instructions and verified that they work.
This article has been viewed 2,265,678 times.
Learn more...
Bubble letters are fun and easy to make. Form the basic letters by sketching a letter in pencil and drawing an outline around it. Then, add details to your bubble letters by creating shadows, color gradients, or patterns. Your bubble letters will look great on cards, posters, brochures, and even school projects.
Steps
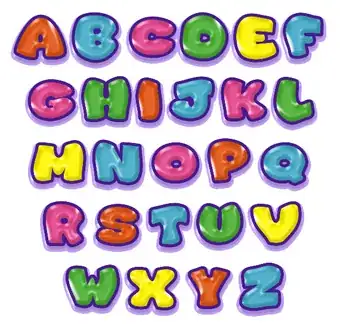
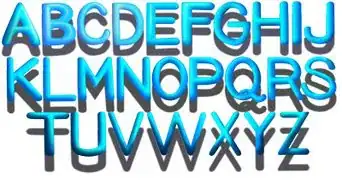
Sample Alphabets

How to Form the Basic Bubbles
-
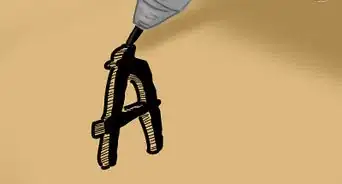
1Sketch a lowercase or capital letter in pencil. Start with whatever letter you want. A simple capital letter, like "A," is a good place to begin, but you can use the exact same technique for lowercase letters, too. Don’t worry about making this letter look perfect, because it is just a guiding line – you’ll erase it later.[1]
- Once you’ve gotten the hang of drawing bubble letters, you won’t need to draw the interior guiding letters anymore.
-
2Draw an outline around the letter with rounded edges. With your pencil, trace around the outside of your letter, leaving the same amount of space between the original letter and your new outline on all sides of the letter. Make sure to round off the edges and corners so that your bubble letters look soft, not like block letters.[2]
- You can draw as many outlines as you want, until you find one that is a thickness you like.
Advertisement -
3Pencil ovals over each line of your letter as an alternative. If you found it hard to draw an outline around the whole letter, you can draw individual ovals for each line of the letter. For straight lines, like the sides of the letter “A,” you can just draw one oval per line. For a curved line, like the letter “C,” you’ll have to use multiple ovals to cover the whole line.[3]
- Experiment with different thicknesses of ovals to see what kind you like. You can even have the ovals be so wide that they touch.
- Your ovals will overlap, but that’s okay, since you will erase the interior lines.
-
4Sketch little circles or triangles inside the loops of letters. For example, for a “B,” you could draw two little circles, one in each hole in the letter. For an “e,” you would only need one circle inside the upper loop of the letter. For an “A,” you could use a triangle in the upper middle part of the letter.[4]
- You can shade in the little triangles and circles or leave them open.
-
5Outline the outside of the letters with pen or marker. Make sure you avoid going over any interior or overlapping lines. For example, if you wrote a “F,” you shouldn’t trace over the lines where the short lines overlap with the long vertical line. Similarly, for an “x,” the part where the two lines overlap should be empty, and you should just trace around the outside in pen.[5]
- The pencil marks are just there to guide you in drawing your bubble letter; you don’t have to stick to them exactly.
- Feel free to accentuate the curves and make adjustments as you outline your letter.
-
6Erase all your pencil marks. Make sure you erase all the inside pencil marks so there are no visible marks. Once you’ve erased the construction lines, you’ll be left with nothing but your beautiful bubble letter.[6]
- Brush off the eraser shavings as you go, so they don’t get in the way of further drawing.


How to Add Details to Your Bubble Letters
-
1Draw cast shadows on one side of your letters. Add a black edge along one side of your letters with pen or marker, to make it look like the letters are casting shadows. It’s important to be consistent about which side of the letter your shadows are on for all the letters. Remember to include shadows on the small inside holes of letters, too.[7]
- It can help to imagine a light source in one particular part of your page. For example, if your light source was on the upper left of your page, it would cast shadows on the lower right of the letters.
-
2Fill in your letters with a color gradient using colored pencils or markers. For example, if your light source is coming from above, you could shade in your letters using a dark blue on the bottom of your letter and a light blue on top. You could also use different colors, like red on the bottom and yellow on the top.[8]
- Get creative with your colors – use as many different colors in one letter as you want.
-
3Color in your letters with fun patterns as an alternative. Fill in your bubble letters however you want. Try polka-dots, zebra print, stripes, spirals, stars, hearts, or zig-zags. Experiment with different colors and find out which designs you like best.[9]
- You can also make one pattern across all your letters for a more cohesive look.
- Use colored pencils, markers, crayons, or really whatever you want to color in your bubble letters.
Community Q&A
-
QuestionHow do I make it look 3D?
 Community AnswerShading the sides will make it look 3D. Remember to pick where your light source is and shade away from that.
 -
QuestionHow do you connect them?
 Community AnswerIf you mean cursive or joined up, you could simply write your word in cursive then outline the words and erase the inside lines.
 -
QuestionHow do I draw an R?
 Community AnswerTo draw a R, first draw a regular R, then trace around it. After that, erase the initial lines, make a circle in the loop thing, and adjust as necessary!
Things You’ll Need
- Paper
- Pencil
- Eraser
- Black pen or marker
- Colored pencils, markers, or crayons

-Step-12.webp)


References
- ↑ https://youtu.be/KEAOx7kGG8E?t=69
- ↑ https://youtu.be/yhiKkJtcHJk?t=230
- ↑ https://youtu.be/KEAOx7kGG8E?t=77
- ↑ https://youtu.be/vc-pEeiPLj0?t=130
- ↑ https://youtu.be/KEAOx7kGG8E?t=113
- ↑ https://youtu.be/499e0SMclcc?t=122
- ↑ https://youtu.be/ZNHg714uHJQ?t=122
- ↑ https://youtu.be/m1ebgSm6d0s?t=158
- ↑ https://youtu.be/yhiKkJtcHJk?t=748
About This Article

To draw bubble letters, start by writing the basic shapes of the letters you want. You can use either capital or lowercase letters. Next, draw an outline around each letter with rounded edges. To make this easier, try surrounding every line in the letter with an oval. If you’re drawing a curved letter, like “C,” use a series of curved ovals to cover the entire line. For letters with an opening in the middle, such as “A,” draw a circle or triangle inside the opening. Once you’re satisfied with the outline you created, use a pen or marker to ink it in. Erase the pencil lines you used to make the basic letter shapes, as well as any overlapping lines if you used the oval technique. If you want, embellish your bubble letters by adding drop shadows, shading, or fun colors or patterns. Experiment around with different techniques until you find the style you like best. To learn how to draw thin bubble letters, scroll down!


-Step-12.webp)


