This article was co-authored by Cory Ryan. Cory Ryan is a Professional Wedding Photographer who runs Cory Ryan Photography based in Austin, Texas. She has over 15 years of photography experience and specializes in weddings and events. Her work has been featured in publications such as The Knot, Style Me Pretty, and Junebug Weddings. She received a BA in Media Production and Broadcast Journalism from the University of North Carolina - Chapel Hill.
There are 7 references cited in this article, which can be found at the bottom of the page.
This article has been viewed 564,719 times.
Why not set up a photo shoot at home instead of going to a studio? You’ll have the chance to give the shoot your own personal twist and save yourself hundreds of dollars. With a camera, a window, and a few household supplies, anyone can create a professional-looking photo shoot at home.
Steps
The Setting
-
1Choose your "studio" location. Find a white wall, preferably in a room that gets a lot of natural light. If you don’t have a white wall, or if yours is covered with pictures, hang a white sheet from the ceiling and drape the end over the floor. This will create a studio-like blank canvas for your photo shoot.[1]
-
2Open the blinds and let sunshine flood the room. Lighting is the single most important element when you’re creating a professional-looking photo shoot, and natural light helps create the best effect.[2]
- Plan to begin your shoot when you know you’ll have plenty of sunlight coming through your windows for hours to come. This way you won’t have to rush your photo shoot.
- If your room gets bright sunlight, diffuse it with a sheer white curtain or thin white sheet. This will create a softer effect and eliminate harsh shadows.
- Even on overcast days, the sun should provide plenty of light for your shoot.
Advertisement -
3Find lamps with hooded shades. Desk lamps, for example, often have shades that are closed on one end so that you can focus their light in a particular place.
- You may also consider buying shop lamps, which artists and photographers use for this very purpose. These are inexpensive and can be found at hardware or photography stores. If you’re planning to create more than one home photo shoot, these will be a worthwhile investment.
-
4Create a professional ambiance. Using your lights to fill the room with soft light devoid of shadows.[3]
- One light should point toward the ceiling, creating a warm glow against the white paint. This should shine softly on your subject from above.
- Use another light as a “fill light”; place it in the back of the room, far enough away from the subject so that it doesn’t create shadows.
- Both of these types of lighting can be used in combination with diffused natural light. The varied light sources will create the optimal setting for a professional-looking photo shoot.
- Don’t use overhead ceiling lights; these will cast harsh shadows over your subject.
- You may use an umbrella, a piece of cloth, or another material to diffuse or filter your lights.
EXPERT TIPCory Ryan is a Professional Wedding Photographer who runs Cory Ryan Photography based in Austin, Texas. She has over 15 years of photography experience and specializes in weddings and events. Her work has been featured in publications such as The Knot, Style Me Pretty, and Junebug Weddings. She received a BA in Media Production and Broadcast Journalism from the University of North Carolina - Chapel Hill.Professional Photographer Cory Ryan
Professional PhotographerExpert Trick: If you're trying to hide wrinkles, acne, or other skin issues, a flat front light will be the most flattering. If you use a sidelight, it can highlight any of those imperfections.
-
5Gather meaningful props. A simple wooden stool for your subject to pose on might be all you need, or perhaps you want your photo shoot to have a fun theme. Gather the materials you need and arrange them tastefully in front of your white backdrop.[4]


The Model
-
1Decide what type of "look" to give your model. Whether you’ve hired someone to model for you or you’re photographing a family member, think ahead about what you’d like your model to wear. Is this a dressy shoot, or a casual one? Keep in mind that people look best in pictures when they’re comfortable in what they’re wearing.[5]
- Consider asking your model to be ready to change into several different outfits. If you’re taking graduation photos of your daughter, for example, you may want to have pictures of her wearing her graduation dress, her favorite outfit, and her basketball uniform. Gather props to go with the different looks.
- Hair and makeup are also important components when it comes to creating a professional effect. Remember makeup doesn’t show up as well in photos as it does in person, so you may want your model to wear a brighter shade of lipstick or a tad more eyeliner than normal.
-
2Have your model practice posing before you begin the shoot.
- Prep him or her before you begin the shoot by describing the effect you’re going for. Perhaps you want to stick with a traditional portrait-style pose, with your model smiling straight at the camera. Or maybe you want to capture your model’s personality - his smile, or his “pensive” look. Either way, the shoot will go more smoothly if your model knows what to expect.

The Shoot
-
1Prepare your camera. Whether you’re using a digital camera or a manual one, make sure the proper settings are in place before you begin your shoot. Take into account the lighting and the effect you’re trying to create.[6]
- Most digital cameras have an “automatic” setting. This should be fine in most cases, but make sure that the flash is turned off. You’ve already set up the proper lighting, so there should be no need for a flash.
- Have a tripod or a flat surface in place. Make sure it’s set at the right angle for professional-looking photos.
-
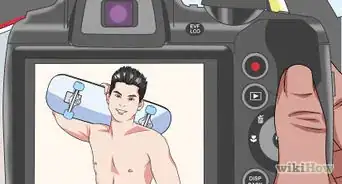
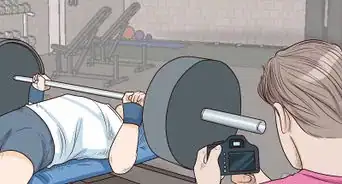
2Start taking pictures. Ask your model to try different poses, and try different creative approaches. Take pictures using the tripod or flat surface, and alternate snapping photos without them. If you’re using a digital camera, you may want to experiment with different settings, too.[7]
- Take more pictures than may be strictly necessary. You went to a lot of trouble to set up this photo shoot, and you’ll want to make sure you come away with some great shots. The more you have to choose from, the better!

The Photos
-
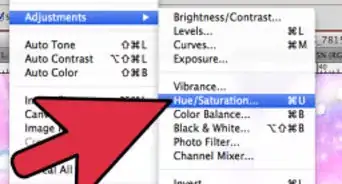
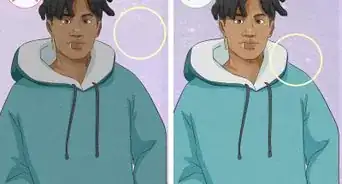
1Edit your photos. Upload your photos to your computer and use photo editing software to crop them, place interesting filters on them, change the contrast, and so on.[8]
-
2Print your photos on glossy paper. If you have a printer at home, you can buy photo-quality paper and print your photos from your computer. For a professional finish, you may want to take them to a photo developing store to complete the job.
- If you conducted your photo shoot with a film camera, take your film to a photo developing store to get your photos developed.
Community Q&A
-
QuestionWhat is shutter speed?
 Community AnswerShutter speed is how quickly the shutter opens and closes. Higher speeds can be used to capture movement with less motion blur, but will also require more light. Lower speeds require less light but will also blur any movement.
 -
QuestionHow can I blur the background of my photo?
 Community AnswerMost editing software provides the option to blur what you choose in your photo, and you can control exactly how much of the effect you want.
 -
QuestionCan I use my iPhone 6s for the photo shoot?Community AnswerYes. However, use the back camera for better looking pictures. The front camera (selfie mode) cannot give the same effect.
What You'll Need
- A camera
- A tripod, or a flat surface constructed at the height of a tripod
- A white wall or white sheet
- An assortment of lights


References
- ↑ https://www.itsalwaysautumn.com/diy-photo-studio-in-your-home-how-to.html
- ↑ https://www.itsalwaysautumn.com/the-secret-to-a-better-portrait-how-to-take-school-photos-at.html
- ↑ https://expertphotography.com/the-complete-guide-to-lighting-83-tips/
- ↑ https://www.itsalwaysautumn.com/category/photography-2/photography-tips
- ↑ https://photographylife.com/how-to-plan-a-photo-shoot
- ↑ https://expertphotography.com/successful-photo-shoot/
- ↑ https://improvephotography.com/35020/how-to-make-a-photo-look-professional/
- ↑ https://photographylife.com/how-to-plan-a-photo-shoot
About This Article
Before you do a professional looking photo shoot at home, make sure to choose a room that receives ample natural light. If you have a blank wall space, use that as your backdrop. If you don't, hang a white sheet over one wall to create a studio-like space. Gather meaningful props and outfits that you'd like in the photos, and open your blinds to take advantage of the natural light. Take lots of photos, edit the ones you like the best, and print them on glossy paper for a professional finish. For tips on getting your model looking great for the camera, keep reading!