This article was co-authored by Erica Coates. Erica Coates is a Professional Makeup Artist and the Owner of Erica Nicole Beauty based in the Washington D.C. metro area. With more than 14 years of experience, she specializes in creating and personalizing makeup looks and skin prep for makeup. Erica received her cosmetology training from the Bennett Career Institute.
This article has been viewed 22,816 times.
Curled eyelashes make your eyes look bigger and more awake. This technique is a quick, easy and effective way to curl your lashes if you find yourself without a curler. Warm a spoon in water, place it over your eyelids and push your lashes against it. Set the curls in place by applying a few coats of your favourite mascara and you’ll be all set in just a few minutes!
Steps
Making the Curls
-
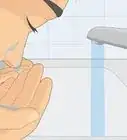
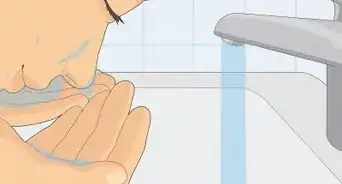
1Heat a teaspoon in a glass of warm water for 3 minutes. Fill a glass halfway with warm water, and place the clean metal teaspoon in head-down. Leave the spoon to heat up for 3 minutes.[1]
- Avoid using a large spoon as this will make it harder to press the lashes against the spoon.
-
2Dry the spoon. Remove the spoon from the water and dry it with a clean cloth. Wet lashes won't form or hold a curl well.[2]Advertisement
-
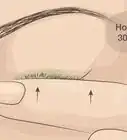
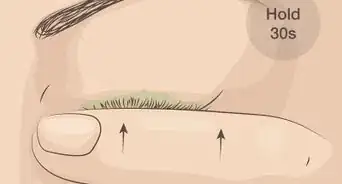
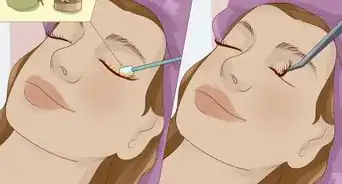
3Hold the inside of the spoon over your eyelid. Hold the spoon horizontally and press the inside of the curve against your eyelid.[3] The rounded outside face of the spoon will be used to curl your lashes.[4]
- Check the temperature of the spoon on your wrist before bringing it up to your eye. If it feels uncomfortably hot on your wrist, allow it to cool for a minute.
-
4Press the top lashes against the spoon for 10 seconds. Pull the top lashes back against the curve of the spoon using your fingertips. Hold the base of the top lashes against the outside face of the spoon for 10 seconds to help set the curls. The curve of the heated spoon will help to set the top lashes into a curled position.[5]
-
5Check for any lashes that haven’t curled well. Look in the mirror to see if any of the lashes haven’t curled properly. The lashes on the corners of the eyes don’t always curl well on the initial curling. Repeat the curling process but concentrate on holding the remaining straight lashes against the spoon.[6]
Setting the Lashes with Mascara
-
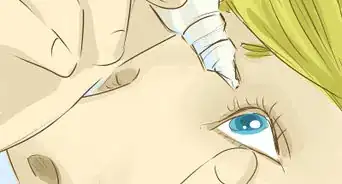
1Sweep the mascara from the bottom to the top of your lashes. Stand in front of a mirror and look straight ahead. Bring the mascara brush to the roots of your top lashes and sweep the brush up, following the curve of your lashes.[7] The mascara will help to set your curls in place.[8]
- If you accidentally get any mascara in your eye, liberally use water to rinse your eye.
-
2Apply a second coat if you want a fuller look. Sweep the brush over your lashes again, follow the same process as for the first coat. The second coat of mascara will coat any lashes that were missed in the first application and will make your lashes look fuller.[9]
- If you prefer a more natural, thinner lash, skip the second layer. If you’re wanting an even fuller look, apply a third layer.
-
3Coat your bottom lashes with mascara. Tilt your chin towards your body to stop the mascara marking your under-eyes. Sweep the mascara brush over the top of the bottom lashes. Coating your bottom lashes will help make your top lashes look more natural.
- If you find that mascara is getting on your cheeks, hold a small piece of paper over the area that gets marked while you apply the mascara.[10]
Warnings
- Don’t place the spoon into boiling water as this will make the spoon too hot. Always check that the spoon isn’t burning hot before placing it over your eyelids.⧼thumbs_response⧽
References
- ↑ https://www.allure.com/story/curl-lashes-without-eyelash-curler
- ↑ https://www.thelist.com/26230/10-mascara-mistakes-youre-probably-making/
- ↑ https://www.allure.com/story/curl-lashes-without-eyelash-curler
- ↑ Erica Coates. Professional Makeup Artist. Expert Interview. 8 April 2022.
- ↑ https://www.allure.com/story/curl-lashes-without-eyelash-curler
- ↑ https://www.allure.com/story/curl-lashes-without-eyelash-curler
- ↑ Erica Coates. Professional Makeup Artist. Expert Interview. 8 April 2022.
- ↑ https://www.thelist.com/26230/10-mascara-mistakes-youre-probably-making/
- ↑ https://www.thelist.com/26230/10-mascara-mistakes-youre-probably-making/
About This Article