X
wikiHow is a “wiki,” similar to Wikipedia, which means that many of our articles are co-written by multiple authors. To create this article, 39 people, some anonymous, worked to edit and improve it over time.
This article has been viewed 134,455 times.
Learn more...
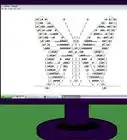
ASCII art uses special characters and numbers to generate image-like text. Here is how to create your own.
Steps
-
1Find a text editor to use to make your ASCII art (example: Notepad).
-
2Set the font to one with fixed width. In Notepad, the only font that you can use is fixed width. This means that you can use spaces; in fonts without fixed width, spaces will be smaller, which can mess up text formatting.Advertisement
-
3Think of an object to draw. Start with something easy, such as a flower.
-
4Use characters that take up more space for darker parts of the picture.
-
5Use characters that take up less space for lighter parts of the picture.
-
6Use various slants and slashes to make lines. You will be forced to only use large angles.
-
7Save it and show your friends and family, or publish it on a website.


Advertisement
Warnings
- Because you cannot make anything smaller than your characters, the size of each character will determine how small your piece of art can be. Because of this, you will not be able to make small figures with ASCII art.⧼thumbs_response⧽
- Do not be too hard on yourself. ASCII art is a hard thing to master, and it will take time.⧼thumbs_response⧽
Advertisement


References
About This Article
Advertisement