This article was co-authored by wikiHow staff writer, Jack Lloyd. Jack Lloyd is a Technology Writer and Editor for wikiHow. He has over two years of experience writing and editing technology-related articles. He is technology enthusiast and an English teacher.
The wikiHow Tech Team also followed the article's instructions and verified that they work.
This article has been viewed 3,342,853 times.
Learn more...
This wikiHow teaches you how to copy music from an iPod to a Windows or Mac computer. You can use the free Sharepod program to move music of of virtually any iPod, or you can use iTunes and your computer's file explorer program to pull music off of older iPods.
Steps
-
1Enable iTunes sharing. While Sharepod doesn't directly interface with iTunes to move songs from your iPod to your computer, it does require iTunes to be installed and capable of sharing XML:
- Open iTunes.
- Click either Edit (Windows) or iTunes (Mac) in the upper-left corner of iTunes.
- Click Preferences...
- Click the Advanced tab.
- Check the "Share iTunes XML with other locations" box.
- Click OK
-
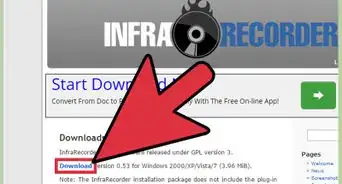
2Open the Sharepod website. Go to https://www.getsharepod.com/download/ in your computer's web browser. Sharepod is a free program for Windows and Mac that will allow you to transfer songs from your iPod directly onto your computer.
- You can use Sharepod with both modern iPods (such as the iPod Touch) and classic iPods.
Advertisement -
3Download Sharepod. Click either Download for Windows or Download for Mac near the top of the page. The Sharepod setup file will download onto your computer.
-
4Install Sharepod. This process will vary slightly depending on your computer:
- Windows — Double-click the Sharepod installation file, then follow the on-screen installation prompts. Sharepod may ask to install QuickTime for you; if so, accept the installation.
- Mac — Double-click the Sharepod DMG file, click and drag the Sharepod logo onto the "Applications" folder icon, and follow any on-screen installation prompts. You may need to make an exception for Sharepod in your Mac's security settings.
-
5Put your iPod in Disk Mode. If you're using a non-Touch model of iPod, you'll need to enable your iPod's Disk Mode feature in order for your computer to recognize it. The process for enabling Disk Mode varies depending on the iPod:[1]
- iPod Nano 6th or 7th Generation — Press the Sleep/Wake and either Home (7th generation) or Volume Down (6th generation) buttons at the same time until the Apple logo appears, then hold down the Volume Down and Volume Up buttons until the Disk Mode screen appears.
- iPod with a Click Wheel — Switch Hold on and off, press and hold Menu and Select until the Apple logo appears, release the buttons, and hold down Select and Play until the Disk Mode screen appears.
- iPod with a Touch/Scroll Wheel — Switch Hold on and off, press and hold Play and Menu until the Apple logo appears, release the buttons, and press and hold Previous and Next until the Disk Mode screen appears.
- iPod Classic — Disk Mode is neither supported nor needed when connecting a classic iPod to your computer.
-
6Attach your iPod to your computer. Plug one end of your iPod's charger cable into one of your computer's USB ports, then plug the other end of the cable into your iPod.
- You may need a USB 3.0 to USB-C adapter for your Mac if your Mac doesn't have any traditional USB ports.
-
7Open Sharepod. Once Sharepod is installed, double-click its app icon.
- Sharepod may open automatically at the end of the installation process.
-
8Click Done when prompted. This will take you to the main Sharepod window.
- At this point, iTunes will re-open if you closed it earlier. You'll need to allow it to run in the background while you use Sharepod.
-
9Select music. Hold down Ctrl (Windows) or ⌘ Command (Mac) while you click each song that you want to select.
- If you want to transfer all of your iPod's music onto your computer, skip to the next step's substep.
-
10Select a transfer folder. Once your music is selected, click TRANSFER in the bottom-right corner of the window, click Transfer selected to a folder, select a folder on your computer, and click OK.
- If you want to transfer all of your iPod's music onto your computer, click TRANSFER, then click Transfer everything to a folder... in the drop-down menu.
-
11Click GO. It's a green button in the bottom-right corner of the screen. Doing so will move your selected music into your preferred folder on your computer.


Using Old iPods on Windows
-
1Understand that this won't work with iPod Touch models. Older iPods, such as the iPod Nano and iPods which have click wheels, store their music in a significantly easier to access format than do iPod Touches.
- If you want to transfer iPod Touch music onto your computer, use Sharepod.
-
2Open iTunes. Double-click the iTunes app icon, which resembles a multicolored musical note on a white background.
- If prompted to update iTunes, click Download iTunes and restart your computer when prompted.
- If you don't have iTunes on your computer, install it before proceeding.
-
3Change your iTunes settings. In order to prevent errors or accidental file overwriting, you'll need to change a few iTunes settings before proceeding:
- Click Edit
- Click Preferences...
- Click the Devices tab.
- Check the "Prevent iPods, iPhones, and iPads from syncing automatically" box.
- Click the Advanced tab.
- Check the "Keep iTunes Media folder organized" box.
- Check the "Copy files to iTunes Media folder when adding to library" box.
- Click OK
-
4Put your iPod in Disk Mode. You'll need to enable your iPod's Disk Mode feature in order for your computer to recognize it. The process for enabling Disk Mode varies depending on the iPod:
- iPod Nano 6th or 7th Generation — Press the Sleep/Wake and either Home (7th generation) or Volume Down (6th generation) buttons at the same time until the Apple logo appears, then hold down the Volume Down and Volume Up buttons until the Disk Mode screen appears.
- iPod with a Click Wheel — Switch Hold on and off, press and hold Menu and Select until the Apple logo appears, release the buttons, and hold down Select and Play until the Disk Mode screen appears.
- iPod with a Touch/Scroll Wheel — Switch Hold on and off, press and hold Play and Menu until the Apple logo appears, release the buttons, and press and hold Previous and Next until the Disk Mode screen appears.
- iPod Classic — Disk Mode is neither supported nor needed when connecting a classic iPod to your computer.
-
5Attach your iPod to your computer. Plug one end of your iPod's charger cable into your iPod, then plug the other end into one of your computer's USB ports.
-
6Wait for the iPod to display in iTunes. Once your iPod's icon appears in the upper-left side of iTunes, you can proceed.
-
7
-
8
-
9Click your iPod's name. You'll find it on the left side of the File Explorer window, though you may have to scroll down on the left-hand pane of the window to see it.
- If you can't find your iPod's name, click This PC on the left side of the File Explorer window, then double-click your iPod's name below the "Devices and drives" heading.
-
10Enable hidden folder viewing. Click the View tab at the top of the File Explorer window, then check the "Hidden items" box. This will allow you to retrieve your iPod's music.
-
11Open the "iPod_Control" folder. Double-click this folder to do so.
-
12Open the "Music" folder. You'll find it inside the "iPod_Control" folder. Doing so will bring you to a list of folders with similar names (e.g., "F00", "F01", "F02", and so on).[2]
-
13Select all folders inside the "Music" folder. Click any folder in the "Music" folder, then press Ctrl+A.
-
14Copy the folders. Press Ctrl+C to do so.
-
15Paste the folders into a folder on your hard drive. Go to a folder in which you want to save the music, then press Ctrl+V to paste in the music.
-
16Add the music to iTunes. Once the music finishes copying onto your computer, you can add it to iTunes by doing the following:
- Open iTunes if necessary.
- Click File
- Click Add Folder to Library...
- Select your folder.
- Click Select Folder
- Since the music will be copied to the "iTunes Media" folder when you do this, you can delete the current folder after the music finishes adding to iTunes.


Using Old iPods on Mac
-
1Understand that this won't work with iPod Touch models. Older iPods, such as the iPod Nano and iPods which have click wheels, store their music in a significantly easier to access format than do iPod Touches.
- If you want to transfer iPod Touch music onto your computer, use Sharepod.
-
2Open iTunes. Click the iTunes app icon, which resembles a multicolored musical note on a white background, in your Mac's Dock.
- If prompted to update iTunes, click Download iTunes and restart your computer when prompted.
- If you don't have iTunes on your computer, install it before proceeding.
-
3Change your iTunes settings. In order to prevent errors or accidental file overwriting, you'll need to change a few iTunes settings before proceeding:
- Click iTunes in the upper-left corner of the screen.
- Click Preferences...
- Click the Devices tab.
- Check the "Prevent iPods, iPhones, and iPads from syncing automatically" box.
- Click the Advanced tab.
- Check the "Keep iTunes Media folder organized" box.
- Check the "Copy files to iTunes Media folder when adding to library" box.
- Click OK
-
4Put your iPod in Disk Mode. You'll need to enable your iPod's Disk Mode feature in order for your computer to recognize it. The process for enabling Disk Mode varies depending on the iPod:
- iPod Nano 6th or 7th Generation — Press the Sleep/Wake and either Home (7th generation) or Volume Down (6th generation) buttons at the same time until the Apple logo appears, then hold down the Volume Down and Volume Up buttons until the Disk Mode screen appears.
- iPod with a Click Wheel — Switch Hold on and off, press and hold Menu and Select until the Apple logo appears, release the buttons, and hold down Select and Play until the Disk Mode screen appears.
- iPod with a Touch/Scroll Wheel — Switch Hold on and off, press and hold Play and Menu until the Apple logo appears, release the buttons, and press and hold Previous and Next until the Disk Mode screen appears.
- iPod Classic — Disk Mode is neither supported nor needed when connecting a classic iPod to your computer.
-
5
-
6Attach your iPod to your computer. Plug one end of your iPod's charger cable into the iPod, then plug the other end into your computer.
- If your Mac uses USB-C ports instead of USB 3.0 (rectangular) ports, you will need a USB 3.0 to USB-C adapter to do this.
-
7Wait for the iPod to display in iTunes. Once your iPod's icon appears in the upper-left side of iTunes, you can proceed.
-
8
-
9Click your iPod's name. It's in the lower-left side of the Finder window. Doing so will open your iPod's window.
- If you can't find your iPod's name, click This PC on the left side of the File Explorer window, then double-click your iPod's name below the "Devices and drives" heading.
-
10Open the "iPod_Control" folder. Double-click this folder to do so.
-
11Open the "Music" folder. You'll find it inside the "iPod_Control" folder. Doing so will bring you to a list of folders with similar names (e.g., "F00", "F01", "F02", and so on).
-
12Select all folders inside the "Music" folder. Click any folder here, then press ⌘ Command+A to select the entire folder's contents.
-
13Copy the folders. Press ⌘ Command+C to do so.
-
14Paste the folders into a folder on your hard drive. Go to a folder in which you want to save the music, then press ⌘ Command+V to paste in the music.
-
15Add the music to iTunes. Once you've moved the music onto your computer, you can add it to iTunes by doing the following:
- Open iTunes if necessary.
- Click File
- Click Add to Library...
- Select your folder.
- If you don't see the music folders listed (e.g., "F00", "F01", "F02", and so on), you'll need to use the Terminal to make them visible to iTunes. In Terminal, change the directory to the folder where you pasted the music folders (e.g., cd the_name_of_the_folder_you_pasted_into). Then type xattr -c *. This will remove the attributes that are preventing iTunes from seeing the music folders.
- Click Open
-
16Make hidden files not visible in Finder again if you want. After successfully importing your music, you can type defaults write com.apple.finder AppleShowAllFiles -boolean false ; killall Finder in Terminal to make hidden files be no longer visible again in Finder.


Community Q&A
-
QuestionCopy from iPod to PC worked, but the files are in code (F01, F05, etc.) and not the name of the song, and they are hidden. Can I copy them to an iPod, and will the song info display at that time?
 Community AnswerYou need to copy the database files in the iTunes folder as well.
 -
QuestionWhat does it mean when if iTunes does not provide the option to "Enable disk use"?
 Community AnswerThis feature is not available on iPod Touch, iPhone, or iPad because they are not storage devices.
 -
QuestionHow do I copy iPod music to iTunes without deleting the music on the iPod?
 Community AnswerYou can easily add music to your iPod without losing any of the files currently on your iPod by going to your iTunes preferences and selecting "Prevent iPods, iPhones, and iPhones from syncing automatically." Next, plug in your iPod, and go to your device options in iTunes and select "Manually manage music and videos." This will allow you to drag and drop music onto your iPod without losing the contents on your iPod.
Warnings
- Some music on your iPod (especially if you're using a classic iPod) may be encrypted. If so, you most likely won't be able to play it even if you can get it off of the iPod.⧼thumbs_response⧽


References
About This Article
1. Install Sharepod.
2. Enable Disk Mode on older iPods.
3. Connect the iPod to the computer.
4. Open Sharepod.
5. Select music from the iPod.
6. Select a transfer folder.
7. Click Go.