This article was co-authored by wikiHow Staff. Our trained team of editors and researchers validate articles for accuracy and comprehensiveness. wikiHow's Content Management Team carefully monitors the work from our editorial staff to ensure that each article is backed by trusted research and meets our high quality standards.
There are 17 references cited in this article, which can be found at the bottom of the page.
This article has been viewed 30,565 times.
Learn more...
Soldering is especially useful for delicate projects such as making jewelry or connecting electronic components, but it forms a weak bond that can easily be broken. Fortunately, you have plenty of other options to choose from if you want to form a strong connection without soldering. The simple solution that’s effective for all types of metal is to bond them together with an epoxy adhesive. But if you’ve got thin metal sheeting you want to connect, riveting or screwing them together is the way to go. For the strongest connection without welding, braze the metal together.
Steps
Using Epoxy to Connect Metal Pieces
-
1Choose metal-containing epoxy for metal that won’t be stressed. Metal-containing epoxy is great for joining together pieces of metal, but isn’t strong enough to keep the metal bonded if it’s put under too much pressure.[1] Additionally, if the metal heats up too much, then the epoxy may melt and won’t keep them connected.
- Epoxy is great for making quick repairs but shouldn’t be used to join metal that will be used as tools or used to support heavier objects.
-
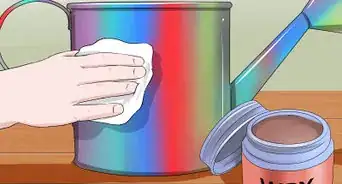
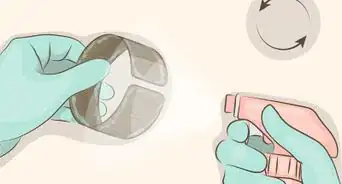
2Clean the metal with a degreaser to remove rust and residue. Spray a degreaser over the surface of the metal and take a clean cloth or sponge and wipe the metal to remove any grease from the surface to create a better adhesion. If there’s rust or stubborn grime on the metal, use a stiff-bristled brush to scrub it clean.[2]
- You can find a degreaser at hardware stores, home improvement stores, department stores, and by ordering it online.
- Let the metal dry or wipe it dry with a clean cloth.
Advertisement -
3Mix together 2-part metal-containing epoxy to activate it. Metal-containing epoxy is a strong adhesive specially designed for metal that comes in 2 parts that need to be combined in order to be activated and create a strong bond. Squeeze out a dab of both parts of the epoxy and mix them together with a stir stick according to the directions on the packaging.[3]
- Look for 2-part metal-containing epoxy, such as J-B Weld SteelStik, at your local hardware or department store. You can also order it online.
Note: The epoxy will start to bond and solidify so don’t mix it together until you’re ready to connect the metal!
-
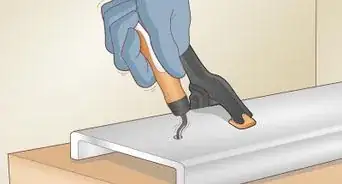
4Spread epoxy over the areas where you’ll connect the metal. Use your stir stick or applicator to spread the epoxy in a thin, even layer over the surface of the metal pieces where you plan to connect them. Spread the epoxy onto all of the pieces of metal to create a stronger bond.[4]
- You don’t need a glob or a thick layer of epoxy. A thin and even layer will bond better.
-
5Hold the metal pieces together for about 10 seconds. Use your hands or a clamp to connect the pieces of metal together. Apply pressure and hold the metal together for at least 10 seconds, then gently release them. The epoxy will bond together and keep them connected, but you need to wait 1-2 hours for the epoxy to fully harden.[5]
- Most epoxy will take a few hours to fully set and cure, but check the packaging for specific drying times.


Riveting Thin Pieces of Metal
-
1Use a rivet gun to drive rivets into thin metal sheets. A rivet gun is a handheld tool with a handle that you squeeze to drive a rivet through metal. Riveting is best used for thin sheets of metal that you want to connect together for light duty applications such as connecting gutters or attaching a metal sign to a wall.[6]
- You can find a rivet gun and rivets at your local hardware store or by ordering them online.
-
2Hold the metal together so the surfaces are flush. Line up the sheets of metal and position them where you want them to be connected. Make sure the surfaces are flush together so you’re able to drill and drive the rivets through both of them.[7]
Tip: Clamp the metal sheets together with a screw clamp, bar clamp, or another type of clamp if you can’t hold the metal together steadily with your hands.
-
3Drill a hole slightly larger than your rivet into the metal sheets. Use a power drill and fit a bit into the end that’s just slightly larger than the rivet or rivets you plan to drive through the metal so they fit through the hole. Drill holes through the metal sheets where you want to place your rivets.[8]
- If you’re drilling multiple holes, use a ruler or tape measure to make sure they’re evenly spaced apart.
-
4Insert a rivet into the rivet gun. Take 1 of your rivets and slide the thin end into the muzzle of the rivet gun. Push the rivet all of the way into the end of the gun so it’s held securely and won’t slide out.[9]
- The rivet needs to be fully inserted in order for the rivet gun to properly insert it into the metal.
-
5Slide the rivet into the hole and squeeze the handle of the rivet gun. Fit the rivet all the way into the hole you drilled so the end of the rivet gun is pressed against the surface of the metal. Squeeze the handle of the rivet gun to drive the rivet into the metal. Then, unclamp the handle and remove it.[10]
- If you’re driving multiple rivets into the sheets of metal, load up another one into rivet gun and keep going!


Screwing Metal Sheets Together
-
1Use self-tapping screws to connect metal sheets securely. Self-tapping screws, sometimes called self-drilling screws, are screws that can be installed into metal without having to first drill pilot holes. They’re useful for connecting metal sheets more securely than by using pop rivets, and can be used to connect multiple layers of sheet metal.[11]
- You can find self-tapping screws at your local hardware store or by ordering them online.
-
2Insert a drill bit into your power drill and wipe off the tip. Choose a bit that fits into your self-tapping screws and attach it to your power drill. Use your fingers to wipe off any dust or metal filings that may be stuck on the end of the bit so you’re able to securely attach a screw.[12]
-
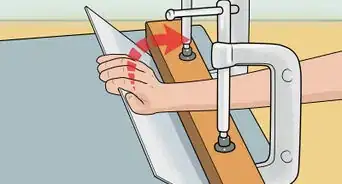
3Clamp the metal sheets together and mark where you want to drill. Use a C-clamp to keep the metal sheets held tightly together so they don’t move when you drill. Take a marker and mark the locations where you plan to add your screws to connect the metal sheets.[13]
- The clamp also makes sure there isn’t space between the sheets so they’re better connected.
Tip: If you’re installing multiple screws, use a ruler or tape measure to make sure the spaces between the screws are even.
-
4Place a screw on the end of the bit and drill it into the metal. Fit the drill bit into the slotted end of a self-tapping screw. Hold the end of the screw against the surface of the metal and apply constant pressure as you start the drill slowly and increase the speed to drive the screw into the metal. Once the head of the screw is flush with the surface of the metal, remove the drill and install another one.[14]
- If a screw breaks or won’t penetrate the metal, try using another one.


Brazing Metal Together
-
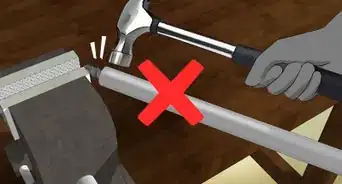
1Use a brazing rod to connect metal without welding. Welding is the strongest way to connect metal together, but it requires special tools and training in order to do it properly and safely. A brazing rod is similar to a stick of solder or flux, but is made out of brass filler and isn’t heated directly like solder is. It’s great for connecting most types of metal, brass, and copper together.[15]
- Brazing is great for most metals except softer ones like aluminum, which require a special process in order to be done correctly and without melting.
-
2Clean the metal with soapy water. Fill a bowl or bucket with warm water and add a few drops of a liquid dish soap. Stir the solution together so it’s nice and sudsy. Dip a sponge or clean cloth into the mixture and use it to wipe the surface of the metal to remove grime and residue. If there are stubborn patches of dirt or residue on the metal, use a stiff-bristled scrubbing brush to remove them.[16]
- Clean all of the metal you plan to connect.
- It’s really important that you remove any grime, grease, or sticky residue from the surface of the metal or they won’t bond together properly.
-
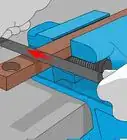
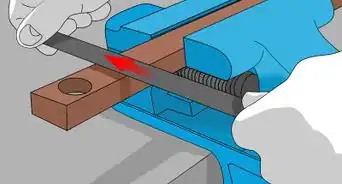
3Scuff the surface of the metal with a wire brush. In order for the brass filler to properly adhere to the surface of the metal, there need to be tiny scratches on the surface. Take a wire brush and run it back and forth over the metal where you plan to connect it to scratch it up.[17]
-
4Place the metal on top of a damp piece of wood. Soak a piece of wood that’s at least twice the size of the metal items you’re brazing in water so it’s damp and place it on a flat surface like a worktable or the ground away from any flammable objects. Position your metal on top of the wood in the way you want it to be connected.[18]
- Make sure the wood is large enough so it can absorb any excess heat from the torch.
- Damp wood won’t catch on fire from the heat used to braze the metal together.
Tip: You can use a metal clamp to hold the metal together if you need to.
-
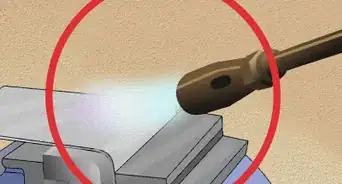
5Heat the metal with a propane blowtorch until it glows. Take a propane torch and ignite it to start up the flame. Hold the flame steady about 1–2 inches (2.5–5.1 cm) away from the metal where you want to connect it. Heat both sides of the seam between the metal to form a strong connection. Keep the flame on the metal until it glows a bright yellowy-orange color.[19]
- Be very careful not to touch the metal while it’s hot.
-
6Apply the brazing rod to the hot metal seam to fuse it together. Take the brazing rod and touch the end of it to the bright, hot metal. Hold the rod so it’s touching both sides of the seam between the metal. The rod will melt and weld the metal together. Spread the rod over the metal to form an even and consistent bond. Wait at least 1-2 hours for the metal to cool before you touch it.[20]


Warnings
- Make sure the metal is clean if you plan to braze it so it’s not a fire hazard.⧼thumbs_response⧽
Things You’ll Need
Using Epoxy to Connect Metal Pieces
- Degreaser
- Sponge or cloth
- 2-part epoxy
Riveting Thin Pieces of Metal
- Rivet gun
- Rivets
- Power drill
Screwing Metal Sheets Together
- Self-tapping screws
- Power drill
- C-clamp
Brazing Galvanized Metal
- Brazing rod
- Propane torch
- Wire brush
- Damp piece of wood
- Dish soap
- Cloth or sponge


References
- ↑ https://youtu.be/S6FLXJ5QZWs?t=37
- ↑ https://www.popularmechanics.com/home/interior-projects/how-to/a25138/how-to-glue-anything/
- ↑ https://youtu.be/QkL7Ua641Ss?t=156
- ↑ https://youtu.be/QkL7Ua641Ss?t=174
- ↑ https://youtu.be/QkL7Ua641Ss?t=210
- ↑ https://youtu.be/bpyPQ0kvGyo?t=28
- ↑ https://youtu.be/yuJqCtSrad0?t=92
- ↑ https://youtu.be/yuJqCtSrad0?t=92
- ↑ https://youtu.be/yuJqCtSrad0?t=100
- ↑ https://youtu.be/yuJqCtSrad0?t=103
- ↑ https://alwaystheadventure.com/vanbuild/installing-studs
- ↑ https://youtu.be/aRq1r4_QMEo?t=65
- ↑ https://youtu.be/aRq1r4_QMEo?t=154
- ↑ https://youtu.be/aRq1r4_QMEo?t=132
- ↑ https://youtu.be/hEx89N3f9u4?t=9
- ↑ https://www.bernzomatic.com/Projects/DIY/Braze-Metal-Together
- ↑ https://www.bernzomatic.com/Projects/DIY/Braze-Metal-Together
- ↑ https://youtu.be/hEx89N3f9u4?t=158
- ↑ https://youtu.be/hEx89N3f9u4?t=280
- ↑ https://www.bernzomatic.com/Projects/DIY/Braze-Metal-Together
About This Article