This article was written by Jeremy Mercer and by wikiHow staff writer, Cory Stillman. Jeremy Mercer is the Manager and Head Technician at MacPro-LA in Los Angeles, CA. He has over ten years of experience working in electronics repair, as well as retail stores that specialize in both Mac and PC.
This article has been viewed 46,799 times.
Whether you need to back up valuable data or you are transitioning to a new computer, you may need to clone your hard drive for a variety of reasons. It's likely you'll want to clone to an SSD (solid-state drive) as well, as most high-end laptops today rely on SSDs as opposed to traditional hard drives, considering SSDs are up to 3x faster. Fortunately, cloning your hard drive to an SSD is surprisingly easy on both PCs and Macs! All you need is a cloning software. While there are many out there, this article will use Macrium Reflect 7 Free. This wikiHow article will teach you how to clone a hard drive to an SSD.
Steps
Clone Hard Drive on Windows
-
1Purchase and install new SSD for transfer. Obviously, you'll need a fresh blank SSD to transfer your hard drive's data to. A SSD should have at least 256GB in storage space, but you may need even more.
- Also be sure to find an SSD that fits your computer. Inspect your computer's specifications and determine whether or not your motherboard requires an M.2 drive, a U.2 drive, a 2.5in SATA, or an SSD add-in-card. [1]
- To install your SSD on your computer, you will likely need to consult your computer's user manual, and handle the SSD with care.
-
2Update your current hard drive. Before cloning your hard drive, you want to make sure it is on the most up-to-date OS.
- This might be a good time to run a malware scan as well, ensuring you are cloning a healthy and clean drive.
- This may also be a good time to backup your hard drive, providing peace of mind in case anything goes amiss during the cloning process.
- Also be sure to disconnect any other external devices, such as USB drives or external displays.
Advertisement -
3Download and install Macrium Reflect Free. The current version is Macrium Reflect 8. Head to the software's website to download the latest version. It's entirely free and safe. Follow the installation wizard's instructions to complete the process.
- If requested to enter an e-mail for registration, you may skip those fields and still install the complete product. [2]
-
4Close all windows on your computer. Before launching Macrium Reflect, be sure to close all windows on your computer first.
-
5Open your cloning software. Open Macrium Reflect 8 Free. If prompted to enter a license key or personal info, you can simply click "Next" to skip this step.
-
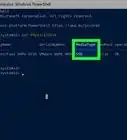
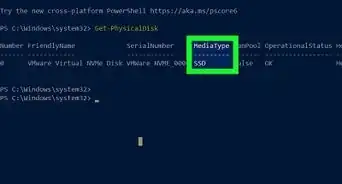
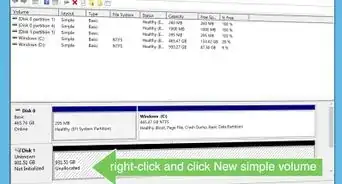
6Select the drive you want to clone. From Macrium Reflect's front page, select your current hard dive. It should be labeled OS (C).
-
7Click "Clone This Disk." With the drive selected, click the available Clone This Disk button. This will open a pop-up window where you will complete the cloning process.
-
8Click "Select a Disk to Clone to" in the pop-up window. You should have already installed your SSD by now, so the software should be able to detect it. If for some reason you are not using an SSD, you may clone to an external drive as well.
- If your SSD already contains existing data, you may need to clear up space. Select each partition you want to delete and click "Delete Existing Partition."
-
9Drag each of your hard drive's partitions to the "Destination" field. Manually drag each of your hard drive's partition to the Destination field to clone your hard drive to your SSD.
- You want to leave as little space on the targeted SSD as possible. Macrium Reflect allows you to scale the size of each partition accordingly, so be sure to make them smaller or larger as needed.
- These partitions are necessary as you cannot simply just copy Windows from a hard drive to an SSD, as portions are stored in various areas of your drive.
-
10Click "Next" to continue. Once you have assigned all of your hard drive's partitions to the SSD, click Next to begin the cloning process.
- Once you continue, you may either choose to "Schedule This Clone" at a later point, or click "Next" to begin the process immediately.
-
11Click "Finish" in the final page. Macrium Reflect's final page will show a summary of the cloning you are about to undertake. Verify all relevant info and click Finish to initiate cloning.
- The software may also ask if you want to save these backup settings for future cloning processes. Click "OK" if you would like to do so.


Clone Hard Drive on Mac
-
1Purchase new SSD for transfer. Cloning a hard drive to an SSD on a Mac is very similar to doing so on Windows. You'll need a fresh blank SSD with at least 256GB in storage space, but you may need even more.
- Also be sure to find an SSD that fits your computer. Inspect your computer's specifications and determine whether or not your motherboard requires an M.2 drive, a U.2 drive, a 2.5in SATA, or an SSD add-in-card. [3]
-
2Update your current hard drive. Before cloning your hard drive, you want to make sure it is on the most up-to-date OS.
- This might be a good time to run a malware scan as well, ensuring you are cloning a healthy and clean drive.
- This may also be a good time to backup your hard drive, providing peace of mind in case anything goes amiss during the cloning process.
-
3Connect your SSD as an external drive. Using an external drive enclosure, connect your SSD as an external drive. We will install it properly once your hard drive's data has been cloned. [4]
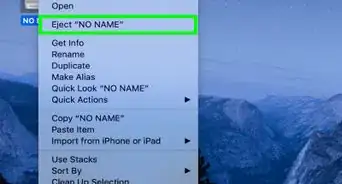
- Also be sure to disconnect any other external devices, such as USB drives or external displays.
-
4Open the Disk Utility app. Cloning a hard drive on a Mac is particularly easy, as you can use the built-in Disk Utility app. Open it by going to "Applications" then "Utilities" then Disk Utility.
- If you have previously backed up your hard drive to the Time Machine, you can skip to installing your SSD and use your Mac's Migration Assistant to restore the most recent hard drive backup. [5]
-
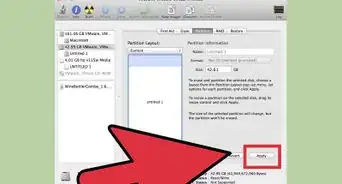
5Select your new SSD volume on the left-hand side of the Disk Utility program. As long as your SSD is externally connected properly, it should display here in Disk Utility. Highlight it to pull up the necessary options to continue with cloning.
-
6Select "Edit" and then "Restore" atop the page. From the Disk Utility options at the top of the screen, we need to Restore our new SSD by cloning the data from our current hard drive.
-
7Change the "Restore from" field to your current hard drive. Upon clicking "Restore," a pop-up window will appear to confirm your restoration. Change the Restore from field to your current hard drive, and click Restore to continue.
- The cloning will now begin. Simply wait for it be completed.
- Before continuing, you may want to verify the cloning process worked. Restart your Mac while holding the "Option" key. Release the key once your Mac starts. If your SSD is visible, try to load from it and ensure your OS loads properly.
-
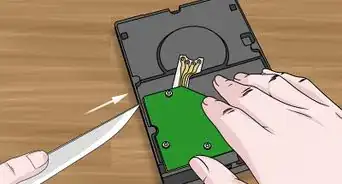
8Install the SSD to your computer. Unscrew the bottom of your computer and consult your computer's user manual to install the SSD properly. Remove the SSD from its enclosure and be sure to handle the drive with care.
- You can now reboot your computer once more and operate with your cloned SSD!


References
- ↑ https://www.tomshardware.com/uk/reviews/ssd-buying-guide,5602.html
- ↑ https://www.macrium.com/reflect-free-faq
- ↑ https://www.tomshardware.com/uk/reviews/ssd-buying-guide,5602.html
- ↑ https://www.crucial.com/support/convert-drive-external-storage
- ↑ https://www.imymac.com/powermymac/clone-mac-hard-drive-to-ssd.html
About This Article