This article was co-authored by wikiHow Staff. Our trained team of editors and researchers validate articles for accuracy and comprehensiveness. wikiHow's Content Management Team carefully monitors the work from our editorial staff to ensure that each article is backed by trusted research and meets our high quality standards.
There are 8 references cited in this article, which can be found at the bottom of the page.
The wikiHow Video Team also followed the article's instructions and verified that they work.
This article has been viewed 11,266 times.
Learn more...
Armpit stains in white T-shirts are a huge problem and could make a perfectly good shirt look dirty and unkempt. But don’t worry, there’s no reason to throw it away! These stains just need the right prep work and washing tricks for the shirt to look good as new again. Carefully pre-treat the shirt and wash it with hot water to draw the stain out. There are also a few home remedies you could use that might work just as well. With the right care, you can keep your white shirts looking fresh for years.
Steps
Pre-Treating the Stain
-
1Soak the shirt in a water and detergent mixture for 30 minutes. This loosens the stain before washing. Take a large bowl that you can fit the whole shirt into. Pour 1 US gal (3.8 L) of warm water into the bowl, then add 3 spoonfuls of liquid detergent. Put the shirt into the bowl and let it soak for 30 minutes before pre-treating the stains.[1]
- You don’t have to use special detergent. The brand that you normally use is fine.
- You could use this method with colored shirts as well. It won’t make them fade.
-
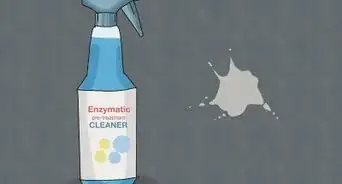
2Spray or pour a pre-treating stain fighter onto the stains. After the stains have loosened for 30 minutes, take the shirt out of the bowl. Lay it flat so you can see the armpit stains. Then take a stain pre-treater and spray it into both armpits, covering the stains.[2]
- Some products that will work are OxyClean, Tide, Carbona, or any other commercial laundry stain pre-treater.
- Remember to check around the neckline. Some yellow stains often hide there as well.
Advertisement -
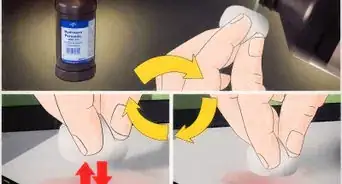
3Apply baking soda and peroxide if you don't have stain fighter. This home remedy can lift off stains that are set in and might not respond to regular detergent. Mix one part baking soda and one part hydrogen peroxide in a bowl and stir until it forms a paste. Rub the paste into the stains and let it sit for a few minutes.[3]
- This can whiten fabrics, so don’t use it on colors.
- Don’t store the paste for use later on. It has to be used fresh, so make a fresh batch every time.
-
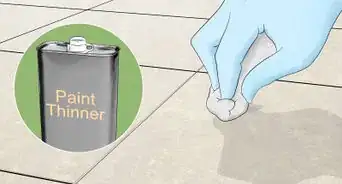
4Pre-treat the stain with vinegar for a natural remedy. White vinegar is another simple stain-fighting solution. Simply pour some onto the stains and let the shirt soak for a few minutes.[4]
- Vinegar might not work as well for set-in stains.
- You can use this trick on colors as well.
-
5Soak newer stains with aspirin as a backup plan. This is a popular home remedy that could work on new stains that haven’t set in yet. Fill a glass with warm water and put 2 aspirin tablets in. Stir the water and let the glass sit until the aspirin is completely dissolved. Pour the water onto the stains and let it soak in.[5]
- This could stain colored clothes, so only use it for whites.
-
6Scrub the spot treatment in with a sponge or toothbrush. Whether you use stain fighter or home remedy as a spot treatment, rubbing it in helps remove the stain. Use a circular motion to really lift the stain and get the stain fighter into the fabric. You might see the stain starting to fade as you scrub it, especially if it isn’t set in yet.[6]
-
7Let the shirt sit for 5 minutes. This gives the spot treatment enough time to soak in and start lifting the stain. After 5 minutes, you can continue with washing the shirt.[7]
- If the stain fighter bottle says to let the shirt sit for a different time, then follow those instructions.


Washing the Shirt
-
1Set the washing machine to the hot water setting. Hot water lifts stains much better than cold water, so put your washing machine on the hot setting. As an added bonus, hot water kills bacteria and reduces smell much better than cold water.[8]
- Check the care label for the shirt you’re washing to make sure hot water won’t damage it.
-
2Put an undersized load into the washing machine. Overloading the washing machine means that less water and detergent can reach each individual item. This means stains won’t lift as well. Keep the load size well below the max fill line to make sure the stain fades as well as it can.[9]
- Don’t mix any colors in with this batch. They could stain the whites, or fade because of the hot water.
-
3Wash the shirt normally with your usual detergent. There’s no need to use special detergent, as long as you’ve pre-treated the stain correctly. Pour in the usual amount and wash the shirt normally.[10]
-
4Air-dry the shirt so stains don’t set in. If any stains are left over, the dryer could lock them in. Instead, air-dry the shirt and see if your laundry treatment removed the stain.[11]


Things You’ll Need
Pre-Treating the Stain
- Detergent
- Bowl
- Warm water
- Stain pre-treater
- Sponge or toothbrush
- Peroxide
- Baking soda
- White vinegar
- Aspirin
- Water
- Sponge or toothbrush
Washing the Shirt
- Washing machine
- Detergent


References
- ↑ https://www.goodhousekeeping.com/home/cleaning/a25641913/sweat-stain-removal/
- ↑ https://www.artofmanliness.com/articles/how-to-remove-yellow-armpit-stains/
- ↑ https://www.bobvila.com/articles/how-to-remove-sweat-stains/
- ↑ https://www.mamaslaundrytalk.com/how-to-remove-armpit-stains/
- ↑ https://www.homestolove.com.au/permanent-sweat-stains-on-shirts-10737
- ↑ https://www.bobvila.com/articles/how-to-remove-sweat-stains/
- ↑ https://www.realsimple.com/home-organizing/cleaning/stain-removal/removing-perspiration-stains
- ↑ https://www.realsimple.com/home-organizing/cleaning/stain-removal/coffee-stain-removal
- ↑ https://www.washingtonian.com/2015/06/29/how-to-remove-armpit-stains-from-your-white-shirts/
About This Article