This article was co-authored by wikiHow staff writer, Christopher M. Osborne, PhD. Christopher Osborne has been a wikiHow Content Creator since 2015. He is also a historian who holds a PhD from The University of Notre Dame and has taught at universities in and around Pittsburgh, PA. His scholarly publications and presentations focus on his research interests in early American history, but Chris also enjoys the challenges and rewards of writing wikiHow articles on a wide range of subjects.
There are 7 references cited in this article, which can be found at the bottom of the page.
The wikiHow Video Team also followed the article's instructions and verified that they work.
This article has been viewed 18,807 times.
Learn more...
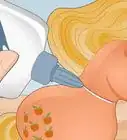
Kids love Play-Doh, especially when they can use the toys that come with many Play-Doh sets to cut, mold, and shape their creations. But cleaning all the bits of Play-Doh off of or out of these toys can be a real hassle for you! Fortunately, a bit of ingenuity and elbow grease can help you remove both soft and dry Play-Doh from toys.
Steps
Soft Play-Doh
-
1Pick away any larger globs of soft Play-Doh with your fingers. Pluck out bigger pieces of Play-Doh with your thumb and index finger, then scoop and scrape out whatever else you can access with your index finger. The more you remove now, the easier the rest of your cleanup job will be.[1]
- Your fingernail can make a good scraping tool, but you’ll probably have to scrape out some Play-Doh from under your nail when you’re done.
-
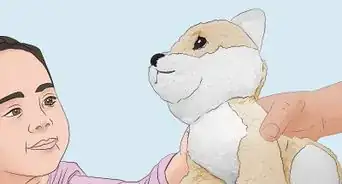
2Take the toy apart if you can to reach any Play-Doh on the inside. If your toy makes Play-Doh into strings or shapes, it probably has hard-to-reach areas that get gunked up with Play-Doh. Fortunately, most multi-part Play-Doh toys can easily be taken apart by hand. Simply use your fingers to disconnect the the plastic pegs or tabs at the joints. If you have the product instructions, use these so you don’t accidentally break the toy.[2]
- If you think you might break the toy by disassembling it, leave it be and do your best to remove all the soft Play-Doh you can get to for now. Try some of the dried Play-Doh removal techniques when the time comes.
Advertisement -
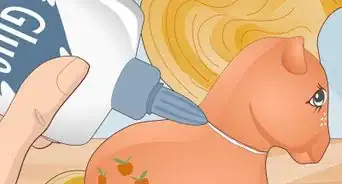
3Smash some soft Play-Doh between your hands into a flat disc. One of the best ways to clean up small bits of soft Play-Doh is by using a bigger piece of soft Play-Doh. Grab a ball of fresh Play-Doh—the softer the better—and squeeze it between your palms to flatten it out. Make the disc as big or small as you want.[3]
-
4Press the disc against the Play-Doh on the toy to lift up some of it. Press hard enough to stick the soft Play-Doh on the toy to your Play-Doh disc, but not so hard that the disc ends up getting stuck to the toy. Lift away the disc—some, if not all, of the Play-Doh that was on the toy should now be stuck to the disc.[4]
- If all the Play-Doh is the same color, just reform it into a new disc and repeat as needed. If the Play-Doh disc and the Play-Doh on the toy are different colors, use your fingers to pick up the bits from the toy that are now stuck to the disc. Put them with their matching colors, then re-form the disc and continue as needed.
-
5Scrape out any remaining Play-Doh with a toothpick, coffee stirrer, etc. Toothpicks, chopsticks, cotton swabs (Q-Tips), pens, coffee stirrers, plastic utensils, straightened paper clips, and a range of other household items can serve as useful Play-Doh scrapers. Pick the best tool for the job and just keep on scraping until the toy is clean.[5]
- If your child is doing the cleanup, or at least helping you clean, choose tools without sharp points—cotton swabs instead of toothpicks, for example.
-
6Allow any Play-Doh you simply can’t reach to dry out. There may be some nooks, crannies, and crevices that you just can’t get to, and that’s okay! Let the soft Play-Doh dry out for at least a few hours, or better yet for a day or two, then proceed to using dried Play-Doh removal techniques.[6]


Dried Play-Doh
-
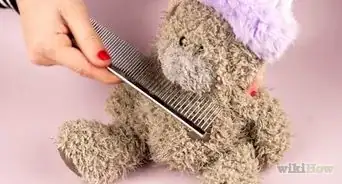
1Scrub the dried Play-Doh vigorously with a stiff-bristled toothbrush. A stiff brush is the best tool for removing dried Play-Doh from carpeting, so it's likely to be a good choice for dried Play-Doh on plastic toys, too.[7] Apply lots of pressure and use a fast brushing motion to knock loose as much of the dried Play-Doh as you can.
- For this job, skip the soft-head toothbrush recommended by your dentist and go for the ultra basic (and stiff) models sold at the dollar store.
- If your Play-Doh toy has multiple parts and you didn’t already disassemble it to get to the Play-Doh while it was still soft, do so now—so long as you’re sure you won’t break the toy.[8]
-
2Dig out bits of dried Play-Doh with a small tool like a toothpick. Just like when trying to pick out soft Play-Doh, many different kinds of household implements will work here. In this case, though, items with sharper tips like toothpicks, skewers, and safety pins are definitely superior in breaking loose hardened bits of Play-Doh.[9]
- Closely supervise kids using tools with sharper tips, or play it safe and do the job yourself.
-
3Soak and rinse the toy, if you don’t mind a hit-or-miss cleaning option. The manufacturer advises against dissolving dried Play-Doh with soap and water because it may actually become more difficult to clean up in its “goopy” state, so take this cleaning tip with a grain of salt.[10] That said, some Play-Doh enthusiasts do find success with this method:
- Soak the Play-Doh crusted toy in hot tap water with a few squirts of dish soap for around 10-15 minutes. Play-Doh is mainly made of materials like wheat flour and salt that dissolve in water.
- Rinse the toy under high-pressure water—like the faucet on full blast or the sprayer attachment—to knock off pieces of loosened Play-Doh. Use your cleaning toothbrush or toothpick to help out as needed.
- Keep in mind that any Play-Doh that you don’t remove will dry out again and perhaps become even more difficult to remove. At this point, you may just want to tip your cap to its resilience and move on!
Sanitizing Hard Plastic Toys
-
1Wipe off any surface debris—like Play-Doh—before sanitizing the toy. Do your best to clean everything you can see on the surface of the toy before sanitizing it. Any material left behind may be able to harbor bacteria, although the odds definitely decrease after you complete the sanitizing process.[11]
-
2Soak the toy in water and chlorine bleach for at least 5 minutes. Combine 1 US gal (3.8 L) of water and 1/3 cup or 3 fl oz (89 ml) of chlorine bleach in a bucket or sink basin. Soak your cleaned hard plastic toy in the mixture for no fewer than 5 minutes. It’s okay to go longer than 5 minutes, but you don’t get additional sanitizing benefits.[12]
-
3Rinse the toy with clean water and let it air dry completely. Make sure to rinse the toy thoroughly to remove any traces of the bleach, especially if you have younger children who may be tempted to put their mouths on the toy. Lay the toy on a drying rack or towel until it dries completely before putting it back into the play rotation.[13]
-
4Use the top rack of your dishwasher as an alternative. Put your dishwasher on its “sanitize” and “heated dry” settings and add detergent as normal. Run a full wash and heated dry cycle, then confirm that the toy is completely dry. If it isn’t, air dry it until it’s free of moisture.[14]
- Most hard plastic toys can handle the top rack of your dishwasher, but you may want to check the toy’s product guide or contact the manufacturer to be sure. Don’t use the bottom rack, or the odds of melting increase greatly.


References
- ↑ https://youtu.be/bZBpRUHUoXM?t=55
- ↑ https://youtu.be/bZBpRUHUoXM?t=5
- ↑ https://playdoh.hasbro.com/en-us#playdohFaqSectionId
- ↑ https://playdoh.hasbro.com/en-us#playdohFaqSectionId
- ↑ https://playdoh.hasbro.com/en-us#playdohFaqSectionId
- ↑ https://playdoh.hasbro.com/en-us#playdohFaqSectionId
- ↑ https://www.goodhousekeeping.com/childrens-products/toy-reviews/g23012842/play-doh-facts/?slide=7
- ↑ https://youtu.be/bZBpRUHUoXM?t=5
- ↑ https://playdoh.hasbro.com/en-us#playdohFaqSectionId
- ↑ https://playdoh.hasbro.com/en-us#playdohFaqSectionId
- ↑ https://utswmed.org/medblog/disinfect-toys-during-covid-19/
- ↑ https://utswmed.org/medblog/disinfect-toys-during-covid-19/
- ↑ https://utswmed.org/medblog/disinfect-toys-during-covid-19/
- ↑ https://www.goodhousekeeping.com/home/cleaning/a31673106/how-to-disinfect-toys/
- ↑ https://www.goodhousekeeping.com/childrens-products/toy-reviews/g23012842/play-doh-facts/?slide=7
- ↑ https://www.bcpft.nhs.uk/documents/policies/i/885-infection-prevention-and-control-assurance-sop-11-cleaning-toys-and-play-equipment/file
About This Article