This article was co-authored by Carlos Alonzo Rivera, MA. Carlos Alonzo Rivera is a guitarist, composer, and educator based in San Francisco, California. He holds a Bachelor of Arts degree in Music from California State University, Chico, as well as a Master of Music degree in Classical Guitar Performance from the San Francisco Conservatory of Music. Carlos specializes in the following genres: classical, jazz. rock, metal and blues.
This article has been viewed 53,841 times.
Breaking a string and having to restring your guitar is intimidating to beginners and intermediates alike. However, you don't have to be a music pro to put new strings on. With a little patience, you can learn to change your own strings quickly, whether you need them for a big gig or you just want to replace a snapped string.
Note: If your guitar has clear nylon strings then, it is a classical guitar. You should click here for advice.
Steps
Removing Old Strings
-
1Change strings that fall out of tune quickly or feel gummy and slow. You should change strings before big shows, or if they start to sound dull or flat. Serious guitarists might change weekly or monthly, while anyone else should aim for new stings every 2-3 months.
-
2Note the position of each string as you remove it. Take a picture of the strings when they're still on, or simply look up a picture of your guitar online.[1] Note the path of the string from top to bottom. While it isn't too difficult, you want a good sense of how the guitar is strung before you get started.[2]Advertisement
-
3Loosen the old strings by down-tuning, usually turning clockwise. Turn the tuning or peg to loosen each string, just enough that you can unwind the rest by hand. You'll know you're loosening if, when plucked, the string sounds deeper. While you can also cut your strings off, this method eases tension gradually and allows you to reuse an old string if one breaks while restringing.
- You should just work on one string at a time to begin. Remove one, replace it, then move on -- this protects your neck from wild changes in tension.[3]
-
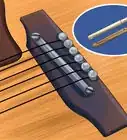
4Remove the strings from the bridge.[4] Once the string is removed from the peg, follow it down to the bridge (right below the acoustic hole). It should be pinned down by a bridge pin. Push the string slightly towards the pin to loosen it, then pull the pin straight out. This should bring the end of the string with it.
- Do not yank the strings or pins out violently.
- Some acoustics are simply threaded through the bridge, and can be pulled out of the opening with ease.[5]
-
5Clean the unstrung guitar with a lint-free cloth, focusing on the now-exposed neck. Remove all of the dust, grime, and dirt from the neck of your guitar with care. This protects new strings, and will make your guitar feel a little faster. For deeper cleaning, purchase a bottle of fret-cleaner from your local music shop and spray that on according to the manufacturer's instructions.


Restringing the Guitar
-
1Purchase the correct strings for your guitar. You should get the "regular" or "lite" strings if you have any doubts or are unsure what to buy. While some guitarists use heavier gauges or odd string configurations to get specific sounds, you can't simply grab a set of strings if your guitar is not made for it. Strings that are too heavy for your guitar will warp or bend the neck without proper adjustments. Just get the regulars or lites until you know more.
- In general, you want your high E to be a ".008-.0011" thickness. This is for medium, lite, and extra lite strings.
- If you use drop tunings frequently, like a drop D, you might want heavier strings. Talk to the staff at your music store for specific questions and recommendations.[6]
-
2Lay the guitar on a flat, soft surface at a comfortable height. Give yourself plenty of room to work, laying the guitar down on a table so that you can adjust it comfortably. You should let the head hang off the edge of the table so that it is easy to turn the pegs. Place a towel or blanket between the guitar and table to prevent scuffing or scratching.
-
3Turn the hole of the tuning post so that it is parallel with the frets on the guitar. This hole should point away from the string so that it is parallel to one of the frets. If you were playing the guitar, the hole would be pointing towards your face.
-
4Open up your first string. In general, most guitarists will begin with their heaviest string, the top E. It will often be marked as "6th string," or by the highest gauge number (usually around .050). Remember, it is often easiest to work one string at a time, so just take care of this one for now. While you can start with any string, the thickest one is the most resistant to snapping, so it is the best one to start practicing with.
-
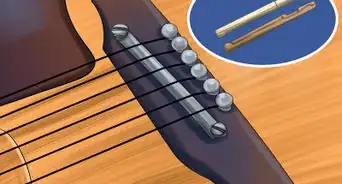
5Bend the last 1/2" of the string near the doughnut-shaped end and feed it into the first hole on the bridge. Simply curl the end of the string around your finger and place it in the bridge, whole. Then re-insert the peg that holds the string in place and pulls on the string -- this will lock it into the bridge and secure the bridge pin.
-
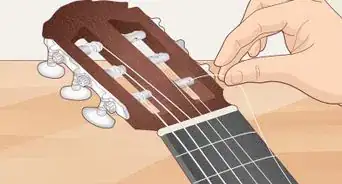
6Thread the string through the hole in the tuning peg, pulling the end away from the guitar.[7] Slide it in the opposite way you took the other strings out, then run it through the hole in the tuning peg, pulling the string away from the guitar. Make sure you leave 2-3 inches of slack as well -- you don't want the string to be completely taut before you start tightening.
- The tuning pegs aren't marked, but you should just replace the strings in the same order you took them out. The first string will go into the bottom left peg, if you're looking straight at the guitar.[8]
-
7Grab the string on both sides of the peg and crimp it into place. Grab ahold of both ends of the string, then crimp them around the tuning peg by pulling down on the right hand (the end of the string by the neck) and up on the left hand (the very end of the new string).
- Your right hand will be coming towards your body, away from the headstock.
- Your left hand will be pushing up, in towards the other tuning pegs on the head.
-
8Loop the end of the string back under half towards the fretboard.[9] Grab the end of the string and loop it underneath the main body of the string, then wrap it up and over, pulling it down towards the top of the guitar. Think of it as snaking the end of the string around the point where the string meets the peg -- like a DNA double-helix.
-
9Hold down the body of the string as you tighten it. Place your index finger down on the string an inch or two before it meets the tuning peg. Hold the string down onto the head of the guitar. From here, turn the tuner counter-clockwise to tighten it. Make sure that your string is winding around the peg in a uniform manner as it wraps around.
- Use a tuner to slowly get yourself up to the proper tension. Once you've got most of the slack out, turn the tuner out and check the string as you tighten.
-
10Repeat the process on the rest of the strings, reversing the directions for the second set of three. Once you've got the first string on, keep going on the rest of the strings, working through the entire packet. Most acoustics are strung with a 3x3 pattern, where the head has two sets of three tuning pegs. For the second set, simply reverse the instructions, replacing right hand with left and up with down.
-
11Cut the ends of the string off, leaving a little room at the end. Use wire cutters to snip away the excess string. You may want to leave a 1/2" to allow deeper tunings, though it is not strictly necessary.
-
12Tune your guitar frequently once the new strings are on.[10] Strings stretch out as they get used to the tension. It will stop after a day or two, but you can speed the process up with regular tuning to get the string into the right length..


Expert Q&A
-
QuestionHow do you replace classical guitar strings?
 Carlos Alonzo Rivera, MACarlos Alonzo Rivera is a guitarist, composer, and educator based in San Francisco, California. He holds a Bachelor of Arts degree in Music from California State University, Chico, as well as a Master of Music degree in Classical Guitar Performance from the San Francisco Conservatory of Music. Carlos specializes in the following genres: classical, jazz. rock, metal and blues.
Professional GuitaristThe bridge part of a classical guitar does not have pegs, it usually contains one hole, unlike a steel-string guitar. You first slide one string in one end of the hole, usually to the end of the hole that's facing the guitar Fretboard. Once the string is inserted loop it back around and then you have to tie a couple of loops on the bridge. Double-check to make sure the string is secure. Thereafter do the same thing and string it up on the tuning peg. If you are changing string for the first time, I would recommend looking at pictures and how-to videos. -
QuestionA D string broke and when I tried to remove it from the bridge (no pins) to replace it, it would not pull out. I finally took a pair of needle nosed pliers and pulled the string out. I thought that would solve the problem, but it didn't, because when I tried to put the new string through the bridge hole, it wouldn't pass through. Something is stuck in the bridge hole, I don't know what or how. Any suggestions about how to clear the hole safely?
 SgtPotatoCommunity AnswerUse a small safety pin or thin paper clip.
 -
QuestionIs it safe to remove all the strings at once like above? Could doing that damage the neck of the guitar due to lack of tension?
 Community AnswerIt will not damage the neck of the guitar; I have been playing the guitar for 5 years, and I remove all the strings on my guitar at once. I would suggest doing this if you're new to the guitar, because you might forget which ones you have already changed.
Warnings
- It's dangerous when you are cutting the string off. You can hold the string with a cloth so that the string will not spring.⧼thumbs_response⧽
- Be sure to take the string off and put the new one on before taking another string off. This could bend the neck of your guitar!⧼thumbs_response⧽
Things You'll Need
- New guitar strings
- Pliers
- clippers (for cutting the strings off)
- Cloth (to clean your guitar)

References
- ↑ Carlos Alonzo Rivera, MA. Professional Guitarist. Expert Interview. 27 August 2019.
- ↑ www.dummies.com/how-to/content/removing-old-guitar-strings.html
- ↑ Guitar All-in-One for Dummies, Off with the Old: Removing Stressed Strings, p. 48, (2009), ISBN 978-0-470-48133-2
- ↑ Carlos Alonzo Rivera, MA. Professional Guitarist. Expert Interview. 27 August 2019.
- ↑ www.dummies.com/how-to/content/removing-old-guitar-strings.html
- ↑ http://thehub.musiciansfriend.com/guitar-buying-guides/how-to-choose-the-right-strings-for-your-electric-guitar
- ↑ Carlos Alonzo Rivera, MA. Professional Guitarist. Expert Interview. 27 August 2019.
- ↑ http://thehub.musiciansfriend.com/guitar-buying-guides/how-to-choose-the-right-strings-for-your-electric-guitar
- ↑ Carlos Alonzo Rivera, MA. Professional Guitarist. Expert Interview. 27 August 2019.
- ↑ Carlos Alonzo Rivera, MA. Professional Guitarist. Expert Interview. 27 August 2019.
About This Article

To change strings on an acoustic guitar, start by turning the pegs for each string clockwise to loosen them. Then, loosen and remove the pins at the end of the bridge. When you’re ready to put the new strings on, bend the string near the doughnut-shaped end and feed it into the first hole on the bridge. Continue to thread the string through the hole until you can crimp it around the peg. Once you finish replacing the first string, repeat the process for the other 5 strings. To learn how to tighten and trim the new strings, keep reading!