This article was co-authored by Aaron Asghari and by wikiHow staff writer, Jennifer Mueller, JD. Aaron Asghari is a Professional Guitarist and the lead guitarist of The Ghost Next Door. He received his degree in Guitar Performance from the Guitar Institute of Technology program in Los Angeles. In addition to writing and performing with The Ghost Next Door, he is the founder and primary guitar instructor of Asghari Guitar Lessons.
There are 7 references cited in this article, which can be found at the bottom of the page.
wikiHow marks an article as reader-approved once it receives enough positive feedback. This article received 12 testimonials and 100% of readers who voted found it helpful, earning it our reader-approved status.
This article has been viewed 4,599,826 times.
Changing your guitar strings at least once a month will keep your instrument sounding its best. No need to take it back to the guitar shop to get that done, though—restringing a guitar is a pretty simple task that you can do with just a couple of tools. Read on to learn how to change your guitar strings yourself, whether you have an acoustic or electric instrument.
Things You Should Know
- Place your guitar on a towel on a flat table and balance the neck with a stack of books so it's level and secure.
- Unwind the old strings with the tuning knobs first, then remove them from the bridge, starting with the highest, thinnest string.
- Put your new strings into the bridge and pull them up and through the tuning pegs, starting with the thickest, lowest string.
- Wind your strings on the tuning pegs and tune your guitar. Then, trim the tails off with wire cutters.
Steps
Basic Setup
-
1Lay your guitar on a clean, flat surface. Find a calm area without a lot of background noise or activity so you can hear the sounds of the strings. Lay a towel down over the table so you won't accidentally scratch the back of your guitar.[1]
-
2Gather your new strings, wire cutters, and a string winder. Restringing a guitar doesn't take a lot of tools. Most string winders come with a notch that you can use to pop out the bridge pins (if you have an acoustic guitar). Wire cutters come in handy for trimming the long tails off the ends once you're done, so they don't poke or scratch you.[2]
- Choose your new guitar strings based on your personal taste, your budget, and the sound you want from your instrument.
- If you're not skilled at tuning your guitar by ear, have a tuner nearby as well (whatever you prefer to use).
Advertisement -
3Balance the neck of your guitar. Experienced luthiers have equipment specifically built for this, but all you need is a stack of books at the right height to keep the neck nice and level. Place a towel over the stack to keep your guitar from getting scratched.[3]


Restringing an Acoustic Guitar
-
1Turn the tuning knob to unwind each string. Start with the highest, thinnest string and loosen it up. You might pluck the string to make sure you're turning the correct tuning knob in the right way—if the pitch lowers, you're unwinding it. Go ahead and loosen all of the strings, moving from the highest to the lowest.[4]
- You don't need a string winder for this—you can just use your fingers—but the string winder makes the job go a lot faster.
-
2Remove the strings from the bridge of the guitar. Use the slot on your string winder to pop the pins out. A set of needle-nose pliers works just as well if your string winder doesn't have the slot for the bridge pins. Once you pull the pin out, pull the string out and away from your guitar.[5]
- Since the strings are off the neck, it doesn't matter what order you go in here.
- While all the strings are off, you have a great opportunity to clean your guitar and the fretboard.
- Despite what you might have heard, nothing bad is going to happen to your guitar if you take all the strings off at once. You can do them one at a time if you want, but the whole process will likely take you longer.[6]
-
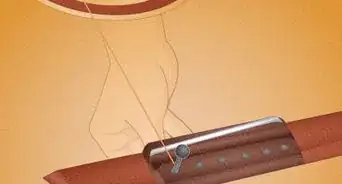
3Insert each new string into the bridge and secure the bridge pins. Bend the string at a 90-degree angle just above the ball-end so it'll catch. That'll keep it from sliding down too far when you put the bridge pin back in. Now, push the pin back in with your thumb. Go ahead and do that with all 6 strings.[7]
- Start with the thickest, lowest string and move to the thinnest, highest string. That's the same order that you'll wind them.
-
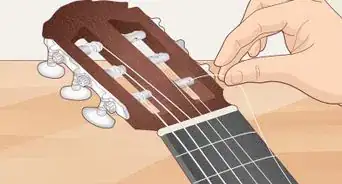
4Pull each string up toward the headstock and through its tuning post. Starting with the thickest, lowest string, pull the string up and across the groove in the nut. Then, slot it through the hole in its tuning post. Pull it through until you've got about 2 to 3 inches (5.1 to 7.6 cm) of excess string tailing out of the tuning post.[8]
-
5Wind each string toward the center of the headstock. Take the thickest, lowest string and start winding it. For the first revolution, wind the string over the hole in the tuning post. For the rest of the revolutions, wind the string under the hole in the tuning post. This locks the string so it won't slip out of tune.[9]
- Move from the thickest, lowest string to the thinnest, highest string, winding each string completely before moving on to the next one.
-
6Trim the excess string with your wire cutters. Since you've locked the string, you can cut as close as 0.5 inches (1.3 cm) from the tuning post. This keeps the sharp points of the string from scratching or poking you as you play your guitar.[10]
- If you're not confident that the string won't slip, wait until after you've tuned your guitar to trim the excess string. That way, it'll be easier to thread it back through and rewind it.
-
7Tune your guitar to pitch. As you tune, stretch your strings a bit—they'll hold their pitch better so you don't have to retune as often. This is pretty important if you play frequently. To stretch them, hold each string up about 0.5 inches (1.3 cm) and slide your finger toward the nut, then do the same thing in the other direction.


Restringing an Electric Guitar
-
1Loosen the strings at the headstock. Turn the tuning knobs of each string to loosen them—just to the point that they don't make any sound when you try to pluck them. You don't have to unwind them completely.[11]
-
2Cut the strings with wire cutters and remove them. Gather the strings together around the neck pickup and cut through them cleanly with the wire cutters. Take care that the sharp ends don't poke you. Then, pull the strings out of the guitar completely.[12]
-
3Push the strings up through the saddle. For most electric guitars, simply poke the non-ball-end of your string through the rear of your guitar and up and over the bridge. There are a couple of special styles, though, that have a different system:[13]
- Floyd Rose and tremolo systems: snip off the ball-end and poke the end of the string into the saddle until it's centered, then trap it there.
- Les Paul-style: feed the non-bell-end of the string through the guitar's tailpiece and keep pulling until it hits the bell-end and stops.
-
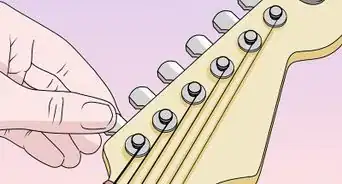
4Thread the strings through the tuner from the inside out. Align the tuning posts so that the holes run perpendicular to the neck of the guitar. Feed each string through the inside hole of its tuning post so that it goes out the other end.[14]
- If your guitar doesn't have a locking nut, feed the tail end of the string back around the tuner and under the string. That creates a kink in the string that will help hold it in place.[15]
-
5Tighten the strings on the tuners. If you don't have a locking nut, make sure each string is sitting in the right groove on the nut as you tighten it. Use your string winder to make this process go faster.[16]
- If you have a tremolo system, reset each fine tuner screw in the middle of its range as well.
-
6Stretch your strings one at a time as you tune. Tune by ear or use whatever electronic tuner you prefer to get your guitar up to pitch. Then, lift each string about 0.5 inches (1.3 cm) away from the neck and run your finger up toward the nut as you gently pull down on the string with your other hand. Then, do the opposite. Do this at least a couple of times with your strings, then tune them again.[17]
-
7Trim the ends of the strings with wire cutters. Cut the tails of your strings about 0.5 inches (1.3 cm) away from the tuning post. Since your strings are stretched and secure, you can cut them just as close as possible to avoid any accidental pokes or scratches.[18]


Community Q&A
-
QuestionCould I use the same strings I took out if I was only taking them out so I could replace the broken one?
 Community AnswerYou could, but it's best to replace all the strings, especially if they're old. Mixing old strings with new strings, or different types of strings, would likely sound bad/different.
 -
QuestionIs there something that I can use for my fingers that I can use for protection to avoid pains while playing guitar?
 Community AnswerPain in your fingers is normal when you first start playing. Over time, your finger pads will develop callouses that will protect them. Just be patient and stop when you need to.
 -
QuestionAre nylon strings easier on your fingers?Community AnswerIt is a matter of personal experience and preference, but they should be a little bit easier on your fingers.
Things You'll Need
- Towel
- Stack of books to balance the neck
- Guitar strings
- Wire cutters
- String winder
- Tuner


References
- ↑ https://bpb-us-e1.wpmucdn.com/sites.psu.edu/dist/7/11774/files/2014/04/Smith-Instruction-Set-Final-Draft.pdf
- ↑ https://youtu.be/qXaMn4jkxDM?t=13
- ↑ https://bpb-us-e1.wpmucdn.com/sites.psu.edu/dist/7/11774/files/2014/04/Smith-Instruction-Set-Final-Draft.pdf
- ↑ https://bpb-us-e1.wpmucdn.com/sites.psu.edu/dist/7/11774/files/2014/04/Smith-Instruction-Set-Final-Draft.pdf
- ↑ https://youtu.be/qXaMn4jkxDM?t=85
- ↑ https://youtu.be/qXaMn4jkxDM?t=48
- ↑ https://bpb-us-e1.wpmucdn.com/sites.psu.edu/dist/7/11774/files/2014/04/Smith-Instruction-Set-Final-Draft.pdf
- ↑ https://bpb-us-e1.wpmucdn.com/sites.psu.edu/dist/7/11774/files/2014/04/Smith-Instruction-Set-Final-Draft.pdf
- ↑ https://www.mi.edu/education/9-reasons-youre-guitar-wont-stay-tuned/
- ↑ https://bpb-us-e1.wpmucdn.com/sites.psu.edu/dist/7/11774/files/2014/04/Smith-Instruction-Set-Final-Draft.pdf
- ↑ https://www.academia.edu/37054471/Electric_Guitar_Service_Manual
- ↑ https://www.academia.edu/37054471/Electric_Guitar_Service_Manual
- ↑ https://www.guitarworld.com/features/how-to-restring-an-electric-guitar
- ↑ https://www.academia.edu/37054471/Electric_Guitar_Service_Manual
- ↑ https://www.guitarworld.com/features/how-to-restring-an-electric-guitar
- ↑ https://www.guitarworld.com/features/how-to-restring-an-electric-guitar
- ↑ https://www.mi.edu/education/9-reasons-youre-guitar-wont-stay-tuned/
- ↑ https://www.guitarworld.com/features/how-to-restring-an-electric-guitar
About This Article

To change guitar strings, start by loosening the old strings and removing the bridge pins. Next, insert the knob end of the new string into the peg hole, stretch it up to the appropriate tuning peg, and thread the end through the hole in the peg. Pull the string tight, turn the tuning key, and wind the string several times around the peg. Once the new strings are in place, tune your guitar and snip off the excess strings with wire cutters. To learn the differences between changing strings on an acoustic and an electric guitar, keep reading the article!