This article was co-authored by wikiHow staff writer, Jack Lloyd. Jack Lloyd is a Technology Writer and Editor for wikiHow. He has over two years of experience writing and editing technology-related articles. He is technology enthusiast and an English teacher.
The wikiHow Tech Team also followed the article's instructions and verified that they work.
This article has been viewed 447,302 times.
Learn more...
This article teaches you how to build a working elevator in Minecraft. While it's possible to build an elevator using advanced Survival mode materials, you'll usually want to create this elevator in Creative mode. The elevator template used in this article will work on desktop, Pocket Edition, and console versions of Minecraft (including the Nintendo Switch).
Steps
Creating the Elevator's Base
-
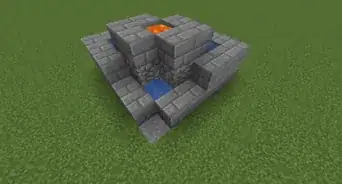
1Dig the foundation. Create a four-block-wide, three-block-long, and four-block deep hole. Make sure that you do this below the area from which you want your elevator to launch.[1]
- For example, if you have a basement's foundation laid out, you'll need to dig this hole in the bottom of the basement's foundation.
-
2Face a three-block-wide side. It doesn't matter which side of the foundation you face.Advertisement
-
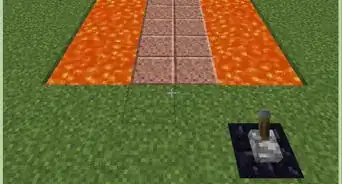
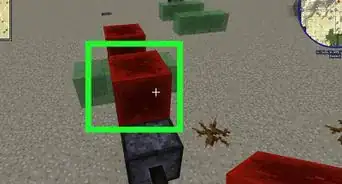
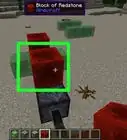
3Replace the middle block in the second row of the floor with obsidian. This means that the first row of the floor out from the three-wide wall will have no obsidian, but the next row will have a block of obsidian instead of a block of dirt (or stone, or whatever the floor's material is).
-
4Reposition yourself. Stand behind the obsidian block and face the four-block-wide side, ensuring that the shorter side of the foundation is to your right and the longer end is to your left.
- This is extremely important, so make sure that you're positioned correctly before proceeding.
-
5Remove the block between the obsidian block and the wall. This will create a one-block-deep hole in the floor of the foundation.
-
6Remove a one-block perimeter from the foundation. Your foundation should now be 5 blocks wide, 4 blocks long, and 4 blocks deep.
-
7Reposition yourself again. You should now be facing the obsidian with the shorter end of the foundation on your left and the longer end to your right.
-
8Add observer blocks. Place an upward-facing observer on top of the obsidian, then add an upward facing observer two blocks up and one to the left.
-
9Remove the block that's touching the bottom-left corner of the obsidian. You should now have a two-block-wide, one-block-deep trench between you and the obsidian block.
-
10Add slime blocks. The slime blocks will go on top of (but not in) the trench.
-
11Add your sticky pistons. You'll place an upward-facing sticky piston on the right-most slime block and a downward-facing sticky piston on the left-most slime block.
- You may have to dig a temporary hole in order to get the correct angle needed to place a downward-facing sticky piston.
-
12Place a slime block on top of each of the sticky pistons. This creates the base for your elevator floor.
-
13Create the elevator's floor. Place a block of your choice (preferably stone) on top of each of the slime blocks. You now have the apparatus that will act as the moving part of the elevator.


Creating the Elevator's Switch
-
1Place a regular piston. Face the three-wide wall so that the bottom observer block is on your right, then place the piston on the floor block immediately in front of you. The piston should be facing you and touching the corner of the observer block, leaving the space directly in front of the observer block free.
-
2Place a stone block behind the piston. This block should go directly behind the piston, leaving one row of space between the block and the back wall.
-
3Create a stone "staircase" shape. Place a stone block one up and one right from behind the piston, then place another stone block one up and one right from there. You should have a set of three stone blocks behind the piston in a staircase shape.
-
4Add a stone block directly above the top staircase block at ground level. This means you'll have to place a block on top of the top staircase block, place a stone block on top of that, and then remove the first block that you place.
-
5Add redstone dust to the staircase. Select redstone dust in your inventory, then select each of the three descending stone blocks.
- Leave the floating stone block that you placed in the last step empty.
-
6Add a button to the floating stone block. This button should be on the side of the stone block that's facing your elevator's floor.
- Do not press the button yet—doing so will cause the elevator floor and base to fly into the sky, never to be seen again.


Creating the Elevator's Top
-
1Create a placeholder column on top of the top observer block. Place a one-block-wide column of blocks on top of the top observer.
- The placeholder should be as many blocks high as you want the elevator to be able to travel.
-
2Place a block of obsidian at the top of the placeholder. This is the block that will stop the elevator from traveling indefinitely.
-
3Remove the placeholder. Remove all blocks from the placeholder column, but make sure that you leave the obsidian block in place.
-
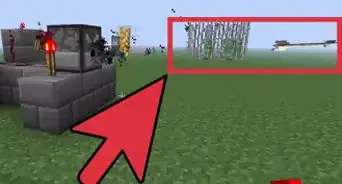
4Activate your elevator. Select the button next to the elevator's floor to do so. The elevator will travel up until it hits the obsidian block.
-
5Add another piston. To do this, face the floor with the block of obsidian closest to you, place a placeholder on the right-hand side of the observer block that's below the obsidian, and then place a piston on the placeholder block facing toward your left.
- With the observer block's face looking at you, the piston should be facing left.
-
6Remove the placeholder block. You should now have a floating, left-facing piston.
-
7Place a row of three stone blocks behind the piston. Place the first block directly behind the piston, place the second block to the right of the first block, and place the third block to the right of the second block.
-
8Add a floating stone block above the third stone block. Place a block on top of the right-most stone block in the row, place a stone on top of that, and remove the first block that you placed in this step.
- At this point, when facing the back of the piston, you should see a three-wide row of stone blocks with a floating stone block above the right-most block in the row.
-
9Place redstone on the three-block column. You'll be left with a three-block-long line of redstone dust.
-
10Add the elevator's "Down" button. This button should go on the side of the floating stone block that's facing the elevator's floor. You now have a fully functional elevator that will travel up and down with the push of a button.
- You can dress up the elevator with walls, doors, and so on.


Community Q&A
-
QuestionWhat materials do I need?
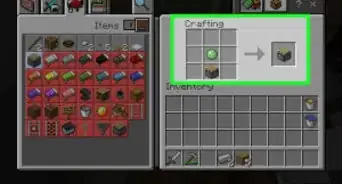
 Community AnswerYou will need: pistons, wood (or any solid block), Redstone torches, Redstone repeaters, and 1 wooden stair block (or any other stair block).
 -
QuestionWhat do I do if I built the elevator and it works, but I don't know how to go up?
 Community AnswerWhen you build it, you have to stand on the pressure plate on the bottom left.
 -
QuestionDose it work for PE?
 Community AnswerYes, this will work with PE since pistons work the same in PE as in PC or console edition.
Warnings
- If you do build your elevator in Survival mode, make sure that you have a secondary staircase as well just in case your elevator is damaged or you fall off.⧼thumbs_response⧽