This article was co-authored by wikiHow staff writer, Jack Lloyd. Jack Lloyd is a Technology Writer and Editor for wikiHow. He has over two years of experience writing and editing technology-related articles. He is technology enthusiast and an English teacher.
The wikiHow Tech Team also followed the article's instructions and verified that they work.
This article has been viewed 541,885 times.
Learn more...
As you progress through Minecraft, you'll start realizing that walking is not a very effective way to travel long distances. Sprinting could be a better choice, but that drains hunger bars. Therefore, making a railway system is the obvious choice. Generally, rail systems are simple to make, and they can be very effective ways to travel quickly through long distances.
Steps
Crafting Components
-
1Decide on how long you want your railway to be. Your railway can be as long as you want it to be, but you'll need to know roughly how many blocks it will traverse so that you know how many rails to create.
- Try walking from point A of your planned railway to point B. This will help you plan out your route as well as make you aware of any obstacles in your way.
-
2Know the components of a railway. There are four main items that you'll use to create your railway:
- Minecart - The "train" section of your railway. This is how you will move from point A to point B.
- Rails - Basic rails on which your minecart will travel.
- Powered Rails - Rails activated by redstone that will speed up your minecart (or keep it moving). Powered rails that don't have redstone powering them will slow (and eventually stop) your cart.
- Redstone Torches - The power source for each section of 14 powered rails. Not necessary for regular rails.
Advertisement -
3Gather the necessary resources. To create a railway system, you'll need the following items:
- Iron bars - For each 16 rails that you want to make, you'll need six iron bars. You'll also need five iron bars to make a minecart. You can make iron by smelting iron ore in a furnace.
- Sticks - For each 16 rails that you want to make, you'll need one stick. You'll also need one stick per lever and redstone torch. You can craft four sticks by adding two planks (one on top of the other) to the crafting table interface.
- Gold bars - Used to create powered rails. You'll need six gold bars for each stack of six powered rails that you want to make. You can make gold by smelting gold ore in a furnace.
- Redstone - Mine redstone blocks with an iron pickaxe (or better).
- Cobblestone - You'll need one cobblestone per lever.
-
4Open your Crafting Table. Face the Crafting Table and select it to open the crafting interface.
-
5Craft your minecart. Place an iron bar in the top-left, top-right, middle-left, center, and middle-right squares in the crafting table, then click or tab the minecart icon and click or tap your inventory to move it to your inventory.
-
6Craft rails. Place one iron bar in each of the squares in the far-left and far-right columns of the crafting interface, place one stick in the middle square of the crafting interface, and then move the rails to your inventory.
- This will create one set of 16 rails, so feel free to multiply these ingredients by the number of sets you want to create.
- On console editions, scroll over to the "Redstone and Transportation" tab, select the "Rails" option, and press A or X until you've created enough rails.
-
7Craft powered rails. You'll need significantly fewer powered rails than regular rails. Place one gold bar in each of the squares in the far-left and far-right columns of the crafting interface, place one stick in the middle square of the crafting interface, and place one redstone in the bottom-middle square. Move the resulting powered rails into your inventory.
- This will create one set of 6 powered rails, so feel free to multiply these ingredients by the number of sets you want to create.
- On console editions, scroll over to the "Redstone and Transportation" tab, select the "Rails" option, scroll down to the "Powered Rails" option, and press A or X until you've created enough rails.
-
8Craft redstone torches. Place an equal number of sticks and redstones in the bottom-middle and center squares of the crafting table respectively, then move the resulting torches to your inventory.
-
9Craft levers. Place an equal number of cobblestone blocks and sticks in the bottom-middle and center squares of the crafting table respectively, then move the resulting levers to your inventory. You're now ready to create your railway system.


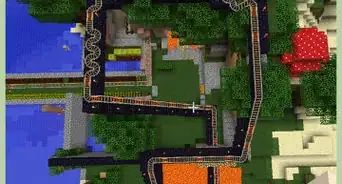
Building the Railway
-
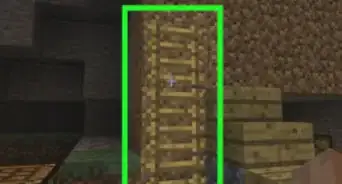
1Equip your rails. Select the rails in your equip bar at the bottom of the screen.
-
2Place your rails. Face the ground, then right-click, tap, or press the left trigger to place your rails.
- You can run tracks up and down hills.
- If you place a track at a 90-degree angle to the main track, it will automatically connect via a bend.
-
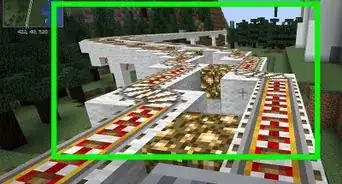
3Add powered rails. You don't need long sections of these, but you should place them intermittently throughout the railway system to keep your cart moving.
- This especially applies if you want your cart to go up a hill.
-
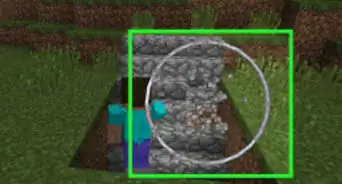
4Place redstone torches next to powered rails. This will activate them permanently. If your powered rails aren't activated by redstone, they'll slow and eventually stop your minecart.
- One redstone torch will power the closest 14 connected powered rails.
-
5Place levers next to rails that you want to control. A lever next to a powered rail will allow you to turn off or on the rail, which is useful if you want to make a stop at a specific point along the railway system.
-
6Put a solid block at the beginning and end of your rail. This will prevent your minecart from flying off of the rail or getting stuck.
- If you don't do this, your minecart will derail at the end of the rail and you'll have to create a new one.
-
7Place your minecart at the beginning of the rail. Select the minecart in your equip bar, face the beginning of the rail, and right-click, tap, or press the left trigger.
-
8Hop into your minecart. Face your minecart and select it to jump in.
-
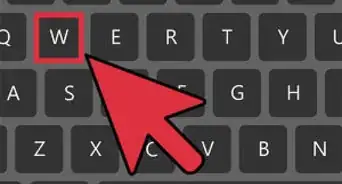
9Face forward and press the "Forward" option. The default "Forward" action is pressing W on a computer, tapping the upward-facing arrow on Minecraft PE, and moving the left analog stick up on console editions. Your minecart will immediately begin to move down the track.
- You can reverse the minecart's direction by facing the other way and pressing the "Forward" option again.


Community Q&A
-
QuestionHow do I turn a corner on the railway line?
 peterptronCommunity AnswerThe tracks automatically adapt to corners; however, powered rails cannot turn corners.
 -
QuestionHow can I build a realistic train in Minecraft?
 Community AnswerThis can only be done using mods. Vanilla Minecraft only provides the usual minecarts. Mods you can consider are Traincraft and Railcraft.
 -
QuestionHow do you drive a mine cart up a mountain, or even just a small hill?
 Community AnswerIf you want to build up a hill, just place redstone rails up the hill and power with levers, or any other redstone power source.
Warnings
- Creating a railway system can be incredibly time-consuming in Survival mode. Switch to Creative mode if you just want to focus on making the railway without worrying about gathering resources and crafting components.⧼thumbs_response⧽


About This Article
1. Craft a minecart.
2. Craft rails and powered rails.
3. Craft redstone torches.
4. Craft a lever.
5. Equip and place your rails.
6. Place redstone torches next to powered rails.
7. Place levers next to rails you want to control.
8. Put solid blocks and minecarts at the beginning and end.