X
wikiHow is a “wiki,” similar to Wikipedia, which means that many of our articles are co-written by multiple authors. To create this article, volunteer authors worked to edit and improve it over time.
This article has been viewed 155,245 times.
Learn more...
One of the processes you should learn as a beginner in Visual Basic is how to add a timer. A timer can be useful when creating games, quizzes, or to limit the time a certain page is viewed. Here are some simple steps in how to add a timer to your Visual Basic application. Please note, you can change and adapt this process to suit the needs of your Visual Basic application. The numbers and layout i have used is only for example.
Steps
-
1Add a label to your form. This will hold the number that you want to be linked with the timer.
-
2Add a button to your form. This will initiate the timer to start.Advertisement
-
3Add a timer to your form. You can find the timer function in the toolbox -> components -> timer
-
4Change the properties for the Timer1 component. Under "Behavior" change "Enabled" to "False" and "Interval" to "1000".
-
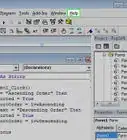
5Double-click the Timer1 component and add the correct coding.
-
6Double-Click the button you have used to commence the timer and add the correct coding.
-
7Start debugging. Test your timer, making sure it works correctly and stops at 0.


Advertisement
Community Q&A
-
QuestionWhat is the max time a timer can take? Can I make something pop up every 4 hours, or is that too long?
 Community AnswerMax time for a timer is 60000 milliseconds, or 30 minutes, so you can't make it for 4 hours.
Advertisement
Things You'll Need
- Microsoft Visual Basic


About This Article
Advertisement