This article was co-authored by Monica Morris. Monica Morris is an ACE (American Council on Exercise) Certified Personal Trainer based in the San Francisco Bay Area. With over 15 years of fitness training experience, Monica started her own physical training practice and gained her ACE Certification in 2017. Her workouts emphasize proper warm-ups, cool-downs, and stretching techniques.
There are 7 references cited in this article, which can be found at the bottom of the page.
This article has been viewed 37,766 times.
Since there is no single muscle that comprises the lower chest, it can be a tough area to work out. For this reason, the best way to work your lower chest is to use more than one exercise that targets the area. By changing the incline or decline of your body, you can use conventional exercises for your pecs to focus on your lower chest. Dips and cable crossovers are also helpful exercises to use for building your lower pecs. Combine 2 or 3 of these exercises for an effective routine that will bulk up your lower chest.
Steps
Warming up with Incline Push-Ups
-
1Place your hands on the edge of a bench. In order to help engage the lower pectoral muscles, the bench should be at least 2 feet (0.61 m) high.[1]
- One of the benefits of the incline push up is that you can do it anywhere. If you like to exercise at home, do incline pushups against a bed, heavy chair, or low coffee table.
- Another variation of the push-up that you can try is the diamond push-up. For this type of push-up, you would place your hands on the floor so that your index fingers and thumbs are touching to form a diamond. Then, do push-ups with your hands in this position.
-
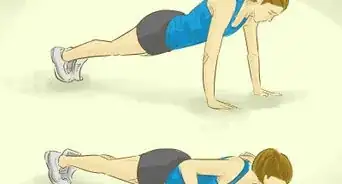
2Hold your body in the ‘plank’ position. This is the standard push-up position: knees locked, back straight, and arms bent. Keep your toes flat on the floor behind you.[2]Advertisement
-
3Lower yourself until your chest touches the bench. Bend your elbows to let your body sink down slowly. Then push your torso away from the bench until your arms are fully extended again.[3]
- Do not let your body fall forward and collide with the bench. Both the descent and the push-up portion should be slow and controlled.
-
4Perform 2 to 3 sets of 12 to 15 push-ups. This will give your lower chest a thorough warm-up. In between the sets, you can rest for 1 or 2 minutes.[4]
- Push-ups are a great exercise and can be done on their own. If you’re at a gym and planning to work out with weights also, be sure to do push-ups first. They’ll warm up your pecs before the subsequent weight training.[5]
Doing a Decline Bench Press
-
1Set the bench at a decline between 20 and 40 degrees. A decline means that your body will be lower at your head/shoulders and higher at your knees. This will force the lower portions of your pecs to do a majority of the lifting.[6]
- The amount of decline can increase as you become more comfortable with this exercise. Set the decline to 20 degrees your first time and increase it to 25, 30, 35, and 40 degrees over the next few weeks.
- The best way to gain access to a decline bench is through joining a local gym. Or, if you are planning to put together a private home gym, you can find decline benches for purchase.
-
2Grip the bar with your hands at or less than shoulder-width apart. Situating your hands at or less than shoulder-width apart on the bar will focus more on the chest muscles than would be if you kept your hands farther apart.[7]
- Always make sure to try new lifts with less weight than you would normally use to avoid injury.
-
3Lower the weight slowly and exhale as you do so. Bend your elbows slowly and use the muscles in your triceps and lower chest to control the bar as it sinks. Let it briefly rest on your chest while you inhale.[8]
- Never let the bar fall or ‘bounce’ against your chest. You could cause yourself serious injury, and it’s incorrect form.
-
4Push the weight back up until your arms are nearly extended. Use your lower pectorals to push the bar slowly up, and exhale as you push. The bench press is complete when your arms are mostly extended, with a very slight bend in your elbows.[9]
- Do not lock your elbows when your arms are extended. Always keep a slight bend in your elbows, since locking them will put pressure on your joint and may lead to elbow damage.
-
5Perform 2 to 6 sets of 6 to 12 repetitions. Start with 2 sets of 6. As you build muscle in your lower chest and feel more comfortable pressing at an increased decline, you can increase the number of reps and sets.[10]
Building Your Chest with Dips
-
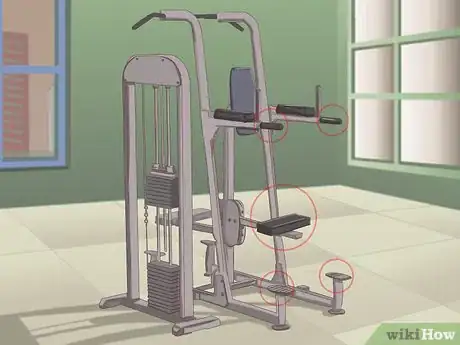
1Grasp the handles of the dip machine. The dip machine should be easy to spot: it will have a small platform for your feet, and two bars for your hands. These handles will each be about 8 inches (20 cm) long, and roughly 18 inches (46 cm) to 24 inches (61 cm) apart.[11]
- If your gym doesn’t have a dip machine, or if it’s in use, you can also perform dips on parallel bars.
-
2Lower your body until your mid-chest is level with the handles. Then, lean forward so that your upper body is at least at a 30-degree angle. Let your body weight pull you downwards, but control the motion with the muscles in your triceps and lower chest. Slowly lower yourself until the center of your chest is even with the handles. Your forearms should be parallel to the ground[12]
- Do not let your body weight abruptly fall, or you will risk damaging your shoulders.
- You can also do this exercise by placing your hands on two parallel benches or using hex dumbbells.
-
3Extend your arms fully. Once you’ve lowered your body between the handles of the dip machine, use your triceps to push yourself upwards until your arms are fully extended. Exhale slowly as you push yourself upwards.[13]
- When your arms are fully extended, your feet will be dangling off the ground.
-
4Perform 2 to 6 sets of 6 to 12 repetitions. As with the decline bench press, start with 2 sets of 6 dips and build from there.[14]
Performing Cable Crossovers
-
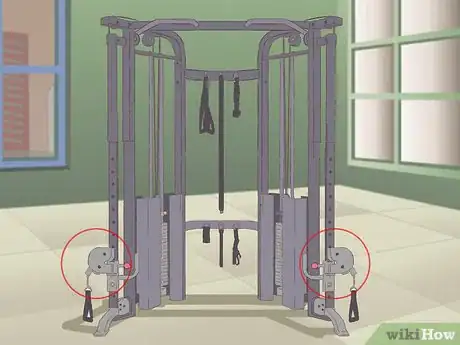
1Attach the desired amount of weight to each side of a dual pulley machine. Unlike other pulley machines, the one you’ll use for crossovers allows you to set weights for each side separately. Set them both to the same weight, and make sure that the cable pulleys are set in a low position as near to the floor as possible.[15]
- Some cable machines have different grip attachments that can be attached. For cable crossovers, make sure to attach the single-grip cable attachments on either side.
-
2Stand with legs shoulder-width apart and lean your body weight forward. Make sure that you have a firm grasp on one of the handles in each hand.[16]
- Based on personal preference, you can stand with your feet side by side, or with one slightly in front of the other. You can leave your feet in whichever position you choose for the entire time you’re performing this exercise.
-
3Pull your arms upward and inward. Starting with your arms extended towards the floor, use your chest muscles and biceps to bring your arms up and forward until both arms are in front of your body, pointing straight ahead. When you’ve brought your arms fully forward, your knuckles should just touch.[17]
- This exercise will be more effective if you pull your shoulders back and keep them that way. Otherwise, your deltoids will do most of the work.[18] Keep your arms slightly bent during this exercise. Avoid locking your elbows, or you’ll place a strain on the joint.
-
4Lower your arms until they’re back at your sides. Don’t let the weights abruptly fall, or you’ll risk damaging your shoulders or elbows. Use your pecs and biceps to slowly lower the weights and exhale continually as your arms return to your sides.[19]
-
5Perform 2 to 5 sets of 6 to 12 reps. As you become more accustomed to this exercise and begin to build your lower-chest strength, you can increase the amount of reps and of sets.[20] Or, keep the number of sets and reps the same but increase the weight on both sides of the cable machine.
Expert Q&A
-
QuestionHow can I workout my lower chest at home?
 Monica MorrisMonica Morris is an ACE (American Council on Exercise) Certified Personal Trainer based in the San Francisco Bay Area. With over 15 years of fitness training experience, Monica started her own physical training practice and gained her ACE Certification in 2017. Her workouts emphasize proper warm-ups, cool-downs, and stretching techniques.
ACE Certified Personal Trainer You can do a lot with a few dumbbells. Bent over rows are a great option, as are chest presses and chest flys. If you don't have weights, push ups, pull ups, and dips will all work your upper body out.
References
- ↑ https://wwws.fitnessrepublic.com/fitness/exercises/5-must-do-lower-chest-exercises.html
- ↑ https://wwws.fitnessrepublic.com/fitness/exercises/5-must-do-lower-chest-exercises.html
- ↑ https://wwws.fitnessrepublic.com/fitness/exercises/5-must-do-lower-chest-exercises.html
- ↑ https://wwws.fitnessrepublic.com/fitness/exercises/5-must-do-lower-chest-exercises.html
- ↑ Monica Morris. Certified Personal Trainer. Expert Interview. 18 November 2019.
- ↑ https://chunkfitness.com/exercises/chest-exercises/lower-chest-exercises/decline-bench-press-barbell
- ↑ https://www.bodybuilding.com/exercises/close-grip-barbell-bench-press
- ↑ https://chunkfitness.com/exercises/chest-exercises/lower-chest-exercises/decline-bench-press-barbell
- ↑ https://chunkfitness.com/exercises/chest-exercises/lower-chest-exercises/decline-bench-press-barbell
- ↑ https://chunkfitness.com/exercises/chest-exercises/lower-chest-exercises/decline-bench-press-barbell
- ↑ https://chunkfitness.com/exercises/chest-exercises/lower-chest-exercises/dips-dip-machine
- ↑ https://chunkfitness.com/exercises/chest-exercises/lower-chest-exercises/dips-dip-machine
- ↑ https://chunkfitness.com/exercises/chest-exercises/lower-chest-exercises/dips-dip-machine
- ↑ https://chunkfitness.com/exercises/chest-exercises/lower-chest-exercises/dips-dip-machine
- ↑ https://chunkfitness.com/exercises/chest-exercises/inner-chest-exercises/bent-forward-crossovers-cable
- ↑ https://chunkfitness.com/exercises/chest-exercises/inner-chest-exercises/bent-forward-crossovers-cable
- ↑ https://chunkfitness.com/exercises/chest-exercises/inner-chest-exercises/bent-forward-crossovers-cable
- ↑ Monica Morris. Certified Personal Trainer. Expert Interview. 18 November 2019.
- ↑ https://chunkfitness.com/exercises/chest-exercises/inner-chest-exercises/bent-forward-crossovers-cable
- ↑ https://wwws.fitnessrepublic.com/fitness/exercises/5-must-do-lower-chest-exercises.html
- ↑ https://www.prevention.com/fitness/7-exercises-that-instantly-un-hunch-your-shoulders
- ↑ Monica Morris. Certified Personal Trainer. Expert Interview. 18 November 2019.
About This Article
There are a few great exercises you can use to work out your lower chest. You can do incline push ups as long as you have a bench, bed, or heavy chair about 2 feet high. All you need to do is place your hands on the bench and do push ups to work your lower pecs. Do a few sets of 10-15 pushups. At the gym, do decline bench presses, where your head is lower than your legs. Set the decline bench to 20-40 degrees and use dumbbells you can lift comfortably. Do a few sets of 5-10 reps. You can also do dips on a dip machine or parallel bars. These are like chin ups at waist level, where you hold your weight on your arms, lower yourself as far as you can, then raise yourself back up. Do a few sets of 10 reps. For more tips from our Personal Trainer, including how to do cable crossovers at the gym, read on!



-Step-10-Version-5.webp)


