This article was co-authored by wikiHow staff writer, Nicole Levine, MFA. Nicole Levine is a Technology Writer and Editor for wikiHow. She has more than 20 years of experience creating technical documentation and leading support teams at major web hosting and software companies. Nicole also holds an MFA in Creative Writing from Portland State University and teaches composition, fiction-writing, and zine-making at various institutions.
This article has been viewed 12,005 times.
Learn more...
Do you want to sync and control your DMX lights with audio? If you want to take your DJ or show lighting to the next level, you can connect a MIDI-capable DMX controller to your computer or tablet and record lighting scenes that trigger automatically during your performance. This wikiHow tutorial will teach you the basics of controlling your DMX light fixtures with sound using both hardware and software DMX controllers.
Steps
Using a DMX Controller with a MIDI Sequencer
-
1Make sure your DMX controller supports MIDI. Not all hardware DMX controllers support MIDI, so you'll want to check for a MIDI input on your controller. This will allow you to connect an external MIDI controller, such as a MIDI keyboard, to the controller.
- If you haven't already connected your DMX controller to your lighting fixtures and created the scenes you want to activate with sound, you'll want to do that first.
-
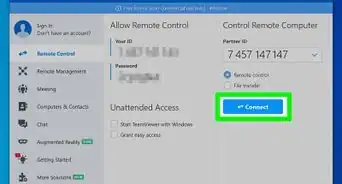
2Connect a MIDI controller to your DMX controller's MIDI input. You can use a keyboard-style MIDI controller or one with pads. Connect one end of a MIDI cable to the MIDI input on the DMX controller, and the other end to a MIDI output of the MIDI controller.[1]Advertisement
-
3Set the DMX controller to the same MIDI channel as the MIDI controller. The DMX controller will have a MIDI button that allows you to switch through channels. Set both devices to channel 1.
-
4Press the keys or pads on the MIDI controller to trigger each scene. You'll see that once the devices are on the same MIDI channel, each key on the keyboard (or pad) will correspond to a scene you created on your controller.
- For example, MIDI note 0, which is the first key on a keyboard controller, corresponds to the first scene.
-
5Connect a MIDI sequencer to the MIDI controller's MIDI OUT port. You can use a hardware sequencer or software on your computer, iPad, phone, or any other device using a USB to MIDI interface.
- If you're using a tablet, you'll likely need a USB adapter to be able to connect to the USB to MIDI interface, such as a Lightning to USB cable for an iPad.
- The sequencer must allow you to do MIDI out while recording audio so you can sync MIDI with the DMX fixtures. Most sequencers will have no problem with this.
-
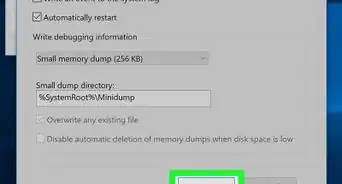
6Set the MIDI controller to MIDI thru. This allows you to record the "notes" you play on the MIDI controller into the sequencer along with the music you play.
-
7In the sequencer, create a new MIDI track in the song you want to sync. Open the track you want to sync with lights in your sequencer, and create a new MIDI track beneath it where you can record your light triggers.
-
8Start recording in the sequencer. As you are recording, press the keys or pads on the MIDI controller to activate the desired lighting scenes exactly when you want them to occur. This creates MIDI triggers at those locations. Go through the entire song and customize your light show.
-
9Play back your recording. When you play the track in the sequencer, the scenes will now activate automatically as you played them on the controller.


Using a Software DMX Controller
-
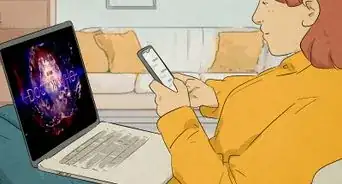
1Install a DMX software controller on your PC, Mac, iPad, or other device. If the audio you're playing is coming through your computer, phone, or tablet, using a software DMX controller should come naturally. You'll find free and paid DMX controller apps and/or VST plugins (if you're using a DAW like Ableton Live or FL Studio).
- Be sure to choose software that is intended to work with audio triggers. For example, if you want to trigger DMX lighting with MIDI from Ableton Live, you'll need a DMX software controller that supports MIDI like ENTTEC DMXIS.
- Before settling on software, make sure that software supports the lighting fixtures and other devices you want to control.
-
2Get a DMX dongle or interface. A USB-to-DMX or ethernet-to-DMX dongle or interface lets you connect your computer or tablet to your DMX lighting system. Check the DMX controller app you want to use to learn which type of dongle or interface you'll need.
- If you're using a tablet, look for a Wi-Fi DMX interface or an ethernet-to-DMX interface, which would require a Lightning-to-ethernet adapter.
- Some DMX controller software comes with an interface.
-
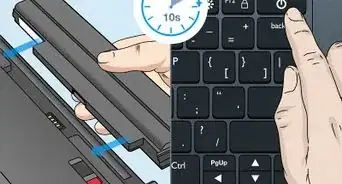
3Connect a DMX cable into your lighting fixture's DMX input. Make sure your DMX light is turned on, in DMX control mode, and set to DMX channel 1.
- If you have multiple light fixtures, connect the cable to the first light in the daisy chain.
- If you only have one DMX device, plug a DMX terminator into its output to end the chain.
- While DMX cables look like XLR cables, they are different. Don't use an XLR/microphone cable for DMX devices, as they can't carry data.
-
4Connect the other end of the DMX cable to your interface or dongle. It's the three-hole port on the interface.
-
5Connect the interface or dongle to your computer, phone, or tablet. Depending on the ports on your computer or device, you might need to use an adapter, such as a USB-C to USB-A adapter.
-
6Patch your lighting fixtures in the software controller. The steps to do this are going to be different depending on the software you're using. The software will scan for compatible DMX device and you'll be able to address them as you want.
- Each fixture will need a starting address, which contains a bank of channels. Each channel reflects a different parameter, such as strobing or dimming, for that light.[2]
- To control each fixture independently, you'll need to assign each a different starting address that's not in the same group of channels for another fixture.
- Check the manual for your lights to find out how many channels it uses and what each channel does.
- Some software is simply drag-and-drop—you'll select individual fixtures by manufacturer and drag them into your workspace to assign addresses.[3]
-
7Create your lighting scenes. Once your DMX lighting is set up in the software, you can customize the scenes that you want to trigger with audio, such as mixing colors and effects, using the faders in the software.[4]
-
8Create and record light show. Now that you have some lighting preferences configured, you can use the software to create a show based on certain parameters, such as BPM or by MIDI trigger points that you add yourself.
- Some software will automatically assign your scenes to specific points in the music without you having to record your own scene changes yourself.
- To customize the triggers yourself, create a new MIDI track in your audio software and record the lighting changes you make as the song plays. When you play the track live, it will also trigger the DMX lighting.


References
About This Article