This article was co-authored by wikiHow Staff. Our trained team of editors and researchers validate articles for accuracy and comprehensiveness. wikiHow's Content Management Team carefully monitors the work from our editorial staff to ensure that each article is backed by trusted research and meets our high quality standards.
There are 8 references cited in this article, which can be found at the bottom of the page.
This article has been viewed 23,556 times.
Learn more...
Spot welding uses the heat from an electrical current to join 2 pieces of metal quickly, and is typically used for joining sheet metal. It’s also easy to do with a spot welding machine, which has 2 electrode tongs about 6 inches (15 cm) long that pass an electrical current through the metal to fuse them together. We'll walk you through the spot welding process in a step-by-step welding tutorial.
Steps
Connecting the Metal Pieces
-
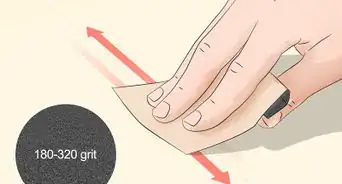
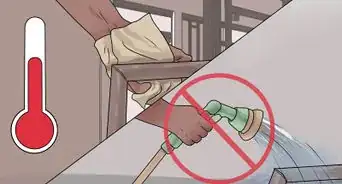
1Wipe the metal and the electrode tongs with a clean cloth. Debris from previous welds can affect the quality of your spot weld. If there’s any dust or dirt on the metal you plan to weld or the electrodes, they could spark up when you weld the metal. Take a clean cloth and wipe down the area of the metal you plan to weld as well as the tips of the electrode tongs.[1]
- Use a clean cloth so you don’t get any more dirt or dust on the surface.
- You don’t need to use soap or water to clean the area.
-
2Clamp the 2 pieces together with a pair of vice grip pliers. Connect the pieces of metal that you plan to weld so they’re flush against each other. Take a pair of vice grips and clamp down on the metal so they don’t move and you have a handle to hold them with.[2]
- Vice grip pliers allow you to clamp down and lock the pliers so they stay tight.
- You can find vice grip pliers at hardware stores and online.
Advertisement -
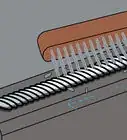
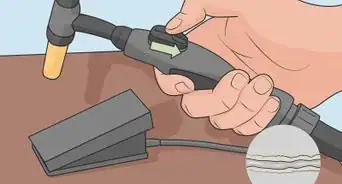
3Position the electrodes so you can fit the metal between them. The 2 electrodes of the spot welding machine are adjustable. Use the adjustment knob or wheel to spread them out so they’re wide enough for you to fit the metal that you plan to weld between them.[3]
Tip: Give a little bit of extra room so you can fit the metal between the tongs. You’ll tighten them so they’re touching the metal when you spot weld.


Fusing the Metal Together
-
1Put on a pair of welding gloves and goggles. Spot welding creates bright light and lots of heat, but there aren’t any sparks, so you don’t need to wear a full welding mask. To keep your eyes and hands protected, be sure to put on a pair of well-fitting welding gloves and welding goggles, which will block the bright light from damaging your eyes.[4]
- Adjust the googles so they fit on your face securely.
- You can find welding gloves and goggles at hardware stores and online.
-
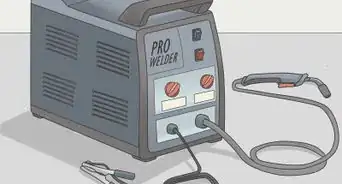
2Make sure the welder is plugged in and turn on the machine. When you’re ready to weld, double-check that the machine is plugged into a wall outlet nearby. Then, flip the power switch so the welder is turned on and ready to go.
- Don’t turn on the machine until you’re ready to spot weld.
-
3Insert the metal between the 2 electrode tongs. Hold the handle of the vice grip pliers and move the metal between the 2 tongs. Keep the metal still as you ready the tongs to spot weld and fuse them together.[5]
- Use 1 hand to hold the metal so you can use the other to press down the handle.
-
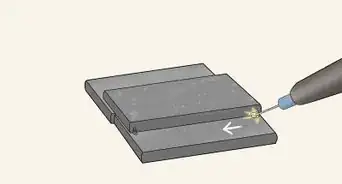
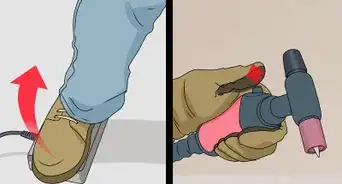
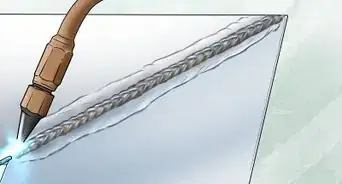
4Press down on the handle to close the tongs. Squeeze the handle on the machine to close the tongs. When they connect with the metal, the 2 ends of the electrodes will pass a current through the metal to heat up the spot where they connect.[6]
- You’ll see the metal start to heat up after a few seconds.
-
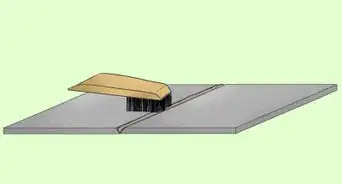
5Hold the handle down for 3-5 seconds to fuse the metal together. To create a proper weld that will last, allow the electrode tongs to remain connected to the metal for at least 3 seconds. Hold the handle down to keep the electrodes connected.[7]
- Don’t hold the handle for more than 5 seconds or you could overheat the metal and it may melt too much to create a clean weld.
Tip: If 1 burst of welding isn’t enough, place the metal back between the tongs at the same location, and hold the handle down for another 3 seconds.
-
6Remove the metal and allow it to cool for 5 minutes. Pull the metal out from between the 2 tongs and inspect it to make sure it’s been fused together well. Let the metal cool before you weld any other spots.[8]
- Take a clean cloth and give the metal a quick wipe to remove any soot that may be on the surface once the metal has cooled.
-
7Unclamp the metal and reposition the pliers to weld additional spots. To add additional welding spots, remove the vice grip pliers and move them over from the spot that you welded. Reclamp them so the pieces of metal are tightly connected and you have a handle to move the metal back between the 2 electrode tongs.[9]
- Make sure the metal has cooled before you weld any additional spots.
- Repeat the process as many times as you need to in order to fully connect the metal.


Warnings
- Always wear welding gloves and goggles whenever you’re spot welding!⧼thumbs_response⧽
Things You’ll Need
- Spot welder
- Vice grip pliers
- Clean cloth
- Welding gloves
- Welding goggles


References
- ↑ https://www.mechanicwiz.com/spot-welding/
- ↑ https://youtu.be/ogyBd0CWbS8?t=163
- ↑ https://youtu.be/nhSuXM5RnvI?t=35
- ↑ https://youtu.be/nhSuXM5RnvI?t=28
- ↑ https://www.mechanicwiz.com/spot-welding/
- ↑ https://sciencing.com/disadvantages-advantages-of-spot-welding-12283375.html
- ↑ https://youtu.be/ogyBd0CWbS8?t=226
- ↑ https://youtu.be/ogyBd0CWbS8?t=231
- ↑ https://youtu.be/ogyBd0CWbS8?t=236
About This Article