This article was co-authored by wikiHow Staff. Our trained team of editors and researchers validate articles for accuracy and comprehensiveness. wikiHow's Content Management Team carefully monitors the work from our editorial staff to ensure that each article is backed by trusted research and meets our high quality standards.
This article has been viewed 47,651 times.
Learn more...
Different types of welding machines have various settings that you can change to adjust how they weld. The 3 main types of welding machines that you might find yourself working with are stick welders, MIG welders, and TIG welders. Note that some machines automatically control certain settings and not every welder allows you to adjust the same settings, so the adjustments you can make depend a lot on the specific welder you’re using. No two welding machines are calibrated exactly the same, so you can also play around with your adjustments to find the perfect settings for your machine and the material that you’re welding.
Steps
Making Adjustments on Stick Welders
-
1Find the amperage for a type and thickness of metal on a welding chart. Look for a stick welding amperage chart online or in your stick welder’s manufacturer’s instructions. Find the type of metal and thickness of the material that you plan to weld on the chart and look at the recommended amperage level that corresponds to those specifications.[1]
- Note that stick welders can be used to weld steel, iron, aluminum, copper, and nickel.
- For example, if you want to weld a piece of steel that is 1 in (2.5 cm) thick, the recommended amperage level will be around 200 amps.
- Another example of a recommendation you might see on a chart is 125 amps for 1⁄8 in (0.32 cm) aluminum.
-
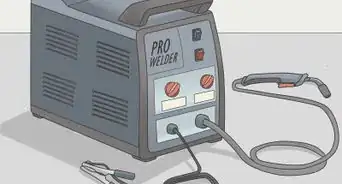
2Set the amps using the knob on the front of the machine. Look at the numbers around the amperage dial and find the recommended amperage for the thickness and type of metal that you’re going to weld. Turn the dial on the stick welder right to increase the amps or left to decrease the amps until the arrow on the knob points at the correct number of amps.[2]
- If you want to make minor adjustments to the heat when you’re stick welding, you can just pull the welding arc back to make the welding puddle hotter and wider. That way, you don’t have to change the machine’s amperage in the middle of welding.
Advertisement -
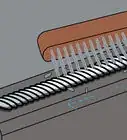
3Use a stick welding rod with a diameter equivalent to the machine’s amps. The diameter of the rod, also known as the electrode, will be a decimal version of the amperage. Use a .125 in (0.32 cm) thick welding rod when you’re welding a material at 125 amps, for instance.[3]
- The stick welding chart you use to set your machine’s amperage for the material you’re welding should also recommend an electrode size.


Changing a MIG Welder’s Settings
-
1Use 1 amp per .001 in (0.0025 cm) of metal thickness as a general rule. The thickness of the material you are welding determines how much amperage is needed to weld it effectively. Turn the amperage dial on your MIG welder to the number that matches the thickness of the material you plan to weld to set the starting amperage.[4]
- For example, if you’re welding steel that is .125 in (0.32 cm) thick, set the amp dial to 125 amps.
- Note that you might find you need to adjust the amperage after you start welding. You might get a better weld on different types of metals by using slightly higher or lower amperages.
- You can use a MIG welder to weld a variety of metals including carbon steel, stainless steel, aluminum, magnesium, copper, nickel, and bronze.
Tip: Many welding machines have a chart printed or stuck onto them that provides recommended settings for different types of materials and thicknesses. You can always refer to this to choose your starting amperage and other settings as well.[5]
-
2Increase the wire size for higher amp ranges. It’s recommended to use .023 in (0.058 cm) wire for 30-120 amps, .030 in (0.076 cm) wire for 40-145 amps, .035 in (0.089 cm) wire for 50-180 amps, and .045 in (0.11 cm) wire for 75-250 amps. Selecting a thickness of wire that works for the different thicknesses of metal that you usually weld means you won’t have to change the wire often.[6]
- For example, if you usually weld metals that are between .125 in (0.32 cm) thick and .150 in (0.38 cm) thick, use .035 in (0.089 cm) wire because the amp range you usually weld at is around 125-150 amps.
-
3Select the starting wire feed speed based on the amps you’re using. Set the wire feed speed at the number of inches per minute (ipm) recommended by your machine’s settings chart, if it has one, for the amperage level you’re welding at. Multiply the amps that you’re welding at by a multiplier that corresponds to the thickness of the wire you’re using, if you don’t have a settings chart. Multiply by 1 in (2.5 cm) per amp for .045 in (0.11 cm) wire, 1.6 in (4.1 cm) per amp for .035 in (0.089 cm) wire, 2 in (5.1 cm) per amp for .030 in (0.076 cm) wire, and 3.5 in (8.9 cm) per amp for .023 in (0.058 cm) wire.[7]
- For example, if you’re welding at 125 amps and using .045 in (0.11 cm) wire, set the wire speed feed to 125 ipm.
- Note that some newer machines might just have a dial with different thicknesses on it. You can simply turn this dial to the thickness of the material you’re welding to set amperage and wire feed speed.
-
4Turn the volts dial to the manufacturer's recommended voltage. Look at the chart on your welding machine and find the voltage that corresponds to the material you’re welding. Move the voltage dial to the number that the chart recommends to find a good starting voltage.[8]
- As a general rule, the thinner the metal you are welding, the lower the voltage you will use to weld it.
- For example, you might use a 21-23 volts to weld 1⁄2 in (1.3 cm) aluminum with a MIG welder. You might use 32 volts to weld 1⁄2 in (1.3 cm) stainless steel.
-
5Choose a mid-range voltage that creates a strong, stable welding arc. Start making a weld on a scrap piece of metal that is the same material and thickness as the metal you plan to weld. Have someone decrease the voltage on your machine until the welding arc starts stubbing, then increase it again until the arc becomes unstable. Choose a voltage in the middle between these 2 voltage points.[9]
- Stubbing is when the welding wire isn’t burning quickly enough and is hitting the bottom of the weld pool, which you can feel as you weld.
-
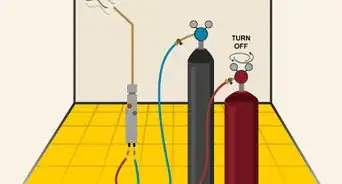
6Turn up the gas flow if there is a lot of surrounding airflow. Welding gas flow is measured in cubic feet per minute (cfm). Increase the cfm if you are working in a drafty area or keep it low if you are working in an enclosed shop where there is not a lot of surrounding airflow.[10]
- Finding the right gas flow is pretty much a matter of experimenting. The goal is to provide enough gas flow to protect your weld from air, which can contaminate it.
- For example, if you’re welding in an open, drafty area, you can try a gas flow of 50 cfm. If you’re working in a closed shop, you can try a gas flow of 15 cfm.
Tip: If you don’t have enough gas flow shielding your weld from air, you can see visible porosity and pinholes in the weld. If this is happening, increase the gas flow.[11]


Controlling the Heat on TIG Welders
-
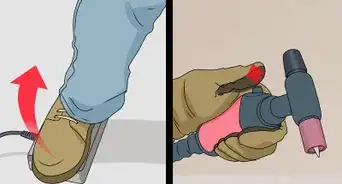
1Move the foot pedal or hand amp control to change a TIG welder’s heat. Push your foot down on the pedal to increase the amperage or let the pedal up to decrease the amperage, if your TIG welder has a foot pedal amperage control. Push the hand amperage control wheel forward to increase the amperage or roll it backwards to decrease the amperage, if your TIG welder has a hand control.[12]
- When you manually adjust the heat on a TIG welder you are really turning the amperage up or down.
- Some TIG welding machines also have amperage controls on the machine itself that allow you to set more precise amperage settings, but this depends totally on the make and model of the machine.
- Some examples of metals that you can use a TIG welder to weld are steel, aluminum, magnesium, nickel alloys, brass, copper, bronze, and gold.
-
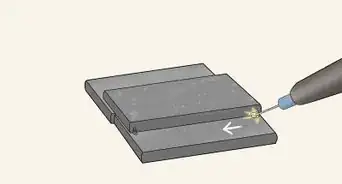
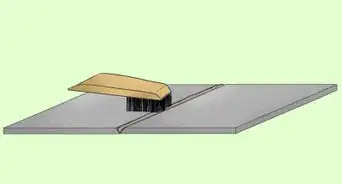
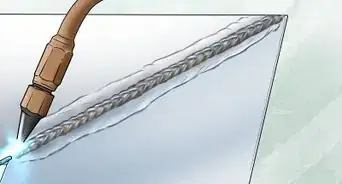
2Turn up the amps to increase heat if your weld’s bead is too narrow and high. Increase the amps using your TIG welder’s foot or hand control to turn up the heat. This will widen and flatten your weld’s bead.[13]
- A general rule of thumb is that your weld bead’s width should be about as wide as the thickness of the metal that you are welding.
- For example, if you’re welding 1⁄2 in (1.3 cm) thick metal, and your welding bead is only 1⁄4 in (0.64 cm) wide, try slowly increasing the heat until the bead widens out to about 1⁄2 in (1.3 cm).
-
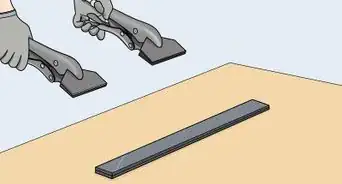
3Lower the amps to decrease the heat if your weld’s bead is too wide and flat. Use your TIG welder’s hand or foot control to decrease the amps and turn down the heat. This will make your weld’s bead higher and more narrow.[14]
- For instance, if you are welding 1⁄4 in (0.64 cm) thick metal and your welding bead is 1⁄2 in (1.3 cm) wide, try lowering the heat until your welding bead is only about 1⁄4 in (0.64 cm) wide.


References
- ↑ https://beginnerweldingguide.com/welding-amperage-selection/
- ↑ https://beginnerweldingguide.com/welding-amperage-selection/
- ↑ https://beginnerweldingguide.com/welding-amperage-selection/
- ↑ https://www.millerwelds.com/resources/article-library/miggmaw-101-setting-the-correct-parameters
- ↑ https://www.youtube.com/watch?v=TJp3tivSxIs&feature=youtu.be&t=45
- ↑ https://www.millerwelds.com/resources/article-library/miggmaw-101-setting-the-correct-parameters
- ↑ https://www.millerwelds.com/resources/article-library/miggmaw-101-setting-the-correct-parameters
- ↑ http://gowelding.org/welding/mig-gmaw/settings-charts/
- ↑ https://www.millerwelds.com/resources/article-library/miggmaw-101-setting-the-correct-parameters
- ↑ http://gowelding.org/welding/mig-gmaw/settings-charts/
- ↑ https://www.millerwelds.com/resources/article-library/miggmaw-101-setting-the-correct-parameters
- ↑ https://www.mmsonline.com/articles/selecting-the-right-welder
- ↑ https://beginnerweldingguide.com/welding-amperage-selection/
- ↑ https://beginnerweldingguide.com/welding-amperage-selection/
About This Article