This article was co-authored by Lois Wade and by wikiHow staff writer, Hannah Madden. Lois Wade has 45 years of experience in crafts including sewing, crochet, needlepoint, cross-stitch, drawing, and paper crafts. She has been contributing to craft articles on wikiHow since 2007.
There are 12 references cited in this article, which can be found at the bottom of the page.
This article has been viewed 547,114 times.
Whether you’re crocheting, knitting, or hand stitching, you may have come across the need for a slip stitch in one of your projects. This stitch, also called the invisible stitch or the ladder stitch, is helpful when you’re joining 2 pieces of fabric together or when you need to move your needle across without adding a ton of bulk. With just a little bit of practice and patience, you can complete your project while keeping it polished and clean-looking in no time!
Steps
Crocheting
-
1Make a chain stitch that’s at least 6 chains long. The easiest way to do a slip stitch is to start with a length of chain stitch. Do a basic single crochet stitch until you have a chain that’s about 6 stitches long, or even a little bit longer.[1]
- Slip stitches are great for moving across your fabric without adding any height or bulk to it.
- You can also use slip stitches to make a ring or a circle.
- In the US, slip stitches are abbreviated as “sl st.” In the UK, they’re known as “ss.”
-
2Insert the hook into the first chain you made. Take your crochet hook and slip it into the first stitch in your chain, or the one furthest away from your hook. Slide your hook through enough so you can wrap another length of yarn over it in just a moment.[2]
- If you don’t want to form a ring with your stitch, then insert your hook into the second chain instead of the first one.
Advertisement -
3Wrap the yarn over the hook from back to front. With your yarn hand, or the hand not controlling the hook, wrap your length of yarn over the hook from the back to the front (also called a yarn over). As you do this, rotate the hook towards you 180 degrees.[3]
- You’ll see the stitch form during this step.
-
4Draw the hook back through the stitch and the original loop. Keeping your hand on the hook, apply gentle pressure pushing upwards and slowly pull the hook backwards. Keep the yarn on the hook as you slide it back through the original loop in one fluid motion.[4]
- If you started at your very first chain, you’ll be left with a ring or a loop. If you started on the second one, you’ll have moved across your fabric ever so slightly. You can continue moving across the fabric by doing more slip stitches, or you can stop with just one.

Knitting: Knitwise
-
1Insert the right needle into the next stitch like you’re doing a knit stitch. Holding your knitting needles like you normally would, insert your right hand needle into the next upcoming stitch. Remember to push the needle in from the left side, just like you would when you’re doing a basic knit stitch.[5]
- This slip stitch only works if you have a good amount of knit stitches started already.
-
2Slip the stitch off the left needle onto the right needle. Move your right hand needle to the right to slide the stitch onto the right needle, just like you would with a basic knit stitch. However, don’t grab the length of yarn and keep going. Now you’re done with your slip stitch![6]
- It can be hard to resist the natural habit of pulling on your thread again, but try not to do it!
-
3Continue stitching your yarn. Now, you can continue to do slip stitches all the way down the line. However, you should note that knitwise slip stitches are more visible than purlwise ones, and they can lead to added bulk.[7]
- If your pattern doesn’t specify whether you should do a slip stitch purlwise or knitwise, go for purlwise.
Knitting: Purlwise
-
1Insert the right needle into the next stitch. Holding your knitting needles like normal, insert the right hand needle into the next stitch. However, don’t set it up like you would for a knit stitch; instead, slide it directly into the stitch from the right side so it loops onto your needle.[8]
- You might have to break your habit of inserting your needle to the left for this stitch!
-
2Slip the stitch onto the right needle. Gently pull your right hand needle to the right to slip the loop of yarn onto it. This won’t take much effort, so you don’t need to pull very hard.[9]
- Unlike the knitwise method, the purlwise one is less bulky and isn’t as visible.
-
3Keep slipping the stitches onto the right needle as you go. Now you can continue to loop the next stitch onto your right needle, pulling them along down the line. You can continue your slip stitch for as long as you need to or however long the pattern calls for it.[10]
- The purlwise stitch is also a little bit faster than the knitwise stitch.
Hand Sewing
-
1Thread a needle and tie it off. Choose a thread color that matches the color of your fabric pretty well. After all, this stitch is supposed to be invisible, so you can help it out by making the thread invisible too![11]
- The slip stitch is great for stuffed animals, pillows, and any other items that you need to sew closed without turning them inside out.
-
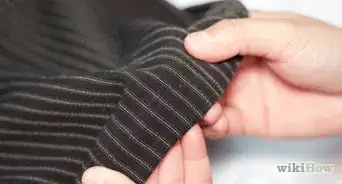
2Fold the edge of your fabric into a hem. Depending on what you’re working on, you may want to fold your hem as much as 1⁄2 in (1.3 cm) over (if you can). Crease the hem into place so you can see the hem line, but don’t worry about pinning it.[12]
- You don’t need to worry about pinning your fabric because you can eyeball it pretty well as you sew.
-
3Pull the needle through the top of the fold. The aim of the game here is to hide your needle and thread. Start out by pulling your needle through the top of the initial fold so the knot is hidden inside of the fabric. If you’re working on a pillow or stuffed animal, the knot will face inwards toward the stuffing.[13]
- Try to line up your initial stitch with the crease that you made earlier.
-
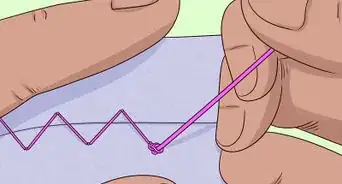
4Catch a few threads at the top of the fabric. Take your needle and position it about 1⁄4 in (0.64 cm) away from your initial hole. Use the tip of the needle to grab a tiny amount of fabric at the crease (think 2 to 3 strands of fabric). Then, pull your needle through these strands to make your initial stitch.[14]
- This is the part of the slip stitch that takes the most precision! Don’t worry if it takes you a few tries to get the hang of this part.
-
5Insert your needle into the top of the fold. Push your needle into the other side of the fabric to connect the 2 sides together. Try to make your stitch about 1⁄4 in (0.64 cm) long to match your first stitch.[15]
- If all goes well, you shouldn’t be able to see your stitches from the front of the fabric.
-
6Keep stitching until you run out of thread, then tie it off. Alternate between grabbing a few strands of fabric on one layer and pushing your needle through to the other layer. Keep going until you run out of thread or fabric, then tie your thread off and cut off the excess. Now you have a conjoined hem where the thread is barely visible![16]
- If you look closely at the front side of your fabric, you’ll be able to see the small areas where your needle picked up the few bits of thread from the fabric, but that’s it.
Things You’ll Need
Crocheting
- Crochet hook
Knitting: Knitwise
- Knitting needles
Knitting: Purlwise
- Knitting needles
Hand Sewing
- Sewing needle
- Sewing thread
References
- ↑ https://www.youtube.com/watch?v=fb5xzPS3nfc&feature=youtu.be&t=11
- ↑ https://www.youtube.com/watch?v=AFk-fdAowbY&feature=youtu.be&t=38
- ↑ https://www.youtube.com/watch?v=fb5xzPS3nfc&feature=youtu.be&t=17
- ↑ https://www.youtube.com/watch?v=AFk-fdAowbY&feature=youtu.be&t=65
- ↑ https://www.youtube.com/watch?v=lH31nc7dRYI&feature=youtu.be&t=13
- ↑ https://knittingunplugged.com/2019/10/17/the-slip-stitch/
- ↑ https://knittingunplugged.com/2019/10/17/the-slip-stitch/
- ↑ https://knittingunplugged.com/2019/10/17/the-slip-stitch/
- ↑ https://www.youtube.com/watch?v=lH31nc7dRYI&feature=youtu.be&t=42
- ↑ https://www.youtube.com/watch?v=lH31nc7dRYI&feature=youtu.be&t=52
- ↑ https://www.fabric.com/blog/sewing-101-hand-slip-stitch/
- ↑ https://www.fabric.com/blog/sewing-101-hand-slip-stitch/
- ↑ https://www.youtube.com/watch?v=jlHyqT4K-p0&feature=youtu.be&t=32
- ↑ https://www.youtube.com/watch?v=jlHyqT4K-p0&feature=youtu.be&t=38
- ↑ https://www.fabric.com/blog/sewing-101-hand-slip-stitch/
- ↑ https://www.youtube.com/watch?v=jlHyqT4K-p0&feature=youtu.be&t=60
About This Article

To crochet a slip stitch, keep in mind that your aim is to end up with 1 loop on your hook. Start by putting the hook through the stitch, then yarn over the hook. Next, pull the yarn through all the stitches on the hook so you’re left with only 1 loop. If you want to use a slip stitch to sew a hem, pin the hem in place before tying a knot in the end of your thread. Then, slip the needle into the fold and pull it up through the top crease. Finally, weave the stitch into 3 or 4 threads of the fabric just above the fold and put the needle back into the fold. To learn how to knit a slip stitch, read on!