Select, remove, and replace static text
This article was co-authored by wikiHow staff writer, Kyle Smith. Kyle Smith is a wikiHow Technology Writer, learning and sharing information about the latest technology. He has presented his research at multiple engineering conferences and is the writer and editor of hundreds of online electronics repair guides. Kyle received a BS in Industrial Engineering from Cal Poly, San Luis Obispo.
This article has been viewed 431,454 times.
Learn more...
Whether you’re working on a marketing class assignment or making a new meme, removing and replacing text on an object is easy in Adobe Photoshop! If the text is in a text box, you can use the Find and Replace Text tool. If the text is part of an image, select the text, remove it with Content-Aware Fill, then insert your own original text. This wikiHow will show you how to replace text in Adobe Photoshop.
Things You Should Know
- Use Edit > Find and Replace Text to replace text in text boxes.
- Select the text, then go to Edit > Content-Aware Fill…
- Use the Type tool by pressing “T” to insert new text.
Steps
Find and Replace Text
-
1Press Edit. It’s in the menu bar at the top of Photoshop. This method is for replacing text that’s in a text box object. If the text you want to replace is part of the image, skip to the next section.
-
2Select Find and Replace Text. This will open a search and replace window.Advertisement
-
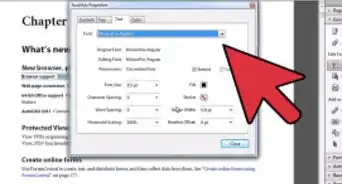
3Type the find and change information. In the Find and Replace Text window, enter the following information:
- Find What: The text that you want to find in your Photoshop project.
- Change To: The text you want to replace the existing text.
-
4Press Find Next. Pressing this button takes you to the next instance of the text in “Find What.”
-
5Press Change. This will change the text in “Find What” to the text in “Change To” for the selected instance of the text.
- Press Change All to quickly replace every instance of the found text with the new text.


Setting Up to Remove Text
-
1Duplicate the original layer. When you open an image file in photoshop, it’ll appear as “Layer 1” by default. Duplicate the layer by clicking it, then pressing Ctrl+J (Windows) or ⌘ Cmd+J (macOS). If you make any mistakes, you’ll have quick access to the original.
- Alternatively, right-click the layer and select Duplicate Layer…
-
2Determine the type of background you need to replace. The Photoshop tool you use to replace the text will depend on its background. Look at the following scenarios to figure out what works best for your image!
- Editable text — Photoshop files can have dedicated Text layers. These layers have a “T” instead of an image thumbnail. Press T to switch to the text tool, then click on the text in the image to rewrite it.
- Single color background — If the text is on a background that’s one solid color, you can use the Eyedropper tool to select the background color, then use the Brush tool to paint over the text.
- Complex background — If the text is on a complicated, busy background, you’ll need to use a more advanced Photoshop tool. The rest of this tutorial focuses on complex backgrounds.[1]
-
3Zoom in close to the text. You'll want precise control when replacing text on a complex background. This way, you won’t change the original background too much.
- Press Z to switch to the zoom tool. Use the options in the tool options bar to adjust the zoom.


Selecting and Removing Text
-
1Select the text you want to remove. Use your preferred selection tool to select the text. The Quick Selection or Lasso tools will work well for selecting the text. You could also use the Pen tool for precise selection.[2]
- You don’t need to be too precise when selecting since we’ll be expanding the selection later.
- Note: this guide uses Photoshop’s Content-Aware Fill feature. It uses the context and background of the image to remove the selected object. Alternatively, you could also use Clone Stamp, Patch, or Spot Heal.
- For more text removal tips, see our guide on removing text from a photo in Photoshop.
- For general object-removal, check out how to remove items from images in Photoshop.
-
2Expand your selection by 5 to 10 pixels. This will make sure all of the text is included in the selection, and help the fill blend in better.[3]
- Go to Select > Modify > Expand.
- Enter in a value 5 to 10 and click OK.
-
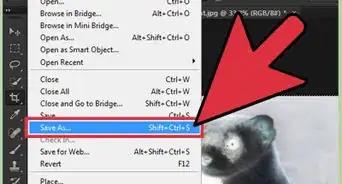
3Click Edit in the menu bar. Then select Content-Aware Fill… This will open the Content-Aware Fill editing menu.
-
4Adjust the Content-Aware Fill settings. In the editing menu, you can see the sampling area, a preview of the fill, and fill settings. Change the settings until the background looks the way you want it.
-
5Click OK. This will confirm the Content-Aware Fill and replace the selection so that it looks like the background.


Adding in New Text
-
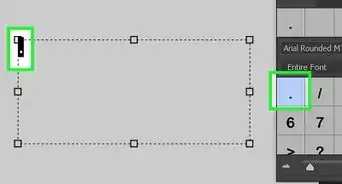
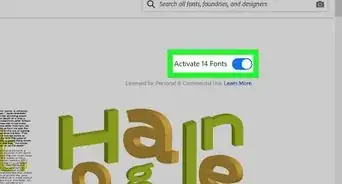
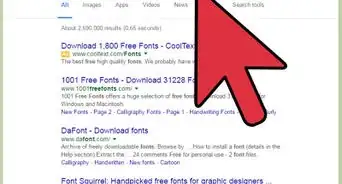
1Find the right font. You can try to match the original font, or select a completely new one! You can add new fonts to Photoshop if you can’t find one that matches in the default fonts.
- Press T to switch to the Type tool. You can select the font in the Type options bar.
-
2Type the new text. When you know what you want to write, click on the spot where the original text was located. Then, type the new text and format it.
-
3Rasterize the new text (optional). After you type the new text, right-click the new text layer. Then, select Rasterize Type. This will convert the text layer to pixels.[4]
- Rasterizing can make the text easier to edit.
- After rasterizing, you won’t be able to change the text or font.
-
4Use Free Transform to move the text. There are plenty of tools for editing a layer, but the Free Transform is one of the most customizable. It lets you completely move and adjust an image layer.[5]
- Select the new text layer. Then press Ctrl+T (Windows) or ⌘ Cmd+T (macOS) to transform the text.
- Click and drag any square point to change the size of the text.
- Hold ⇧ Shift to temporarily toggle off the “maintain aspect ratio” function.
- Hold Alt or ⌥ Opt to resize the text from its center.
- Hold Ctrl or ⌘ Cmd while clicking a point to reshape the text.
-
5Use the Liquify tool to rotate, twist, and bend the text. For example, if you want to replace text on a soda can, you can bend the text to look like its wrapping around the can.[6]
- Select the text layer. Then, go to Filter > Liquify….
- Use the brush to curve the text.
- Make the brush bigger to adjust the entire block of text.
- Lower the brush pressure for more subtle effects.


Community Q&A
-
QuestionHow do I change the text color?
 Community AnswerYou can right-click on the text under the Layers tab and click on 'blending options'. You then go to either 'color' or 'gradient overlay' and choose your colors from there.


References
- ↑ https://helpx.adobe.com/photoshop/using/editing-text.html
- ↑ https://helpx.adobe.com/photoshop/using/making-quick-selections.html
- ↑ https://helpx.adobe.com/photoshop/using/content-aware-fill.html
- ↑ https://helpx.adobe.com/photoshop/how-to/rasterize-type-shape-layer.html
- ↑ https://helpx.adobe.com/photoshop/using/transforming-objects.html
- ↑ https://helpx.adobe.com/photoshop/using/liquify-filter.html
About This Article