X
wikiHow is a “wiki,” similar to Wikipedia, which means that many of our articles are co-written by multiple authors. To create this article, volunteer authors worked to edit and improve it over time.
The wikiHow Tech Team also followed the article's instructions and verified that they work.
This article has been viewed 21,346 times.
Learn more...
Pictures and photos sometimes contain background images and objects that decrease the overall quality of your images. Most popular photo editor programs such as Adobe Photoshop and Microsoft Office feature built-in tools that allow you to remove backgrounds and specific items without the use of third-party applications.
Steps
Method 1
Method 1 of 2:
Using Adobe Photoshop
-
1Open the picture from which you want the background removed.
-
2Click on the “Eraser” tool in the left sidebar. This displays all your eraser tool options.Advertisement
-
3Select “Background Eraser Tool.” This tool is designed specifically for erasing picture backgrounds.
-
4Select a round, hard brush from the Options bar at the top of your session. This brush is most effective at erasing large backgrounds. If working with smaller images and backgrounds, experiment with using a different brush style.
-
5Select your preferred sampling from the Options bar. Select “Continuous” if erasing multiple colors in the background, or select “Once” if removing a background with one or two colors.[1]
-
6Select “Find Edges” from the Limits dropdown menu. This feature allows you to remove the background while preserving the sharpness of edges in your picture.
-
7Select a value from the Tolerance dropdown menu. A low tolerance level is ideal for erasing one to two colors, while a high tolerance level erases a larger amount of colors. For example, if erasing the blue background of a sky, set your tolerance level between 20 and 25 percent for the best results.[2]
-
8Position your cursor near the edge of the object from which you want the background removed. For example, if removing a tree behind a vehicle, position the pointer near the edge of the vehicle. The pointer will turn into a circle with crosshairs at its center.
-
9Click and drag the cursor across the background you want removed. Take care not to drag the crosshairs over the edges of the object against the background, since this erases part of your image.
- Use a smaller brush size to remove the background from small, tight areas between the object and background.
-
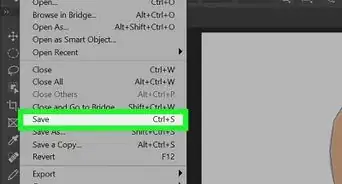
10Click “File” and select “Save.” The background of your picture is now removed.


Advertisement
Method 2
Method 2 of 2:
Using Microsoft Word, PowerPoint, and Excel
-
1Open your document and select the picture from which you want the background removed.
-
2Click on the “Format” tab and select “Background Removal” under Picture Tools.
-
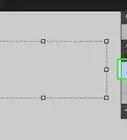
3Click one of the handles surrounding your picture, then drag the handle so the picture you want to keep is just inside the marquee lines. This excludes most of the background you want removed.
-
4Select either “Mark Areas to Keep,” or “Mark Areas to Remove.” The “keep” option allows you to choose the parts of the picture you don’t want automatically removed, while the “remove” option allows you to choose parts of the picture you want removed in addition to those automatically marked. For example, to remove the entire green background behind an object, select “Mark Areas to Remove.”
-
5Select all areas you want removed from the picture. A minus sign will appear in these areas to indicate their removal.[3]
-
6Click anywhere outside of your selected image when finished. The background areas selected will now be removed from your picture.[4]


Advertisement
Community Q&A
-
QuestionIs pen tool better for background removing from an image?
 Andrea AbrahamCommunity AnswerAll the tools and techniques mentioned up to this point can be very effective for removing a background in Photoshop. But if you want to really up your game and have ultimate control over your cutout, you need to master the Pen tool.
Advertisement


-Step-9-Version-2.webp)
References
- ↑ http://www.photoshopessentials.com/photo-editing/background-eraser/
- ↑ http://www.sitepoint.com/how-to-quickly-easily-remove-a-background-in-photoshop/
- ↑ http://blog.hubspot.com/marketing/how-to-remove-background-image-in-powerpoint-design-ht
- ↑ https://support.office.com/en-us/article/Remove-the-background-of-a-picture-c0819a62-6844-4190-8d67-6fb1713a12bf
- ↑ https://itunes.apple.com/us/app/background-eraser-superimpose/id815072622?mt=8
About This Article
Advertisement