This article was co-authored by wikiHow Staff. Our trained team of editors and researchers validate articles for accuracy and comprehensiveness. wikiHow's Content Management Team carefully monitors the work from our editorial staff to ensure that each article is backed by trusted research and meets our high quality standards.
The wikiHow Video Team also followed the article's instructions and verified that they work.
This article has been viewed 21,503 times.
Learn more...
A sewing machine cover is a great way to keep dust off of your sewing machine. If you keep it in a sunny room, it can also protect your sewing machine's outer shell from sun damage. Making your own sewing machine cover is simple and a great beginner's project. You can choose between a simple cover that drapes over the machine and a snug cozy that slides on top of it.
Steps
Making a Drape-and-Tie Cover
-
1Wrap a measuring tape over the top of your sewing machine. Hold the end of a measuring tape against the front of your sewing machine, right at the base. Pull the rest of the tape across the top of the machine and back down to the other side. Hold the tape against the base and record the measurement.[1]
- Start and finish your measuring at the long side of the sewing machine's base, not the short.
- This will be the “height” measurement for your pattern.
-
2Measure the length of your sewing machine. Hold the end of the measuring tape at the front of your sewing machine. Run it along the long, bottom edge, and stop when you reach the back. Write that measurement too.[2]
- This will be the “length” measurement for your pattern.
Advertisement -
3Cut 2 rectangles out of fabric based on your measurements. Choose 2 pieces of fabric, 1 for the outside of the cover and 1 for the lining. Stack the fabric pieces together, then draw a rectangle based on the “length” and “height” measurements of your pattern. Cut the rectangle out using fabric scissors.
- You don't need to add seam allowances because you'll be trimming the edges with bias tape.
- Cotton fabric works great for both the lining and outer fabric.
- If you want a more durable cover, use canvas for the outer fabric instead. You could even just do a single layer of canvas with no lining.[3]
-
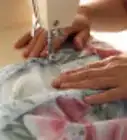
4Stack and baste the fabric pieces with the front sides facing out. You won't be turning this cover inside-out, so you need to have the front sides facing out from the start. Stack the rectangles together, then sew a loose, straight stitch around all 4 edges by hand or on a sewing machine. Keep the seam allowance within 1⁄2 in (1.3 cm).
- The front side is the same thing as the "right side" in traditional sewing terms.
- Alternatively, use sewing pins; just be sure to pull them out as you sew later.
-
5Cut four 10 in (25 cm) pieces of ribbon. Choose a color that coordinates with your cover. Measure and cut the ribbons, making sure that they are all the same length. Next, seal the cut edges of the ribbons with fray check, glue, or a flame.[4]
- If you want longer ties, make the ribbons 12 inches (30 cm) long instead.
- Choose ribbons that are around 1⁄2 in (1.3 cm) wide. This way, they won't tangle as much, but they will still be easy to tie.
-
6Stitch the ribbons to the side edges of the cover's lining. Flip your cover over so that the back (lining) side is facing you. Sew the ends of 2 ribbons to the left side edge using a 1⁄4 in (0.64 cm) seam allowance. Repeat the process for the right side edge with the other 2 ribbons. You can do this by hand or on a sewing machine.[5]
- How far away from the top and bottom edges of the cover you sew the ribbons is up to you. About 4 in (10 cm) would be good, however.
- The end of each ribbon should touch the raw edge of the cover; the rest of the ribbon should be on top of the cover, not sticking out over the edge.
- The left- and right-side edges are the "height" edges of your sewing machine cover. The top and bottom edges are the "length" edges.
-
7Pin bias tape around the cover, adding 2 in (5.1 cm) for the overlap. Open up the bias tape and slip it over the raw edge of your cover. Pin the bias tape all around the cover until you are back where you started. Overlap the ends by 2 in (5.1 cm), then cut the bias tape.[6]
- The bias tape can be whatever color you want, but something that coordinates or contrasts with the outer fabric would look the best.
- The width of the bias tape is also up to you, but something between 1⁄4 and 1⁄2 inch (0.64 and 1.27 cm) would look nice.
-
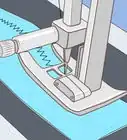
8Topstitch the bias-tape down, hemming the raw end by 1 in (2.5 cm). Begin sewing at 1 end of the bias tape. Work your way around all 4 edges of your cover. When you get back to where you started, fold the narrow end of the bias tape under itself by 1 in (2.5 cm), then finish sewing.[7]
- Topstitching is the same thing as a straight stitch. Sew as close as possible to the edge of the bias tape, where it meets the cover. About 1⁄8 in (0.32 cm) will do.
- Remember to backstitch at the start and end of your sewing!
- If the basting stitch is still visible, snip the thread, then pull it out with your fingers. If it’s too tight, use a seam ripper.
-
9Cut pockets from the same fabric as the outside of the cover, if desired. Decide how big you want the pockets to be, then add 1⁄2 in (1.3 cm) to all 4 edges. Cut the pockets out of matching or contrasting fabric. You can have as many pockets as you want, but 1 or 2 for each side of the cover would be good. This will give you a total of 4 pockets.[8]
- A good starting size for pockets is 5 by 5 in (13 by 13 cm) and 5 by 9 in (13 by 23 cm). You can also make them the same size.
- Use the same type of fabric for the pockets as you did for the outer fabric. The color and pattern is up to you.
- You don't need to add pockets; they are purely optional.
-
10Hem the pockets by 1⁄2 in (1.3 cm) if you made them. Turn the pockets over so that the back side of the fabric is facing you. Fold the side edges down by 1⁄2 in (1.3 cm), then press them with a hot iron. Next, fold the top and bottom edges down by 1⁄2 in (1.3 cm), then press them with a hot iron as well.[9]
- For a nicer finish, fold and press the corners by 1⁄2 in (1.3 cm) first, before you fold and press the side, top, and bottom edges. This will give you seamless edges.
- Use a heat-setting on the iron that's suitable for the fabric that you are working with. Most irons come labeled with the fabric type.
-
11Topstitch the pockets to the cover, leaving the top edges open. Turn your cover so that the outer fabric is facing you. Pin the pockets at least 1 in (2.5 cm) from the bottom and side edges of the cover. Topstitch the side and bottom edges of the pockets using a straight stitch. Rotate the cover 180 degrees, and sew the next set of pockets in the same fashion.[10]
- Sew as close to the edges of the pockets as possible. About 1⁄8 in (0.32 cm) will do.
- Backstitch when you start and finish sewing. This is where you simply reverse the sewing machine for a couple of stitches.
- Make sure that the opening of each pocket is facing towards the middle of your cover, not the "length" edge.
-
12Place the cover on top of the sewing machine, then tie the ribbons. Pull the first set of ribbons away from the lining, and then tie them in front of the sewing machine. Pull the next set of ribbons away from the lining as well, and tie them in the back of the sewing machine.
- The front of the sewing machine is the end with the needle. The back is the end with the wheel and thread spool.
- Tie the ribbons into bows, not double-knots. Not only will they look nicer, but they'll be easier to untie.
- If you added pockets, feel free to stash extra items in them, such as manuals or scissors.


Sewing a Full Sewing Machine Cover
-
1Measure the width and height of the sewing machine for the side panels. Use a measuring tape to measure 1 of the narrow edges on the base of your sewing machine. Next, measure the height of your sewing machine, starting at the base and finishing at the thread spool. Record each measurement separately.[11]
- You will use these measurements to create the 2 side panels on your cover.
- When viewed from the top, a sewing machine is shaped like a rectangle. The narrow edges are on the same sides as the needle and wheel/thread spool.
-
2Measure the length, height, and width of the machine for the main panel. Place 1 end of your measuring tape against the longest edge of the sewing machine, right at the base. Bring the tape up, over the top of the machine's thread spool, and back down to the other side of the base. Record this measurement, then measure the length of the base.[12]
- This will create the main panel that drapes across the top of your sewing machine, from front-to-back.
- The longest edge of your sewing machine is in the front. It is the same side that faces you when you sew. The back of the machine contains the other long edge.
-
3Cut the panels from your fabric, adding 1⁄2 in (1.3 cm) seam allowances. Get out the fabric you want for the outside of your cover, then draw 2 rectangles using your "side panel" measurements. Next, draw a big rectangle using your "main panel" measurements. Add 1⁄2 in (1.3 cm) seam allowances, then cut the panels out with fabric scissors.[13]
- Cotton, linen, and canvas make great choices for outer fabric.
- Add the seam allowances after you draw the panels. This way, you can still use the original tracing as a sewing guideline.
-
4Sew the side panels to the main panel with the front sides facing in. Wrap the side edges of the main panel around the side, top, and side edges of each side panel. Pin the panels in place, with the front sides facing in, then sew them using a straight stitch and a 1⁄2 in (1.3 cm) seam allowance.[14]
- The front side is the same as the "right side" using traditional sewing terms.
- Be sure to backstitch when you start and finish sewing each side panel. This is where you reverse the sewing machine for a couple of stitches.
-
5Repeat the process if you want a lining. Draw the panels on your desired lining fabric, then cut them out, adding 1⁄2 in (1.3 cm) seam allowances. Pin and sew the panels together, front sides facing in, using a straight stitch and a 1⁄2 in (1.3 cm) seam allowance.[15]
- If you don't want a lining, skip this step and read on to learn how to add a bias tape hem to the bottom edge of the cover.
-
6Tuck the lining into the cover, with the back sides touching. Turn the cover right-side-out so that you can't see the seams. Keep the lining turned inside-out so that you can see the seams. Tuck the lining into the cover, making sure that the edges and seams align.[16]
- Pin along the bottom edge or sew a basting stitch using a 1⁄4 in (0.64 cm) seam allowance.
-
7Pin bias tape around the bottom, raw edge of your cover. Measure all around the bottom edge of the cover, add 2 in (5.1 cm), then cut your desired bias tape accordingly. Fold your bias tape over the bottom, raw edge of your cover, then pin it in place.[17]
- If you used pins to hold the bottom edge of the cover together, be sure to remove these as you add the bias tape.
- Choose bias tape in a color that contrasts or coordinates with the outside of the fabric.
- The width of the bias tape can be whatever you want, but something around 1⁄4 to 1⁄2 in (0.64 to 1.27 cm) would be good.
-
8Sew the bias tape to the cover, hemming the end by 1 in (2.5 cm). Begin sewing at 1 end of the bias tape, without hemming it. Work your way around the cover. As you get close to the other end of the bias tape, fold the end under the rest of the bias tape by 1 in (2.5 cm), then finish sewing it.[18]
- Topstitching is the same as a straight stitch. Sew about 1⁄8 in (0.32 cm) from the inside edge of the tape, where the cover starts.
- Remember to backstitch when you start and finish sewing!
-
9Pop the cover over the top of the sewing machine. Since this cover includes the side panels, you don't need to do any extra tying like with the simpler, drape-over cover.


Community Q&A
-
QuestionWhat are suitable materials to use to make a machine cover?
 Community AnswerStrong materials such as linen, felt, calico, etc. I find that recycled shower net material works great!
Things You'll Need
Making a Drape-and-Tie Cover
- Cotton, linen, or canvas fabric
- 1⁄2 in (1.3 cm) bias tape
- 1⁄2 in (1.3 cm) ribbon
- Measuring tape
- Fabric scissors
- Thread
- Sewing pins
- Sewing machine
Sewing a Full Cover
- Cotton, linen, or canvas fabric
- 1⁄2 in (1.3 cm) bias tape
- Measuring tape
- Fabric scissors
- Thread
- Sewing pins
- Sewing machine
References
- ↑ https://www.thecraftpatchblog.com/simple-sewing-machine-cover-tutorial/
- ↑ https://www.thecraftpatchblog.com/simple-sewing-machine-cover-tutorial/
- ↑ http://www.trashtocouture.com/2017/09/diy-embroidered-sewing-machine-cover.html
- ↑ https://www.thecraftpatchblog.com/simple-sewing-machine-cover-tutorial/
- ↑ https://www.thecraftpatchblog.com/simple-sewing-machine-cover-tutorial/
- ↑ http://www.trashtocouture.com/2017/09/diy-embroidered-sewing-machine-cover.html
- ↑ http://www.trashtocouture.com/2017/09/diy-embroidered-sewing-machine-cover.html
- ↑ http://www.trashtocouture.com/2017/09/diy-embroidered-sewing-machine-cover.html
- ↑ http://www.trashtocouture.com/2017/09/diy-embroidered-sewing-machine-cover.html
- ↑ http://www.trashtocouture.com/2017/09/diy-embroidered-sewing-machine-cover.html
- ↑ https://www.thehappierhomemaker.com/sewing-machine-cover/
- ↑ https://www.thehappierhomemaker.com/sewing-machine-cover/
- ↑ https://www.thehappierhomemaker.com/sewing-machine-cover/
- ↑ https://www.thehappierhomemaker.com/sewing-machine-cover/
- ↑ https://weallsew.com/reversible-sewing-machine-cover/
- ↑ https://weallsew.com/reversible-sewing-machine-cover/
- ↑ https://weallsew.com/reversible-sewing-machine-cover/
- ↑ https://weallsew.com/reversible-sewing-machine-cover/
About This Article

To make a sewing machine cover, start by measuring the width and height of your sewing machine for the side panels and the length, height, and width for the main panel. Then, cut the 3 panels out of a piece of fabric, adding 1/2-inch seam allowances, and sew the side panels to the main panel. Next, pin bias tape around the bottom edge of the cover, and sew it in place. Finally, slide the cover over your sewing machine until you're ready to use it again. To learn how to make a drape-and-tie sewing machine cover, keep reading!