This article was co-authored by wikiHow Staff. Our trained team of editors and researchers validate articles for accuracy and comprehensiveness. wikiHow's Content Management Team carefully monitors the work from our editorial staff to ensure that each article is backed by trusted research and meets our high quality standards.
There are 11 references cited in this article, which can be found at the bottom of the page.
This article has been viewed 112,899 times.
Learn more...
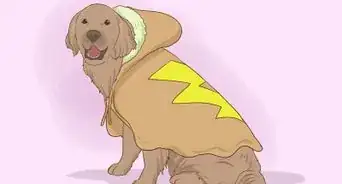
Dog hats make a cute accessory for a holiday gathering or a photoshoot. While you can always buy a hat, making your own is much more convenient. It's not too difficult, and you get to custom-size the hat to fit your dog's head. Best of all, you get to choose the colors and patterns for the hat! Just remember: never leave the hat on your dog unattended!
Steps
Creating a Party Hat
-
1Cut a cardstock circle that's twice the height you want the hat to be. Decide how tall you want your dog's hat to be, then double it. Find a plate or bowl roughly that size, then set it face-down on sheet of cardstock. Trace around the cardstock with a pen, then cut the circle out with scissors.
- For example, if you want an 4 in (10 cm) tall hat, you need to make an 8 in (20 cm) wide circle.
- You can also use poster paper and thin cardboard. The color doesn't matter since you'll be covering it.
-
2Cut a wedge from the circle that's a little bit more than a quarter of its size. Use a pen and ruler to trace 2 lines from the outside edge of the circle to the middle. If this were a clock, you'd be drawing the lines from 12 o'clock and 4 o'clock to the center. Cut the wedge out when you’re done.
- Find the middle of the circle by measuring it, or by folding it in half lengthwise and widthwise. If you fold the circle, be sure to unfold it.
Advertisement -
3Discard the edge and curve the cut-out circle into a cone. Don't staple or glue the cone shut just yet. You just need it to have a slight curve before you add the fabric. If you don't have this curve, the fabric won't stretch properly around it when you do curve it.
-
4Coat the back of the cone and your fabric with spray adhesive. Each brand of spray adhesive will be a little different, so be sure to read the instructions on the back of the can. In most cases, you need to shake the can, then spray the adhesive using a sweeping motion in a well-ventilated area.
- Cotton fabric works the best here, but felt will also work. You can use a solid color or a pattern.
- Match the fabric to the occasion. For example, if this is a birthday, try a bright, happy color, such as yellow, with a colorful confetti print.
- Alternatively, choose a dog-themed pattern. For example, you could pick black paw prints on a blue background, or white doggy bones on a red background.
-
5Press the cardstock against the fabric, then trim the excess fabric away. Set the fabric face-down on a flat surface so that the sticky side is facing up. Next, set the cardstock sticky-side-down on top of the fabric. Smooth the fabric over the cardstock, then cut the rest off.
- When you're done, you should end up with a cut-out circle that's fabric in one side and paper on the other.
- For a nicer finish, leave a 1⁄2 in (1.3 cm) seam allowance around the curved part of the circle, then fold the excess fabric onto the back of the cardstock.
-
6Roll the cardstock into a cone that fits your dog's head. Use a bulldog clip to secure the bottom of the cone as you try it on your dog's head. Ideally, it should sit right between your dog's ears, with a little bit of extra space to the left and right.
- This extra space will give your dog's ears more freedom to move around.
- If you can't find a bulldog clip, try an alligator clip, bobby pin, or paperclip.
-
7Hot glue the cone together. Use a pen to mark the inside of the cone where the overlap is. Remove the bulldog clip, then roll the cone back into shape, using the mark as a guide. Apply hot glue to the 2 layers of cardstock to hold the cone together.
- Hot glue sets up fast, so work quickly! You may have to hold the cone together for a few minutes while the glue dries.
- If you don't have hot glue, try tacky glue or fabric glue instead. Use a bulldog clip to hold the cone together until the glue dries, about 15 to 20 minutes.
-
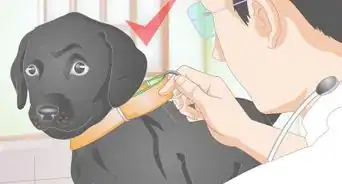
8Add ribbon or elastic to the bottom of the hat. Which you choose depends on which you think your dog will react the best to. Some dogs are fidgety, so an elastic might be best. Calmer dogs might handle a ribbon being tied under their chin. Something that is around 1⁄8 to 1⁄4 inch (0.32 to 0.64 cm) thick would be ideal.
- Ribbon: cut 2 strips of 13 1⁄2 in (34 cm) long ribbon, then hot glue each strand to the inside of the hat.
- Elastic: cut a strand of elastic long enough to wrap under your dog's chin. Tie a knot in each end, then staple the knots to the inside of the hat.
-
9Decorate the hat with pompoms, trim, and other items. Hot glue a large pompom in a contrasting color to the top of the hat. Decorate the bottom edge with a trim or a row of mini pompoms. Add other decorations to the hat, such as glitter or sequins, if desired.
- Don't use any decorations you think your dog might mess with. For example, most dogs won't appreciate tassels dangling in front of their face.

Sewing a Santa Hat
-
1Measure the top part of your dog’s head, then add 1 inch (2.5 cm). Use a measuring tape to measure the distance between your dog’s ears. Add 1 inch (2.5 cm) to the measurement for the seam allowances.[1]
- For example, if the space between your dog’s ears is 3 inches (7.6 cm), then 4 inches (10 cm) will be your seam allowance.
-
2Cut a cone from paper using the measurement for the bottom. How tall the cone is depends on how tall you want your Santa hat to be. In general, the hat should be 1½ to 2 times the width of the cone’s base. Draw the cone using a pencil and ruler first, then cut it out.[2]
- Make the bottom edge of the cone curved. Use a plate, cup, or can to do this.
-
3Fold a sheet of red fabric in half, then pin the cone on top. Get some soft, red fabric, such as felt, flannel, fleece, or velvet. Fold it in half, then set the cone shape on top. Make sure that one of the straight edges on the cone is aligned with the folded edge of the fabric. Secure the cone to the fabric with sewing pins.[3]
- Make sure that the wrong (back) side of the fabric is facing out when you fold it. On velvet and some types of fleece, this is the smooth, non-fuzzy side.
-
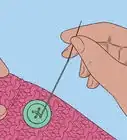
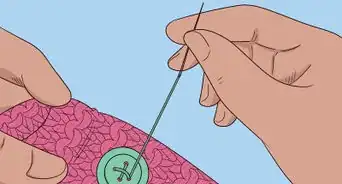
4Cut the fabric out, then sew the edge using a 1⁄2 in (1.3 cm) seam. One side of your cone is already sealed because you cut it on a fold. Now, you need to seal up the other side! Sew it up using a straight stitch and a 1⁄2 in (1.3 cm) seam allowance. Do this by hand or on a sewing machine.[4]
- If you’re doing this on a sewing machine, backstitch when you start and finish sewing. This is where you reverse the sewing machine for a couple of stitches.
- If you don’t know how to sew, hot glue the seam instead. Apply the hot glue 1⁄2 inch (1.3 cm) from the edge.
-
5Turn the hat right-side out and add an elastic chin strap to the bottom. Set the cone on top of your dog’s head, then measure under its chin, from one side of the cone’s base to the other. Cut a piece of 1⁄8 to 1⁄4 in (0.32 to 0.64 cm) elastic according to this measurement. Take the hat off, then hand-sew the ends to the inside of the hat.[5]
- You don’t need to use sewing machine for this. A few, simple hand stitches are all you need.
- Make sure that the elastic is tight enough to keep the hat on your dog’s head. You may need to cut it shorter.
-
6Sew or hot glue a strip of white, fluffy material to the bottom of the hat. Faux fur is the traditional choice, but fleece or felt will also work. Flannel is not recommended because it’s not fuzzy enough. Make the strip about 1 to 2 inches (2.5 to 5.1 cm) thick.[6]
- The smaller the hat is, the narrower the strip should be; the bigger the hat is, the wider the strip should be. Go with what looks the most proportionate.
-
7Add a big, white pompom to the top of the hat. You can hot glue or hand-sew this on. Match the width of the pompom to the width of the white trim. For example, if your trim was 1 inch (2.5 cm) wide, then your pompom should be about 1 inch (2.5 cm) wide too.[7]
- Use a store-bought pompom or make your own using yarn.

Making a Felt Fashion Hat
-
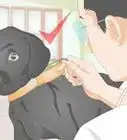
1Measure the space between your dog's ears. Place a measuring tape against the top of your dog's head, then measure the space between its ears. It would be a good idea to subtract about 1 inch (2.5 cm) from your measurement. This will give your dog's ears a little more wiggle room.
- You can use this method to create all sorts of hats, such as pillbox hats, cowboy hats, and top hats.
-
2Trace a circle on a sheet of felt using the measurement as the diameter. Find a cup or can that has the same diameter as your measurement, then use it to trace the circle. A compass will also do the trick. If you don't own a compass:[8]
- Tie a pen to a piece of string.
- Divide your diameter by half, then cut your string based on that measurement.
- Pin the end of the string to the felt and pull the pen end of the string taut.
- Use the pen to draw a circle around the pin.
-
3Draw a skinny rectangle on the felt based on the circle's circumference. Multiply the circle's diameter by 3.14 (pi) to get the circumference. Round the measure up to the nearest whole or half number, then draw a skinny strip based on this measurement. The thickness of the strip is up to you; it will create the height of the hat.[9]
- For example, if your diameter is 3 inches (7.6 cm)}
- 3 x 3.14 = 9.42
- 9.42 is difficult to work with, so round it up to 9.5
- 9 1⁄2 inches (24 cm) is your circumference.
-
4Cut the shapes out, adding 1⁄2 in (1.3 cm) seam allowances. You can make the seam allowances smaller, if you want to, but stay consistent! If you're making a pillbox hat, you don't need to add a seam allowance to one of the long edges on the strip.[10]
-
5Use the circle to create a brim, if desired. Cut a circle that's at least 2 inches (5.1 cm) bigger than your first circle. This is the base of your brim. Next, cut a circle from inside the brim that's 1 inch (2.5 cm) smaller than your first circle. Set the brim aside for later.[11]
- The size of the brim is up to you. Decide how thick you want it to be, double that measurement, then add it to your circle's diameter.
- For example, if you want a 2 in (5.1 cm) brim, you’ll add 4 inches (10 cm) to the diameter of your original circle. This is the final width of your brim!
-
6Sew the strip around the circle, using a 1⁄2 in (1.3 cm) seam allowance. Align the edge of the strip with the edge of the first circle. Begin sewing 1⁄2 inch (1.3 cm) from the narrow end of the strip. Sew your way along the circumference of the circle until you’re back where you started.[12]
- You may have a little bit more than 1⁄2 inch (1.3 cm) left at the other end of your strip, which is fine.
- Sew this by hand or on a sewing machine. If you choose to use a sewing machine, backstitch when you start and finish sewing.
- If you don't know how to sew, use hot glue. Apply it 1 inch (2.5 cm) at a time so that it doesn't dry out too fast.
-
7Hand-sew the ends of the strip together. You can try using a sewing machine for this, but it will be easier to just do it by hand. Start sewing at the circle-side of the strip, and finish sewing at other side.[13]
- The seam allowance should still be around 1⁄2 inch (1.3 cm), but be aware that it may be off due to the nature of working around a circle.
-
8Trim the seam allowances, if desired, then turn the hat right-side out. If you sewed the hat, consider cutting the seam allowances down to 1⁄4 inch (0.64 cm). This will help reduce bulk. If you used hot glue, you may not be able to do that.[14]
- This completes the base of your hat. Decorate it to make it look like a pillbox hat or a fez, or read on to learn how to add a brim.
-
9Sew the brim to the bottom edge of the strip, if you made it. Use a 1⁄2 in (1.3 cm) seam allowance and a straight stitch. You may be able to do this on a sewing machine, but it will probably be easier to do it by hand. You can also hot glue the brim on instead.[15]
- Remember to trim the seam allowance down to 1⁄4 inch (0.64 cm) when you are done.
-
10Decorate the hat with a hat band and other embellishments. Wrap a ribbon around the base of the crown, right where the brim starts, then hot glue it in place. Add a brooch to the hat band, if desired. If this is going to be a cowboy hat, do the following:[16]
- Use a star-shaped button for the brooch; place it at the front of the hat.
- Fold the left and right sides of the brim to the crown and hot glue them in place.
- Create an indent in the top of the hat, running from front-to-back.
-
11Add an elastic chin strap. Cut a strip of 1⁄8 to 1⁄4 in (0.32 to 0.64 cm) wide elastic that's long enough to wrap under your dog’s chin. Sew each end of the elastic by hand to the inside edge of your hat.[17]
- Don’t use hot glue; the glue won’t hold the elastic.
- You don’t need to use a sewing machine for this. A few, simple stitches are all you need.


Community Q&A
-
QuestionCan I make these lovely hats for my cats?
 Community AnswerYes, of course. Just make them a tad bit smaller, unless you have a huge cat!
 -
QuestionHow do I make a pharaoh headpiece for a small dog?
 Community AnswerTake a piece of cardboard and cut it into the shape you want it to be. Use acrylic or puffy paint to add colors. Glue the cardboard onto an elastic band. Place the piece on your dog's.
 -
QuestionHow do I size a crocheted hat for a dog?
 Community AnswerPart 1 explains how to measure your dog's head circumference to pick out a hat. All you need to do is to make your circumference of your crocheted had to stretch a little to that size. Don't make it too tight or too loose, and it really depends on the crochet stitch you choose. Some are better for this than others.
Warnings
- Never leave a hat on your dog unattended.⧼thumbs_response⧽
- If your dog looks uncomfortable, distressed, or annoyed, take the hat off. Don't force it to wear the hat.⧼thumbs_response⧽
- The chin strap should be tight enough to secure the hat to your dog's head, but not so tight that your dog can't breathe or swallow.⧼thumbs_response⧽
Things You’ll Need
Creating a Party Hat
- Cardstock or thin cardboard
- Fabric, felt, or patterned paper
- Spray adhesive
- Scissors
- Pen
- Ruler
- Plate or bowl
- Pompoms
- 1⁄8 to 1⁄4 in (0.32 to 0.64 cm) ribbon or elastic
- Bulldog clips
Sewing a Santa Hat
- Pen
- Paper
- Red fabric or felt
- White felt or faux fur
- 1 white pompom
- 1⁄8 to 1⁄4 in (0.32 to 0.64 cm) elastic
- Thread
- Needle or sewing machine
- Scissors
Making a Felt Fashion Hat
- Pen
- Paper
- Compass or round object
- Felt
- Scissors
- Thread
- Needle or sewing machine
- Hot glue
- Ribbon
- Embellishments
- 1⁄8 to 1⁄4 in (0.32 to 0.64 cm) elastic
References
- ↑ http://www.kickingitwithkelly.com/home/pets/how-to-prepare-your-pets-for-the-holidays-diy-pet-santa-hat-tutorial/
- ↑ http://www.kickingitwithkelly.com/home/pets/how-to-prepare-your-pets-for-the-holidays-diy-pet-santa-hat-tutorial/
- ↑ http://www.kickingitwithkelly.com/home/pets/how-to-prepare-your-pets-for-the-holidays-diy-pet-santa-hat-tutorial/
- ↑ http://www.kickingitwithkelly.com/home/pets/how-to-prepare-your-pets-for-the-holidays-diy-pet-santa-hat-tutorial/
- ↑ http://www.kickingitwithkelly.com/home/pets/how-to-prepare-your-pets-for-the-holidays-diy-pet-santa-hat-tutorial/
- ↑ http://www.kickingitwithkelly.com/home/pets/how-to-prepare-your-pets-for-the-holidays-diy-pet-santa-hat-tutorial/
- ↑ http://www.kickingitwithkelly.com/home/pets/how-to-prepare-your-pets-for-the-holidays-diy-pet-santa-hat-tutorial/
- ↑ https://www.youtube.com/watch?v=44Y6IJhPsuA&t=53s
- ↑ https://www.youtube.com/watch?v=44Y6IJhPsuA&t=3m7s
- ↑ https://www.youtube.com/watch?v=44Y6IJhPsuA&t=6m45s
- ↑ https://www.youtube.com/watch?v=YdsY25FdKJg &t=4m5s
- ↑ https://www.youtube.com/watch?v=44Y6IJhPsuA&t=7m20s
- ↑ https://www.youtube.com/watch?v=44Y6IJhPsuA&t=8m15s
- ↑ https://www.youtube.com/watch?v=44Y6IJhPsuA&t=8m30s
- ↑ https://www.youtube.com/watch?v=YdsY25FdKJg &t=5m45s
- ↑ https://www.youtube.com/watch?v=YdsY25FdKJg &t=6m30s
- ↑ https://www.youtube.com/watch?v=44Y6IJhPsuA&t=9m45s
About This Article

If you want to make a party hat for a dog, cut a circle out of cardstock that’s twice as wide as you want the hat to be. For instance, if you want to make a hat that’s 4 inches tall, you’d cut out a circle with a diameter of 8 inches. Cut a wedge that’s a little bit more than a quarter of the circle, then repeat with a piece of colorful fabric. Use spray adhesive to attach the fabric to the cardstock, then curve them into a cone-shape and hot-glue together the sides. Add ribbon or elastic to the hat to hold it in place. For tips on making a Santa hat for your dog, keep reading!