This article was co-authored by Nicole Bolin. Nicole Bolin is a Crafting Specialist and the CEO of Stencil, a DIY Craft Studio in Phoenix, Arizona. Nicole specializes in interior design and various craft and DIY projects. Nicole holds a Certificate in Interior Design from the New York Institute of Art and Design. She opened Stencil in 2017 to teach others to create DIY projects that fit their home and lifestyle.
wikiHow marks an article as reader-approved once it receives enough positive feedback. This article received 16 testimonials and 83% of readers who voted found it helpful, earning it our reader-approved status.
This article has been viewed 497,447 times.
Pompoms are small, fluffy balls, typically added to knit hats. You can always buy them from the store, but making your own will allow you to choose any color and texture of yarn you want. They are fast, fun, and easy to make. You can add them to knitted or crocheted hats, use them as Christmas ornaments, or give them to your cat to play with. Best of all, there are lots of different ways to make them![1]
Steps
Using Your Fingers
-
1Cut a 12-inch (30.48-centimeter) piece of yarn, and set it aside.[2] You will be using this piece of yarn to tie your pompom together. Your fingers will be literally tied up, so it will be easier to do this part first.
-
2Drape your yarn around your fingers. Take the rest of your yarn, and place it horizontally across your fingers. If you want a standard sized pompom, drape it across your forefinger and middle finger. If you'd like a bigger pompom, extend the yarn over your ring finger too.[3]Advertisement
-
3Wrap the yarn around your fingers. Do not wrap the yarn too tightly, or you will risk cutting off your circulation. If your fingers start to turn blue or purple, you are wrapping too tightly. Wrapping the yarn too tightly will also make it harder to slide it off in the end. How many times you wrap the yarn around your fingers will depend on how big you want the pompom to be:[4]
- If you are using two fingers, wrap the yarn 100 to 125 times.
- If you are using three fingers, wrap the yarn 125 to 150 times.
- The more you wrap, the bigger and thicker your pompom is going to be.[5]
-
4Carefully pull the yarn off your fingers and set it down on top of your short piece of yarn. Hold your yarn bundle together as you pull it off so that it doesn't come apart. Make sure that you place it in the center of your short piece of yarn.
-
5Tie the yarn tightly around your bundle. Pull both ends of the yarn towards yourself, then tie them together into a tight knot over the center of your yarn bundle. This is very important. If the knot is not tight, the pompom won't hold together.[6]
-
6Turn the bundle over, and tie the yarn into a double knot. Bring the two yarn ends towards yourself again, and tie them into another tight knot. Tie them together once more to make a secure double knot.
-
7Trim off the excess yarn, then cut through the loops to either side of the bundle. Be sure to cut through all of the loops, or your pompom won't look right in the end.[7]
-
8Fluff the pompom up. You can do this with your fingers, or by gently rolling it between your palms. Don't panic if a few strands come out; this is normal.
-
9Shape and neaten the pompom. Your pompom is mostly done, but it may look a little scruffy. Neaten it up by trimming off any long bits of yarn that stick out. Do this by carefully rotating the pompom between your fingers, and cutting away any pieces of yarn that are longer than the rest.[8]

Using Cardboard
-
1Use a cup to trace a circle onto a piece of cardboard. This will create the base for your pompom maker. If you want a really big pompom, you can use a small bowl or even an old CD or DVD.[9]
-
2Trace a smaller circle inside the first one. The circle should be ½ to 1 inch (1.27 to 2.54 centimeters) wide. The bigger your outer circle is, the bigger your inner circle should be. Avoid making the inner circle too big, however, or you'll have a hard time tying your pompom together.
-
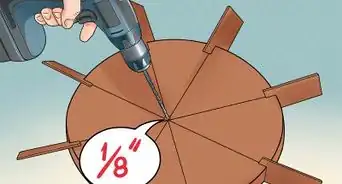
3Cut the circles out using a craft blade. Cut your larger circle out first, then the smaller one. You will end up with something that looks like a doughnut. If you are a child doing this craft, ask an adult to help you with this step.
-
4Cut a ½-inch (1.27-centimeter) wide slit into the doughnut. The slit needs to go from the outer edge straight down to the inner edge. This will make wrapping the yarn around your doughnut easier.[10]
-
5Use your doughnut to trace and cut a second one just like it. Stack the doughnuts one on top of the other, and make sure that the slits are aligned. You will be treating these as one doughnut until the very end.[11]
-
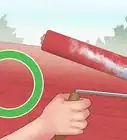
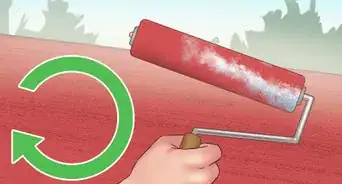
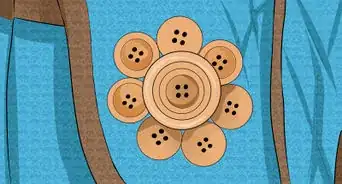
6Start wrapping the yarn around your doughnut. The easiest way to do this would be to start at one edge of the slit, going all the way around your doughnut, and finishing at the other edge of the slit.
-
7
-
8Cut the yarn. Snip off the excess yarn first, then slid your scissors between the yarn and the cardboard. Pull your scissors towards the edge of your doughnut, and start cutting through the yarn. Hold your yarn together, and don't let it come apart.
-
9Cut a long piece of yarn, and tie it around the middle of your yarn bundle. Separate your two cardboard doughnuts enough so that you can slide your yarn in between them. Tie the ends of your yarn into a tight knot. Wrap them back in the opposite direction, then tie them into a tight, double knot.[14]
- You can choose to snip off the excess pieces of yarn, or you can tie the ends into a loop so that you can hang it.
-
10Carefully pull the cardboard doughnuts off of your pompom. If you need to, you can tear them to make things easier, but keep in mind that if you do that, you won't be able to reuse them.
-
11Fluff up the pompom. You can do this by gently going through it with your fingers. You can also roll it between your palms instead. Don't worry if a few pieces of yarn come out.
-
12Neaten and even your pompom out. Your pompom might still have some scraggly bits coming off of it, especially after all that fluffing. Rotate the pompom between your fingers, and snip off any long pieces of yarn that stick out.
Using a Fork
-
1Place the end of your yarn horizontally across the prongs of a fork. You can use a plastic fork, but a metal fork will be less likely to bend or snap. Because you are working with such a small tool, consider working with a thinner type of yarn, rather than a bulky type.
-
2Wrap the yarn around 90 times, then trim the rest off. Do not wrap the yarn too tightly, or you will bend the fork. Not only will you ruin the fork, but the pompom may not come out even. It will also make the pompom more difficult to tie at the end.
-
3Cut a 12-inch (30.48-centimeter) piece of yarn. You will be using this to tie your pompom together. If you want, you can thread this through a yarn needle. This will make tying your pompom together easier.
-
4Wrap the short piece of yarn tightly around the wrapped yarn on your fork. Thread the yarn through the middle of the fork, right under the wrapped yarn first. Next, wrap it over the top of the wrapped yarn, and back under it, as tightly as you can.
-
5Tie the short piece of yarn into a tight, double knot. Snip off any excess yarn, or tie it into a loop if you'd like to hang your pompom.
-
6Slide the wrapped yarn off of the fork, then snip through the loops on either side. Gently fluffy the pompom out. You can do this with your fingers, or by rolling it between our palms. Don't worry if you lose a few threads.
-
7Even out the pompom. At this point, you are done. Your pompom may look a little bit scraggly, however. If this bothers you, use a pair of scissors to trim off any uneven bits of yarn so that you get a ball-shape. This will also help make your pompom look more dense.
Expert Q&A
Did you know you can get expert answers for this article?
Unlock expert answers by supporting wikiHow
-
QuestionHow do you make easy pompoms?
 Nicole BolinNicole Bolin is a Crafting Specialist and the CEO of Stencil, a DIY Craft Studio in Phoenix, Arizona. Nicole specializes in interior design and various craft and DIY projects. Nicole holds a Certificate in Interior Design from the New York Institute of Art and Design. She opened Stencil in 2017 to teach others to create DIY projects that fit their home and lifestyle.
Crafts & DIY SpecialistThere are many videos online to show you how to make pompoms with a fork, with a tool made out of a cardboard tube, or with your fingers. I prefer the simple fingers method, which you can read about in this article.
Support wikiHow by unlocking this expert answer.
-
QuestionI want to brush out my pompom, so that it looks like fur. How can I do this?
 Mo.mow.mo.moneyCommunity AnswerTry using a fine-toothed comb, and brush with small strokes starting at the ends and gradually go closer to the center.
 -
QuestionHow do I make it into a ball shape?
 Community AnswerRoll it and trim it. You have to roll the ball of the pom pom and trim the yarn of the ball to make it look good.
Warnings
- When using the finger method, take care not to wrap the yarn too tightly, or you will risk cutting off your circulation.⧼thumbs_response⧽
Things You'll Need
Using Your Fingers
- Yarn
- Scissors
Using Cardboard
- Cardboard
- Pencil or pen
- Cup, small bowl, or CD/DVD
- Craft blade
- Yarn
- Scissors
Using a Fork
- Metal fork
- Yarn
- Scissors


References
- ↑ Nicole Bolin. Crafts & DIY Specialist. Expert Interview. 29 October 2020.
- ↑ http://www.momontimeout.com/2011/12/how-to-make-your-own-pom-poms-tutorial
- ↑ Nicole Bolin. Crafts & DIY Specialist. Expert Interview. 29 October 2020.
- ↑ http://www.momontimeout.com/2011/12/how-to-make-your-own-pom-poms-tutorial
- ↑ Nicole Bolin. Crafts & DIY Specialist. Expert Interview. 29 October 2020.
- ↑ http://www.momontimeout.com/2011/12/how-to-make-your-own-pom-poms-tutorial
- ↑ Nicole Bolin. Crafts & DIY Specialist. Expert Interview. 29 October 2020.
- ↑ http://www.momontimeout.com/2011/12/how-to-make-your-own-pom-poms-tutorial
- ↑ http://ashleemarie.com/extra-large-yarn-pom-pom/
About This Article

To make a yarn pom pom, first cut a piece of yarn that's 12 inches (30 cm) long and set it aside. Then, grab the end of the yarn still attached to the yarn ball and wrap it around the four fingers on your nondominant hand. Continue wrapping the yarn around your fingers about 125 times. Cut the yarn off from the ball when you're finished. Next, carefully slide the bundle of yarn off of your fingers and set it down in the middle of the piece of yarn you cut before. Wrap the cut yarn around the bundle, pull it tight, and tie a tight knot with the two ends. Cut the excess yarn off. Now, cut through the loops of yarn on each half of the tied piece of yarn with a pair of scissors. Finally, fluff the individual yarn lengths up and trim them as needed until you have a perfectly round pom pom. For tips on how to use cardboard or even a fork to make your pompom, read on!