This article was co-authored by Luigi Oppido. Luigi Oppido is the Owner and Operator of Pleasure Point Computers in Santa Cruz, California. Luigi has over 25 years of experience in general computer repair, data recovery, virus removal, and upgrades. He is also the host of the Computer Man Show! broadcasted on KSQD covering central California for over two years.
There are 10 references cited in this article, which can be found at the bottom of the page.
The wikiHow Tech Team also followed the article's instructions and verified that they work.
This article has been viewed 384,489 times.
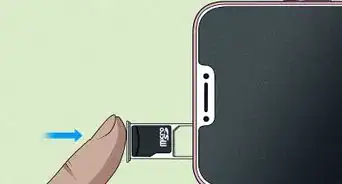
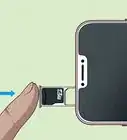
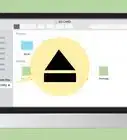
A micro SD card is a tiny memory card that is often used for extra storage in devices such as cameras, GPS devices, and mobile phones. In most cases, you can format a micro SD card using commands built into your device. However, you can also format a micro SD card using your Windows or Mac computer.
Steps
Android
-
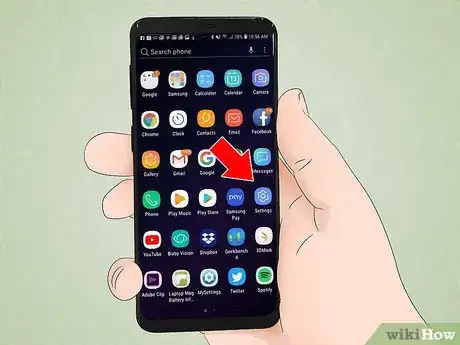
1Tap on “Settings” from the Home screen of your Android device. Your “Settings” app will be somewhere on your home screen. Scroll through your pages until you find it.
- Your “Settings” app may look slightly different depending on which version of Android you run, but for most phones it can be identified by the gear icon.
-
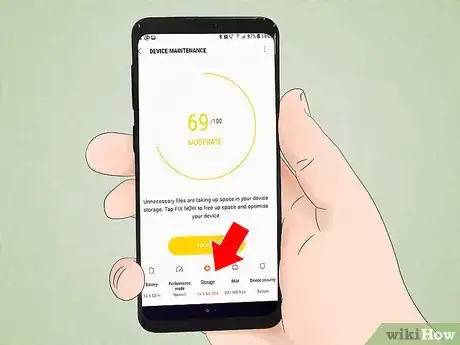
2Tap on the option that reads “Storage” or “SD & Phone Storage”. Each version of Android may have a different name for this area. Look for the option that has the word “Storage” in it.
- You can identify the right option by the SD card icon.
Advertisement -
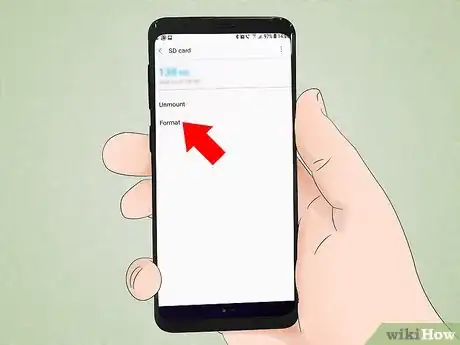
3Select the option for “Erase SD card” or “Format SD card”. On this screen, you will see info on your total SD card space, your available free space, and an option to “Unmount SD Card” and “Format SD Card”. [1] [2]
- If the “Format SD Card” option is grayed out, you will first have to unmount your SD card. Tap on “Unmount SD Card” in this case.
-
4Tap on the option to confirm you want to erase the contents of your SD card when prompted to by your Android. Your Android device will begin to format your micro SD card, and erase all its contents. [3]
- You may see several screens that ask you if you are sure that you wish to format your SD card. Doing so will erase all the content on the card.
- Follow the prompts to erase and format your card.
- Once you have formatted, your card will be formatted to FAT32 filesystem type. All your content will be cleared, and you will have a new card formatted to your Android phone.
- Note: If you are using Android 6.0 Marshmallow, you will have the option to treat your SD card as either internal storage or portable storage. If you choose to use it as portable storage your SD card will be treated like any other removable storage, allowing you to remove it and transfer files to your computer or another device. If you make it internal, it will be formatted and not be allowed to be read by your computer. Your SD card will be treated as your main storage system. [4]
Windows Phone
-
1Locate your “Settings” app. This method works if you have a Windows phone like the Windows Phone 8 or later; the HTC One M8; Nokia Lumia 635; Nokia Lumia 830; Microsoft Lumia 735.
-
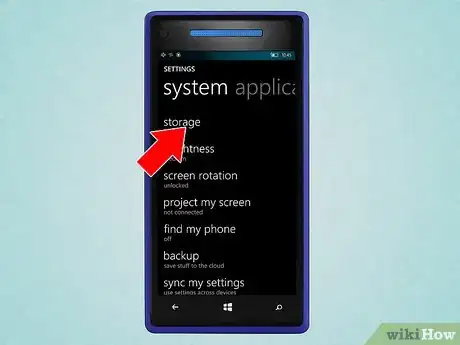
2Scroll down to the “phone storage” option and tap. Once in your “Settings” screen, scroll down to find the option for “phone storage” in between “battery saver” and “backup”.
- The “phone storage” option should show you how much free space you have on your phone and on your SD card.
- If you clicked on “Storage Sense”, you will see an option for “SD card”.
-
3Tap on the “Format SD card” option. Once in your “phone storage” page, you will see a graph that shows how much memory all your storage areas are taking up. You want to tap on “SD card”.
- Formatting your SD card will erase all of the contents of it. Make sure that you have backed up your data elsewhere.
-
4Tap the “format SD card” option. Once you have tapped on the “SD card” option, you will see a screen that has two options, one for removing the card and one for formatting. You want the formatting option.
- Once you tap on “format SD card” a prompt will appear that warns you that formatting your SD will erase all of your data and files on the card. And it will ask you if you wish to continue. Tap “yes” to format.
- After the process is complete, your phone will again recognize the card and automatically ask you to reconfigure it. Follow the prompts.
Windows
-
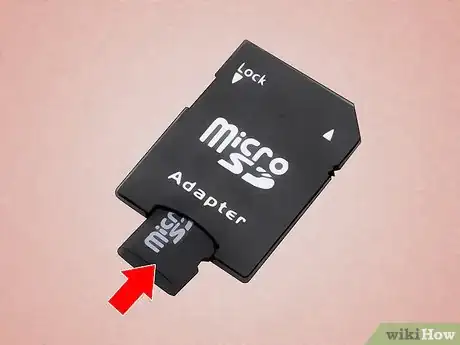
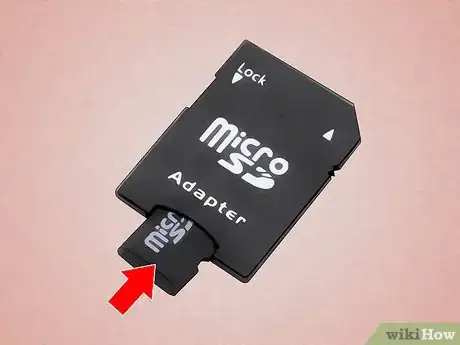
1Insert your micro SD card into a micro SD card adapter or reader compatible with your micro SD card. For example, if you own a SanDisk micro SD card, you should have a micro SD card adapter that came with it. The adapter looks like a regular SD card with a slot at the bottom where you insert your micro SD card.
- Note that most Micro SD cards that are 32 GB or less come formatted as FAT32. Cards above 64 GB are formatted to exFAT file system. If you are formatting your SD for your Android phone or Nintendo DS or 3DS, you will have to format to FAT32. With Android, many of your apps or custom recoveries, if you are rooted, will not read exFAT.
- Formatting to FAT32 is usually your best option, however, FAT32 formatted cards won’t let you transfer or store a file more than 4 GB.
- You can also purchase a third-party micro SD card adapter if you don’t already have one. Just make sure that it is compatible with your micro SD card. Some third-party adapters also use a USB component on one end and operate like a flash drive.
-
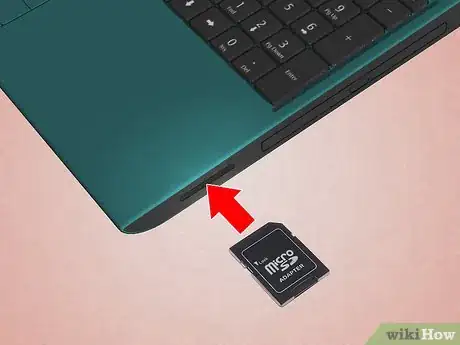
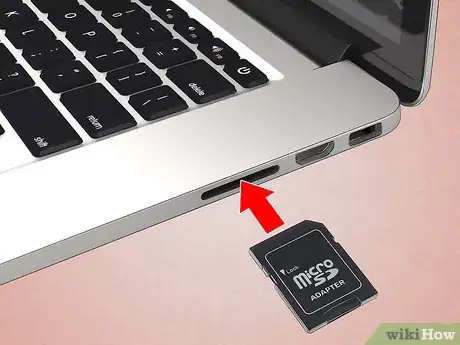
2Insert the card reader or adapter into a USB port or SD card slot on your Windows computer. Depending on your computer and type of adapter you will either need to use your SD card slot or a USB port.
- If you are using a micro SD card adapter, make sure that the lock toggle is up and in the unlocked position. If it is in the locked position your computer may not read the card or let you make any changes. It may be “Read only”.
- It’s a good idea to copy the files currently on the card over to your computer to save. This will allow you to keep your data and files for transferring back after you format.
-
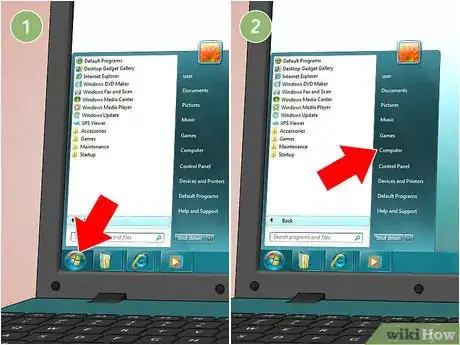
3Click on the Start menu and select “Computer” or “My Computer”. This method works for Windows 7 and up.
- Once you are in your “Computer” window a list of all your computer drives will display on-screen.
- Locate your micro SD card. It can be identified by the brand name of your SD card unless you changed the name of your card. If you changed the name, locate it by that name.
-
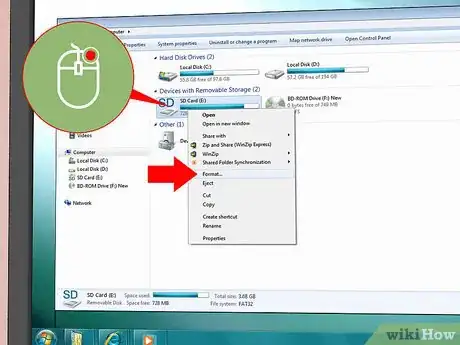
4Right-click on your card reader in the list of drives and select “Format”. A window displaying formatting options will display on-screen.
- If you don’t see a “Format” option you may have to download and install the fat32format utility in GUI version.
-
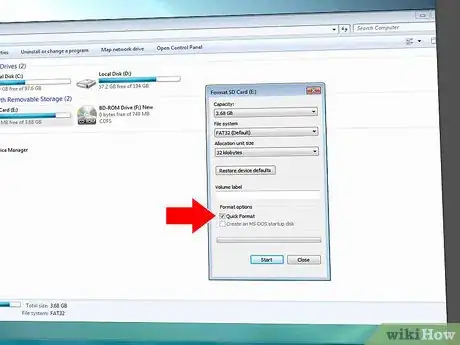
5Place a checkmark next to “Quick Format”. If you were able to click the “Format” option, a box will appear with several options including “Quick Format”. Check that box for best results.
- If you had to install the fat32utility, you will also see the same box pop up once you have launched the guiformat.exe file.
- Before you click “Start” make sure that the other tabs and options are correct. Check that the “Capacity” has the right amount of storage. Make sure you are formatting to the desired format, usually FAT32.
-
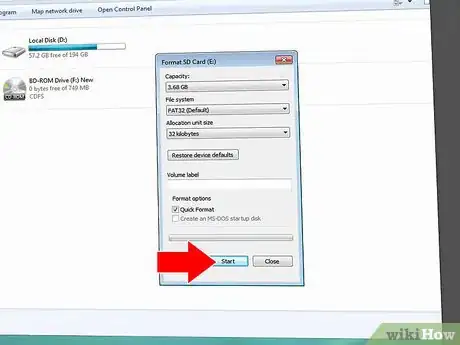
6Click on the “Start” button. Your computer will begin to format your micro SD card, and erase all its contents. [7]
- Once formatting is complete you will have a blank, newly formatted micro SD card for use.
Mac
-
1Insert your micro SD card into a micro SD card adapter or reader compatible with your micro SD card. For example, if you own a SanDisk micro SD card, you should have a micro SD card adapter that came with it. The adapter looks like a regular SD card with a slot at the bottom where you insert your micro SD card.
- Note that most Micro SD cards that are 32 GB or less come formatted as FAT32. Cards above 64 GB are formatted to exFAT file system. If you are formatting your SD for your Android phone or Nintendo DS or 3DS, you will have to format to FAT32. With Android, many of your apps or custom recoveries, if you are rooted, will not read exFAT.
- Also note that if you are using Mac OS 10.6.5 (Snow Leopard) or earlier, you won’t be able to use or format an exFAT card as these older versions of Mac OS don’t support this file system. You will have to upgrade your OS.
- Formatting to FAT32 is usually your best option, however, FAT32 formatted cards won’t let you transfer or store a file more than 4GB.
- You can also purchase a third-party micro SD card adapter if you don’t already have one. Just make sure that it is compatible with your micro SD card. Some third-party adapters also use a USB component on one end and operate like a flash drive.
-
2Insert the card reader or adapter into a USB port or SD card slot on your Mac computer. Depending on your computer and type of adapter you will either need to use your SD card slot or a USB port.
- If you are using a micro SD card adapter, make sure that the lock toggle is up and in the unlocked position. If it is in the locked position your computer may not read the card or let you make any changes. It may be “Read only”.
- It’s a good idea to copy the files currently on the card over to your computer to save. This will allow you to keep your data and files for transferring back after you format.
-
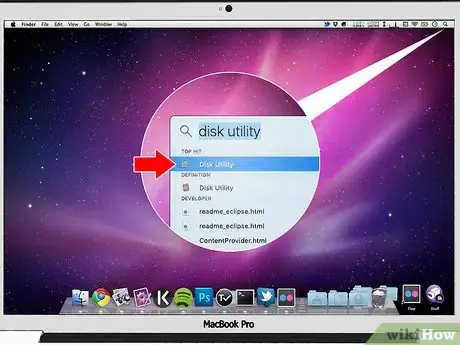
3Open Disk Utility. Click on the search icon in the upper right-hand corner of your task bar at the top of your screen. Search for “Disk Utility” and click on the “Disk Utility” application.
- The Disk Utility application will display on-screen. It will show you all of your available drives and storage systems.
- You can also get to “Disk Utility” by going into your “Applications” Folder > “Utilities” > “Disk Utility”.
-
4Click on the name of your micro SD card displayed in the left pane of Disk Utility. You will see a panel on the left that shows your computer’s hard drive, and below it, any partitions and external drives.
- Your SD card will show up as a removable disk and display how much space it can hold.
- Click on your SD card drive to bring up a page with a list of options.
-
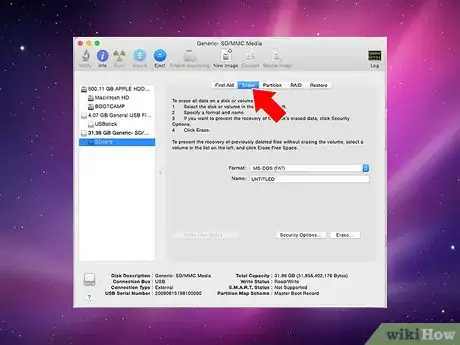
5Select the radio button that says “Erase”. This will bring up a page that lets you erase and format your card. [8]
- You will see three or four radio button options at the top: “First Aid” “Erase” “Partition” “RAID” and “Restore”. You may also see "Unmount" if you are running El Capitan. You want to click “Erase”.
-
6Select your desired format. You will now see a dropdown that has a format option. [9]
- You will have options for Mac OS Extended (Journaled), Mac OS Extended (Case-Sensitive, Journaled) MS-DOS (FAT), and exFAT. MS-DOS (FAT) is the option that formats your micro SD to FAT32. [10] The exFAT option will format to the exFAT filesystem and allow you to transfer and store files larger than 4 GB.
- After you select your desired format, enter a name for your card.
-
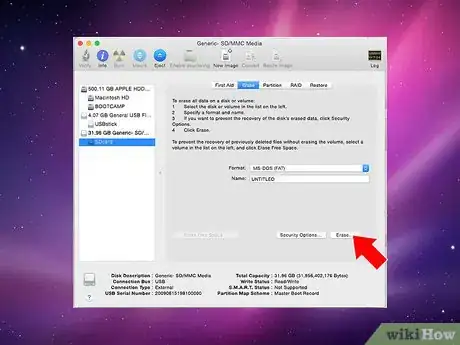
7Click “Erase” to restore and format your card. Once you click erase, you will see a popup that asks you if you are sure you want to erase and format your card. It will warn you that doing so will wipe everything off your card. Click “Erase” on the popup menu.
- Once you click “Erase” your computer will format and erase your card. Once it is complete it will show up with the new name. Your micro SD card is now formatted.
Expert Q&A
-
QuestionDo you have to format a micro SD card before you can use it in an Android device?
 Luigi OppidoLuigi Oppido is the Owner and Operator of Pleasure Point Computers in Santa Cruz, California. Luigi has over 25 years of experience in general computer repair, data recovery, virus removal, and upgrades. He is also the host of the Computer Man Show! broadcasted on KSQD covering central California for over two years.
Computer & Tech Specialist Most of the time if you turn off the device, plug in the SD card, and turn the device back on, it will install the SD card on its own, and you don't have to do anything. If it doesn't, you'll need to go into your storage settings and format the card.
 -
QuestionHow can I format a Microsoft computer?
 R2_d2000Top AnswererYou can follow the steps on this article to effectively format your computer.
 -
QuestionHow can I do this on a Nintendo Switch?
 R2_d2000Top AnswererCheck out How to Format an SD Card on the Nintendo Switch for step-by-step directions.
Warnings
- Keep in mind that formatting a micro SD card will erase and remove all contents. Take steps to back up your personal data prior to formatting your micro SD card if you want to save photos, music, and all other data.⧼thumbs_response⧽
References
- ↑ Luigi Oppido. Computer & Tech Specialist. Expert Interview. 24 February 2021.
- ↑ https://www.maketecheasier.com/format-sd-card-android/
- ↑ http://www.gazelle.com/thehorn/2013/05/28/how-to-back-up-and-format-your-microsd-card-on-your-galaxy-smartphone/
- ↑ http://liliputing.com/2015/10/android-6-0-can-treat-sd-cards-as-internal-storage-at-a-cost.html
- ↑ http://www.tech-recipes.com/rx/37811/windows-phone-8-format-sd-card/
- ↑ http://www.windowsphone.com/en-us/how-to/wp8/phones-and-hardware/use-an-sd-card-to-add-space
- ↑ http://kb.sandisk.com/app/answers/detail/a_id/312/~/formatting-a-memory-card,-flash-drive-or-device-using-a-pc
- ↑ https://www.youtube.com/watch?v=na9dLlYNFOs
- ↑ http://kb.sandisk.com/app/answers/detail/a_id/203/~/formatting-on-a-mac-computer
About This Article
The right way to format a micro SD card depends on the device you're using. If you're using an Android, go to your settings and tap on "Storage." Then, tap on the "Format SD card" button and confirm that you want to erase the contents of the card. If you're using a Windows phone, go to your settings and tap on "phone storage." Then, tap on the "Format SD card" option. To learn how to format a micro SD card on a Windows or Mac computer, scroll down!
