X
This article was co-authored by wikiHow Staff. Our trained team of editors and researchers validate articles for accuracy and comprehensiveness. wikiHow's Content Management Team carefully monitors the work from our editorial staff to ensure that each article is backed by trusted research and meets our high quality standards.
The wikiHow Tech Team also followed the article's instructions and verified that they work.
This article has been viewed 412,616 times.
Learn more...
A security envelope is type of Adobe Acrobat file that can password-protect one or more PDF files. We'll show you how to use Adobe Acrobat Pro to add a password to one or more PDF files by creating a security envelope.
Steps
-
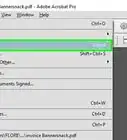
1Open the Security Envelope tool in Acrobat Pro. The process for this varies a little depending on what version you're using. You cannot create security envelopes in the free Acrobat Reader.
- XI and DC - Click the Tools menu on the right side of the window and select "Protection" → "More Options"/"More Protection" → "Create Security Envelope."
- X and older - Click the "Secure" button in the toolbar and select "Create Security Envelope." If you don't see the "Secure" button, open the Advanced menu and select "Security" → "Create Security Envelope."
-
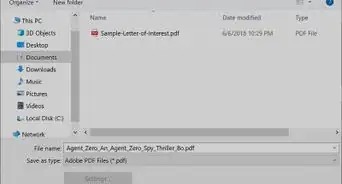
2Add files to send in the envelope. Your currently-open PDF file will be added automatically, and you can add any other files you want. The files that you add do not have to be PDF files; you can add Word documents, Excel spreadsheets, and other types of files.
- Click the "Add File to Send" button and browse for the files that you want to add. More files will increase the size of the security envelope file.
Advertisement -
3Select an envelope template. Acrobat comes with three different envelope templates that you can pick from, and you can download more online. If you're using a Mac, you may not have any templates to pick from. If this is the case, perform the following steps:
- Open your Applications folder and right-click Adobe Acrobat.app.
- Select "Show Package Contents" and then navigate to /Applications/Adobe Acrobat DC/Adobe Acrobat.app/Contents/Resources/en.lproj/DocTemplates.
- Copy the templates to an easier location, such as your Documents folder.
- Back in the Create Security Envelope window, click "Browse" and choose your new template location.
-
4Choose how you want to send the envelope. You can choose to send it immediately, which will open your email client after the envelope has been created. If you choose to send it later, Acrobat will create the envelope file in PDF format, allowing you to send it how you wish.
- It's generally best to select to send the file later.
-
5Check the "Show all policies" box and select "Encrypt with Password." This will allow you to add a password to the envelope. You won't be prompted to create the password until the process is finished.
- You can choose to secure with certificates, but this is a more complex process that requires creating encrypted certificates for both you and the recipient. This is more secure than a password, since only the certificate holder can open the file, but will confuse most people you're trying to send the file to. Stick with passwords unless you are under very strict security or confidentiality measures.
-
6Enter in your sender information. You'll be prompted to enter your sender information, which Acrobat will use to fill out the template. You can check "Do not show again" after filling this out to save it for future envelopes.
-
7Review your settings and click "Finish." This will open the Password Settings window.
-
8Check the "Require a password to open the document" box. This will allow you to enter your password.[1]
-
9Create a password for the envelope. Newer versions of Acrobat will rate your password strength as you type it. You'll be prompted to enter it again to confirm it.
-
10Select your compatibility (optional). Most users can leave this at "Acrobat 7.0" for maximum compatibility. If you know your recipient is using Acrobat 6.0, you can select that instead. If you know they are using XI or newer, you can select that for increased password encryption.
- Security envelopes are not compatible with 5.0 or earlier.
-
11Finish the creation process. You'll be warned that the settings will not take effect until you save the file.
-
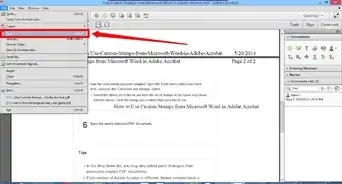
12Put the finishing touches on the envelope. After you finish the creation process, you'll see your security envelope. you can go through and make edits to the fields, and fill in the appropriate information. You can include instructions for the recipient in the "To" box, but make sure you don't put the password here.[2]
-
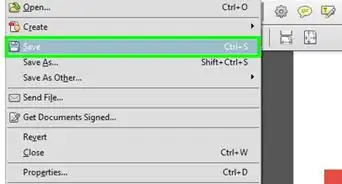
13Save the file. Once you're finished, save the file to your computer. It will save as a regular PDF file. Once the file is saved, you can send it to anyone as an email attachment or upload it to a cloud storage service, and they'll need the password to open it.
-Step-1-Version-3.jpg)
-Step-2-Version-3.jpg)
-Step-3-Version-3.jpg)
-Step-4-Version-3.jpg)
-Step-5-Version-3.jpg)
-Step-6-Version-3.jpg)
-Step-7-Version-3.jpg)
-Step-8-Version-3.jpg)
-Step-9-Version-3.jpg)
-Step-10-Version-3.jpg)
-Step-11-Version-3.jpg)
-Step-12-Version-3.jpg)
-Step-13-Version-3.jpg)
Advertisement
Community Q&A
-
QuestionEverytime I try to enter a password for an email from the office to my Android it won't work. What should I do?
 Community AnswerContact the person who created the protected PDF document - he would know the password. Chances are he wouldn't use a password attached to someone's email, because the only person who'd be able to open the PDF would be the person with that email and specific password. The issue doesn't have anything to do with your phone.
 -
QuestionHow can I open this secure PDF if my browser doesn't force it to open?
 Community AnswerMake sure you have a PDF viewer, such as the free Acrobat Reader or the paid Adobe Acrobat, and try again. PDFs are meant to open from all browsers that have a PDF reader available.
Advertisement


References
About This Article

wikiHow Staff
wikiHow Staff Writer
This article was co-authored by wikiHow Staff. Our trained team of editors and researchers validate articles for accuracy and comprehensiveness. wikiHow's Content Management Team carefully monitors the work from our editorial staff to ensure that each article is backed by trusted research and meets our high quality standards. This article has been viewed 412,616 times.
How helpful is this?
Co-authors: 15
Updated: February 16, 2022
Views: 412,616
Categories: Portable Document Format (PDF)
Advertisement