wikiHow is a “wiki,” similar to Wikipedia, which means that many of our articles are co-written by multiple authors. To create this article, 11 people, some anonymous, worked to edit and improve it over time.
The wikiHow Video Team also followed the article's instructions and verified that they work.
This article has been viewed 333,922 times.
Learn more...
When a pattern calls for a yarn over (abbreviated yo), you are adding an extra stitch to your work. When you go back over this stitch on the next row, you will get a lace-like hole in your work that also acts as an increase. This article will show you how to do two different styles of the yarn over: English and Continental.
Steps
Doing a Yarn Over English Style
-
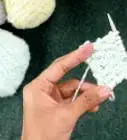
1Have at least one stitch done on your right needle. The left needle will have the rest of the stitches. In this tutorial, the stitch just before the yarn over will be called the "first stitch." The stitch after the yarn over will be called the "next stitch."
- Pay attention to your stitch pattern. When working the English style, you will need to move the yarn into the correct position. This will depend on what the first stitch was, and what the next stitch will be.[1]
-
2If the first stitch and the next stitch are both knits, wrap the yarn under and over the needle. Bring the yarn towards you, under the right needle. Next, drape the yarn over the top of the needle, away from you.
- This is called a "yarn forward" or "yfwd" in knitting patterns.
Advertisement -
3If the first stitch was a knit, and the next stitch is a purl, wrap the yarn around the needle, from back to front. Bring the yarn under the right needle, towards you. Drape the yarn over the top of the right needle, away from you. Next, wrap the yarn under the needle back towards you again.
- This is called a "yarn 'round need" or "yrn" in knitting patterns.
-
4If the first stitch was a purl, and the next stitch is a knit, bring the yarn towards the front. Simply drape the yarn over the top of the right needle as you bring it towards you.
- This is called a "yarn over needle" or "yon" in knitting patterns.
-
5If the previous stitch and the next stitch are both purls, wrap the yarn, over the needle from front to back. Drape the yarn over the top of the right needle, away from you. Next, wrap the yarn under the right needle, towards you.[2]
- This is called a "yarn 'round need" or "yrn" in knitting patterns.
-
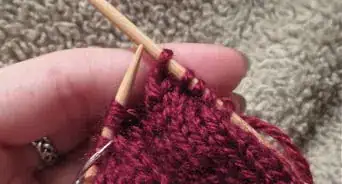
6Finish the next stitch. Stick the right needle through next stitch on the left needle. Wrap the yarn under and over the tip of the right needle. Use the tip of the right needle to pull the yarn back through the stitch. Keep the working yarn on the right needle, and slip the stitch off the left needle.
- Some patterns call for you to yarn over twice. Simply wrap the yarn around the right needle like you did previously, then complete the next stitch.
-
7Finish the row, as the pattern directs. When you do the next row, you will eventually go over the extra stitch you got from the yarn over. You will get a lace-like hole that also acts as an increase.[3]
Doing a Yarn Over Continental Style
-
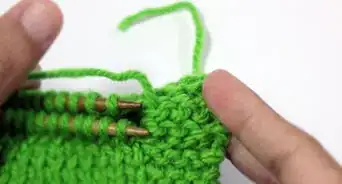
1Have at least one stitch on your right needle. The left needle should have the rest of the stitches. Unlike the English method, it does not matter what your first and second stitch will be. The working yarn automatically shifts itself into the correct position.[4]
-
2Bring the right needle under the working yarn. If you are doing a knit stitch, the yarn will drape over the top of the needle, towards the back.[5] If you are doing a purl stitch, the yarn will drape over the top of the needle, towards the front.
-
3Finish the next stitch. Stick the right needle through next stitch on the left needle. Wrap working yarn under and over the tip of the right needle. Use the right needle to pull the yarn back through. Keep the working yarn on the right needle, then slip the stitch off the left needle.
- Some patterns call for you to yarn over twice. Pick up the working yarn over your right needle again, then complete the next stitch.
-
4Finish the row according to the pattern. When you do the next row, you will eventually go over the extra stitch you got from the yarn over. This will create a lace-like hole in your project that also acts as an increase.
Community Q&A
-
QuestionWhat is the stitch before the yarn over?
 Community AnswerThe stitch before the yarn over depends on what pattern you are knitting. If you were knitting the entire row, the stitch before the yarn over will be a knit stitch. If you were purling the entire row, the stitch before the yarn over will be a purl stitch. If you were doing a rib or seed pattern, the stitch is simply the last stitch you did—either a knit or purl.
 -
QuestionAfter completing a yarn over before a purl stitch and after a purl stitch row, how do I knit the next row? I'm struggling and end up with more stitches.
 Community AnswerKnit the next row straight across if that is what your instructions say. If you end up with too many stitches, you may accidentally be doing a yarn over in the knit-only row.
 -
QuestionCan you provide some more tips to use while knitting?Community AnswerAlways push that right needle through the next stitch passed the tapered part of the needle and onto the wider part.
Things You'll Need
- Yarn
- Knitting needles


References
- ↑ https://sheeptoshawl.com/a-yarn-over-by-any-other-name/
- ↑ https://sheeptoshawl.com/a-yarn-over-by-any-other-name/
- ↑ http://www.knittinghelp.com/video/play/yarn-over-english
- ↑ https://sheeptoshawl.com/a-yarn-over-by-any-other-name/
- ↑ http://www.knittinghelp.com/video/play/yarn-over-continental
- Videos provided by New Stitch a Day: Knitting and Crochet Video Tutorials
About This Article
To yarn over, start with at least 1 stitch on your right needle. Then, bring the right needle under the working yarn. Next, stick the right needle through the stitch on the left needle and wrap the working yarn under and over the tip of the right needle. Pull the yarn back through with the right needle to finish the stitch. Finally, finish the row according to the pattern you're working with. To learn how to yarn over English style, keep reading!