This article was co-authored by Gregory Patrick. Gregory Patrick is a knitter who runs the popular blog Madman Knitting. He is also the author of the book "Mad Man Knitting or The Waiter and the Fly". He has been knitting and writing about knitting for over 10 years.
This article has been viewed 538,782 times.
There are only two basic stitches in knitting. One is the knit stitch, and the other is the purl stitch. Learning how to knit both of these stitches, will allow you to follow most knitting patterns. While it might feel awkward knitting at this stage, if you take it slowly you will soon gain speed.
Steps
Casting On and Positioning the Needles
-
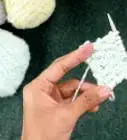
1Get a pair of knitting needles and yarn. To practice the knit stitch, all you need is a pair of knitting needles and a ball of yarn. You can use any size needles you like to practice, but make sure that the needle size is appropriate for the type of yarn you are using. You can find the recommended needle sizes for different types of yarn by checking the yarn label.
-
2Cast on your stitches. Casting on is how you begin every knitting project. Start by looping the yarn around your finger twice and then pull the back loop through the front loop to make a slipknot.[1] Then, slip the slipknot onto the needle in your non-dominant hand. Loop the yarn around the needle and pull new yarn through it make more cast on stitches.
- If you are following a pattern, then cast on the number of stitches that the pattern specifies. If you just want to practice the knit stitch, then cast on 10 stitches.
Advertisement -
3Hold the needles in your hands. You should hold the needle with the cast on stitches on it in your non-dominant hand and the other needle in your dominant hand. Hold the needles near the points for better control of the knitting motion.


Knitting Across the First Row
-
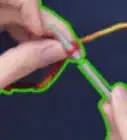
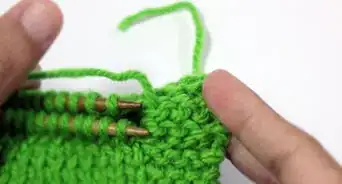
1Push the tip of the right needle into the first loop on the left needle. Place the needles so that the right needle crosses behind the left needle. Then, insert the tip of your right needle into the back of the first stitch on the left needle.
- When working the knit stitch, it is important to always go in through the back of the stitch.
-
2Check that the yarn is lying at the back of the needles. Your working yarn should always be behind the needles while you knit, so position it this way if it is not already behind the stitches.
-
3Loop the yarn over the back needle. Wrap your working yarn around the tip of the back needle, so that the yarn hangs between the two needles.[2] This yarn will form your first new knit stitch.
- If you are right handed, then you will loop the yarn around counterclockwise. If you are left handed, then you will loop the yarn around clockwise.
-
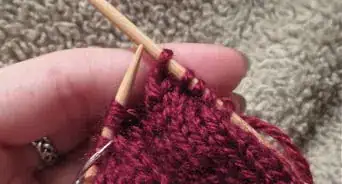
4Pull the new yarn through the cast on stitch. Use your non-dominant hand to hold the free end of the yarn and ensure that the loop is secure. Then, pull the tip of the right needle gently back through the first loop towards you, bringing the yarn with it.[3]
-
5Slip the cast on stitch off as you pull the new loop through. Let the old loop slide off the end of the needle.[4] Keep the yarn taut after each stitch to keep the loops close to the needle but not so tight that you can't slide the needle into the loops.
- Be careful as you slid off the cast on stitch. Make sure that only the stitch that you knit into comes off.
-
6Continue to knit all of the cast-on stitches in the same way. You should have one new knit stitch on your right (dominant hand) needle. Repeat the process to knit the other cast on stitches.
-
7Complete the first row. When all of the stitches are on your right needle, you have finished your first row of knitting. You can continue knitting your other rows in the same way until you finish your project or until you feel like you have mastered the knit stitch.

Knitting the Second and Subsequent Rows
-
1Hold the needle that has all the stitches in your left hand. To knit the second row as well, you do not have to reverse the movement. Simply switch the needle with all of the stitches on it over to your non-dominant hand again. You are now ready to start knitting your second row in exactly the same way as you did the first row.
-
2Knit the knit stitch row after row. This produces what is otherwise known as the garter stitch.[5] If your pattern calls for the garter stitch, then you will simply need to knit all of the rows.
-
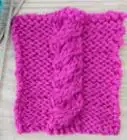
3Show off your work. Once you're skilled at knitting the knit stitch, you will find it becomes second nature and you'll be using it to make garments, accessories and much more. Practice the knit stitch until you feel comfortable using it.
- If you want to determine the number of stitches to cast on, make a one-inch square practice piece.
- The number of stitches depends on the size of the yarn.
- It also depends on the tension, or how tight or loose the stitches are when you knit.


Expert Q&A
-
QuestionWhat does knit in the round mean?
 Gregory PatrickGregory Patrick is a knitter who runs the popular blog Madman Knitting. He is also the author of the book "Mad Man Knitting or The Waiter and the Fly". He has been knitting and writing about knitting for over 10 years.
Knitting SpecialistKnitting in the round is a seamless way of knitting socks, hats, and gloves. You have to use either circular needles or a set of 4 or 5 double-pointed needles to knit in the round. -
QuestionHow can I prevent my knitting from curling at the bottom?Gregory PatrickGregory Patrick is a knitter who runs the popular blog Madman Knitting. He is also the author of the book "Mad Man Knitting or The Waiter and the Fly". He has been knitting and writing about knitting for over 10 years.
Knitting SpecialistIt is not possible to prevent the knitting from curling at the bottom. But after you finish knitting, you can block the piece by wetting it, pinning it flat to a blocking mat, and letting it dry. It will remove the curling. -
QuestionI keep gaining stitches. What am I doing wrong?
 SarahBCommunity AnswerGaining stitches without the pattern telling you to happens when you have knitted into the gap between 2 stitches. Take care to knit into the stitch itself, not the gap.
Warnings
- Don't use any worsted weight yarn with small needles. It will be hard when you pull the loop that you made through the stitch.⧼thumbs_response⧽
Things You'll Need
- A pair of knitting needles
- A ball of yarn

References
- ↑ http://www.learn2knit.co.uk/knitting/casting-on.php
- ↑ http://newstitchaday.com/knitting-101-how-to-knit-the-knit-stitch-for-beginners/
- ↑ http://newstitchaday.com/knitting-101-how-to-knit-the-knit-stitch-for-beginners/
- ↑ http://newstitchaday.com/knitting-101-how-to-knit-the-knit-stitch-for-beginners/
- ↑ http://www.craftyarncouncil.com/instructions_kn.php3
About This Article

To practice the knit stitch, start by casting on as many stitches as you like. Then, take hold of the needle with the stitches in your non-dominant hand and the empty needle in your dominant hand. When you're ready to begin, push the tip of the empty needle into the back of the first loop so the two needles cross over. Next, wrap your working yarn around the needle before gently pulling the needle out of the first loop to pull the new yarn through. Finish by slipping the old stitch off the needle. For more tips on how to knit rows, read on!