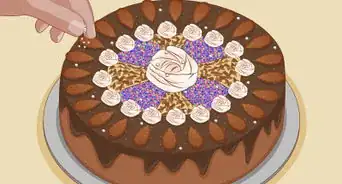
This article was co-authored by Maria Short and by wikiHow staff writer, Eric McClure. Maria Short is a Baker and the Owner of Short N Sweet Bakery & Cafe in Hilo, Hawaii. With over 24 years of experience, she specializes in specialty desserts and wedding cakes. She graduated from L’Academie de Cuisine’s Pastry Arts Program with honors and studied at Baltimore International Culinary College. In 2019, Maria competed in the 6th season of the Food Network’s Holiday Baking Championship. In 2010, she had a cake named one of “America’s Most Beautiful Cakes” by Brides magazine.
There are 10 references cited in this article, which can be found at the bottom of the page.
This article has been viewed 40,540 times.
After a large party or birthday celebration, you may find yourself with a large amount of leftover cake. Luckily, there are a variety of ways to turn your old cake into something entirely new without throwing it out! You can crumble the cake and scoop it into small balls to make cake bites or even use skewers and candy coating to turn the cake bites into cake pops. Alternatively, you can use cake crumbs to create a fruity trifle—a traditional English dessert. You can even use cake to make an ice cream topping or incorporate it into cookies, muffins, or french toast.
Ingredients
- Leftover cake (any amount)
- 16–32 ounces (0.45–0.91 kg) of candy coating (optional)
Yields 12-48 servings based on amount of leftover cake
- 1 apple
- 5.3 ounces (150 g) of berries
- 3.5 ounces (99 g) of leftover cake
- 1.75 fluid ounces (52 mL) of brandy or sherry
- 2 tablespoons (25 g) of fruit jam
- 8 fluid ounces (240 mL) of custard
- 0.7 cups (150 ml) whipped cream
- Chopped walnuts (to garnish)
Yields 4 servings
Steps
Creating Cake Bites or Pops
-
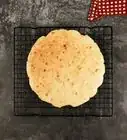
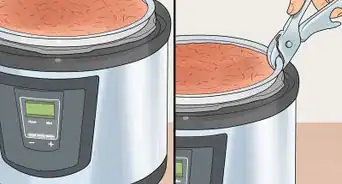
1Crumble your leftover cake into a large mixing bowl. Let your cake reach room temperature or store it in the refrigerator for at least 1 hour. Put on gloves if you’d like to keep your hands clean. Take the cake and transfer it to a large mixing bowl. Use your hands to gently rub and break the cake until it crumbles into smaller pieces. Rub each piece gently until it crumbles into small chunks that are smaller than 0.5 in (1.3 cm).[1]
- This process will work with almost any kind of flour-based cake. Birthday cake, red velvet, angel food, and carrot cake will all work well.
- Do not squeeze the cake or compress it. The goal is to break it down without compressing it.
- If your cake has frosting, you can either scrape it off crumble it up along with your cake. Many people enjoy bits of frosting in their cake bites, but you can take it off if you’d like.
- If you have any pieces larger than 1 in (2.5 cm), the cake bites won’t cool properly and may fall apart when you bite into it.
-
2Roll the cake into 1.5 in (3.8 cm) balls by hand. Scoop up a handful of cake crumbs. Use both hands to compress your handful of crumbs into a small ball. Readjust your grip after every squeeze to compress softer portions of the ball. Continue turning each handful around and squeezing it until you have a ball that is roughly 1.5 inches (3.8 cm) in diameter. Repeat this process until you’ve finished turning your cake crumbs into balls.[2]
- You can use an ice cream scooper to make your balls uniform if you’d like. These balls will be a little bigger, though.
- Don’t worry if the balls aren’t all equal in size. A little variation is totally fine.
Advertisement -
3Set the balls out on a baking sheet covered in wax paper. Line a baking sheet with wax paper. After you make each ball, place it on a baking sheet. Set your balls in columns and rows with at least 1 in (2.5 cm) of space between each ball.[3]
- You can use multiple baking sheets if you run out of space.
-
4Cover the baking sheet with plastic and chill the cake balls for 2-3 hours. Take a sheet of plastic wrap and spread it over your baking sheet. Cut or tear the plastic and press it down around the rim of your baking sheet to cover the balls. Don’t lay the plastic wrap so tight that it compresses the balls, though. Put your baking sheet in the refrigerator and wait 2-3 hours for the cake balls to cool.[4]
- If you’re in a rush, put the baking sheet in the freezer instead of the fridge. Wait 15-30 minutes for the balls to cool and harden. These cake balls may be a little firmer, though.
-
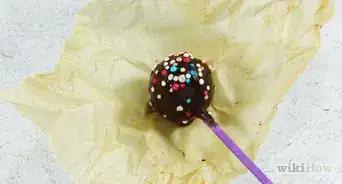
5Dip each ball into candy coating to turn the bites into cake pops. Remove your baking sheet from the fridge. Fill a bowl with liquid candy coating and stick a skewer into each ball before submerging them in the coating and putting them back on the baking sheet. If you want to make standard cake bites, place your balls on a spoon and dip them into the coating before putting them back on the baking sheet.[5]
- Candy coating typically comes in a liquid form. The most popular flavors are chocolate, vanilla, and strawberry. Make sure that you buy a coating that hardens.
- For a leftover cake that is roughly 9 by 13 in (23 by 33 cm), you’ll probably need around 16–32 ounces (0.45–0.91 kg) of candy coating.
- Spoon extra coating on top of each ball after you put them on the baking sheet if you really want to sweeten them up.
- For a less sweet version, skip this step entirely. Eat your cake bites without dipping them in anything.
Tip: If the coating pools up around the base of each ball when you put it back on the baking sheet, use a toothpick to draw a line around the base of each piece of cake. This way the coating won’t harden the ball to the wax paper as it dries. You can also stick the skewers in a block of Styrofoam to avoid drips and make your pops look more appealing.
-
6Decorate your cake balls with sugar, sprinkles, or caramel if you’d like. For a better looking treat with an additional layer of flavor, sprinkle confectionary sugar on top of the pops as they dry. Sprinkles, chocolate syrup, or caramel are all excellent options as well. You can also fill a pastry bag with a different color of frosting and drizzle it on top of your pops if you’d like.[6]
-
7Let the cake pops dry for 30-45 minutes before enjoying them. Candy coating typically takes 15-30 minutes to dry and harden, but it may take longer if you added extra coating. Let your cake balls or pops dry until the coating is hard and even. Enjoy your pops or store them in the fridge for up to 3 days.[7]


Making Fruity Cake Trifles
-
1Chop an apple into 1–2 in (2.5–5.1 cm) pieces. Get an apple and run it under cool water to wash it. Set it out on a cutting board. Use a chef’s knife to around the core of the apple. Continue cutting until you have slices or cubes that are 1–2 inches (2.5–5.1 cm) thick.[8]
- This recipe will work with birthday cake and any fruit-based flour cake.
- Feel free to use a variety of berries instead of an apple. If you do, don’t worry about cutting them unless they’re strawberries.
- You’re going to heat the apple so don’t worry about making clean cuts.
- Alternatively, you can cut around the core and blend the apple for 20-30 seconds.
-
2Heat the sliced apples in a saucepan over medium heat they’re soft. Transfer your apples to a non-stick saucepan. Spread them out so that they’re distributed equally across the pan. Turn the heat on and set it to medium. Let the apples heat for 5-10 minutes and mix them as needed to keep the heat distribution even. Continue heating your apple until they turn soft.[9]
- If the apple starts to smoke or burn, reduce the heat immediately and stir the apple chunks to spread the singed fruit out on top with the cooler apples.
-
3Stir in 5.3 ounces (150 g) of berries of your choice and let it cool. Once the apple has turned into a paste, grab 5.3 ounces (150 g) of your favorite berry. Blackberries are a popular choice, but you can use raspberries, strawberries, or some other fruit if you prefer. Sprinkle the fruit into the apple and heat over low heat for 2-3 minutes while you stir. Remove the pan from the burner and let it cool for 5-10 minutes while you prepare the leftover cake.[10]
- If you use strawberries, cut them into thin slices before adding them to the saucepan.
-
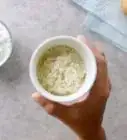
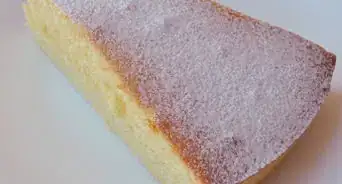
4Crumble 3.5 oz (99 g) of leftover cake into 0.5–1 in (1.3–2.5 cm) pieces. While your fruit sauce cools, grab a large mixing bowl for your cake. Take 3.5 ounces (99 g) of leftover cake and crumble it up by hand. Rub pieces of cake together until it crumbs into a thin, gravel-like texture.[11]
- You can use more cake if you want. The amount of cake is completely up to you. The more cake that you use, the thicker your trifles will be.
- Wear gloves if you want to keep your hands clean.
- Do not squeeze or compress the cake as you crumble it up.
-
5Toss the cake with a spirit and a little fruit jam. Pour 1.75 fluid ounces (52 mL) of a sweet spirit, like brandy or sherry, into your mixing bowl. Then, add 2 tablespoons (25 g) of fruit jam. You can use the same type of jam as the berry you added to the apples, or use a different flavor to add another dimension to your dish. Toss the ingredients together by hand until it forms a thick paste.[12]
- You can replace the liquor with extra fruit jam if you want a non-alcoholic version of the treat.
- You can use Chambord, Cointreau, or some other sweet liqueur if you prefer.
-
6Transfer the cake mixture into 4 glasses. Set out 4 glasses on your countertop. Mason jars or pint glasses are ideal, but any wide-rimmed glass will work. Use a large spoon to scoop your cake mixture up and pour 1/4 of the cake mixture into each of your glasses. Let the cake mixture settle at the bottom of each glass.[13]
- Alternatively, you can use 1/8 of the cake mixture if you want to add multiple layers of each ingredient.
- The size of each layer depends on the width and shape of your glass. Use a wider glass for thinner layers and a taller glass for thicker layers.
- If you want larger servings, you can divide the mixture between 2 or 3 glasses instead.
-
7Add 1/4 of your apple mix to each of the 4 glasses. Use a large spoon to scoop your apples and berries up. Add 1/4 of the apple and berry paste to each glass. Pour it on top of the cake mix and let it settle on top.[14]
- If the apples and berries hardened up while you were working on the cake mixture, heat it on your stove for 20-45 seconds to soften it up before adding it to your cake mixture.
- If you’re adding multiple layers, use 1/8 of the apples and berries.
-
8Top each glass with 2 fluid ounces (59 mL) of custard. Once the apple mix has settled on top of the cake, pour roughly 2 fluid ounces (59 mL) of custard into each glass. Use a spoon to scoop it up and let it settle on top of the apple and cake.[15]
- Vanilla or plain custard is the most common choice for trifle, but you can use another fruit flavor if you’d like.
- If you’re using multiple layers, add a layer of custard before adding another layer of cake. Add the rest of your apples and berries. Top your final layer with more custard.
Variation: You can substitute the custard with yogurt if you want a healthier option that won’t be as sweet. The yogurt version makes a great breakfast treat.
-
9Fill the remainder of each glass with whipped cream if you’d like. Fill the remainder of each glass with whipped cream if you want to sweeten the dish further. Alternatively, you can add a small squirt of whipped cream to sweeten it a little bit. It’s entirely up to you how much whipped cream you add.[16]
- This step is completely optional. If you don’t want to sweeten the already-flavorful dish, feel free to skip the whipped cream.
- You can use any type of whipped cream for this.
-
10Garnish each glass with chopped walnuts. To add a little crunch to the dish, sprinkle chopped walnuts on top of each glass to taste. If you really enjoy nuts, cover the top of each glass entirely. Otherwise, sprinkle a small amount on top. It’s completely up to you.[17]
- You can use chopped almonds or some other variety of nut if you prefer. You can also skip the nuts entirely if you aren’t into them.
- A dash of cinnamon or nutmeg can make a great addition as well if you enjoy these flavors.
-
11Refrigerate for 1-2 hours and enjoy your treat. Put your glasses in the refrigerator to let the ingredients cool and stiffen a little. Leave the glasses in the fridge for 1-2 hours before taking them out to eat. Cover any glasses you aren’t going to eat immediately with plastic wrap and store them for up to 36 hours.[18]
- Add a maraschino cherry or slice of strawberry to the top of the whipped cream if you want a little extra fruit.


Using Cake for Other Treats
-
1Use the cake crumbs as a topping for ice cream. Turning your leftover cake into a topping for ice cream is the easiest way to get rid of your leftovers. Simply crumble the cake in a mixing bowl until you reach a texture that seems appealing to you. You can make the chunks as big or small as you’d like. Sprinkle the cake crumbs over a few scoops of ice cream to give it a unique flavor and texture.[19]
- For a crunchier version, crumble the cake on a baking sheet and bake it for 20 minutes at 250 °F (121 °C).[20]
-
2Replace some of the flour in your muffins or cookies with cake. This is a particularly good option if you have a lot of crumbs leftover but don’t want to make a specific recipe. Crumble the leftover cake into a fine powder and mix it in with your flour. Replace up to 50% of the flour in your cookie recipe with cake. For muffin recipes, don’t replace more than 25% of the flour with cake crumbs to avoid overpowering the flavor.[21]
- This will work with plain cakes the best, but you can certainly change the overall flavor of your cookies or muffins by using a fruit-flavored or vanilla cake as well. Chocolate cake will work nicely with chocolate chip muffins or cookies.
- You cannot do this with flourless cake. So long as the cake recipe used flour though, this is a great way to use excess leftover cake.
- You can also use this process to replace 50% of the flour in a pie crust recipe.
-
3Make some French toast using your leftover cake slices. Freeze your cake for 20-60 minutes. Then, whisk 1 egg in a bowl with 1 fl oz (30 mL) of milk and 2 fl oz (59 mL) of Baileys, Rumchata, or cream. Dredge your frozen cake in the mixture and heat the slices in a buttered frying pan over medium heat for 2-3 minutes on each side. Top with syrup or sugar to enjoy your slices of cake as French toast![22]
- Ideally, your cake should be in rectangular slices that are 1–2 in (2.5–5.1 cm) thick. Cut your cake as needed to turn preexisting slices into rectangles.
- This will only really work with standard birthday cake.


Expert Q&A
-
QuestionWhat can I do with leftover sponge cake?
 Maria ShortMaria Short is a Baker and the Owner of Short N Sweet Bakery & Cafe in Hilo, Hawaii. With over 24 years of experience, she specializes in specialty desserts and wedding cakes. She graduated from L’Academie de Cuisine’s Pastry Arts Program with honors and studied at Baltimore International Culinary College. In 2019, Maria competed in the 6th season of the Food Network’s Holiday Baking Championship. In 2010, she had a cake named one of “America’s Most Beautiful Cakes” by Brides magazine.
BakerUse it as a trifle! Cut up your sponge cake into cube portions and layer it with whipped cream and jam (or your favorite sauce). Always layer the sauce/jam on top so the cake gets nice and moist. For an especially pretty touch, serve the dessert in a clear dish.
Things You’ll Need
Creating Cake Bites or Pops
- Leftover cake
- Mixing bowl
- Metal spoon
- Wax paper
- Baking sheet
- Plastic wrap
- Candy coating (optional)
- Toothpicks (optional)
- Skewers (optional)
- Spoon (optional)
Making Fruity Cake Trifle
- Leftover cake
- Mixing bowl
- Spoon
- Glasses
- Saucepan
- Knife
- Cutting board
Using Cake for Other Treats
- Baking sheet
- Wax paper
- Mixing bowl
- Whisk
- Saucepan
Expert Interview
Thanks for reading our article! If you'd like to learn more about using leftover cake, check out our in-depth interview with Maria Short.
References
- ↑ https://www.epicurious.com/recipes/food/views/basic-cake-balls-361550
- ↑ https://www.epicurious.com/recipes/food/views/basic-cake-balls-361550
- ↑ https://www.epicurious.com/recipes/food/views/basic-cake-balls-361550
- ↑ https://youtu.be/rB6pOUSJqIk?t=99
- ↑ https://youtu.be/rB6pOUSJqIk?t=127
- ↑ https://youtu.be/y0mVSs_icFo?t=147
- ↑ https://www.epicurious.com/recipes/food/views/basic-cake-balls-361550
- ↑ https://www.theguardian.com/food/2019/oct/12/turn-stale-cake-into-a-seasonal-trifle-recipe-waste-not-tom-hunt
- ↑ https://www.theguardian.com/food/2019/oct/12/turn-stale-cake-into-a-seasonal-trifle-recipe-waste-not-tom-hunt
- ↑ https://www.theguardian.com/food/2019/oct/12/turn-stale-cake-into-a-seasonal-trifle-recipe-waste-not-tom-hunt
- ↑ https://www.theguardian.com/food/2019/oct/12/turn-stale-cake-into-a-seasonal-trifle-recipe-waste-not-tom-hunt
- ↑ https://www.theguardian.com/food/2019/oct/12/turn-stale-cake-into-a-seasonal-trifle-recipe-waste-not-tom-hunt
- ↑ https://www.theguardian.com/food/2019/oct/12/turn-stale-cake-into-a-seasonal-trifle-recipe-waste-not-tom-hunt
- ↑ https://www.theguardian.com/food/2019/oct/12/turn-stale-cake-into-a-seasonal-trifle-recipe-waste-not-tom-hunt
- ↑ https://youtu.be/vihRdNMKaAI?t=250
- ↑ https://youtu.be/Re-Foo_ClPc?t=243
- ↑ https://www.theguardian.com/food/2019/oct/12/turn-stale-cake-into-a-seasonal-trifle-recipe-waste-not-tom-hunt
- ↑ https://www.theguardian.com/food/2019/oct/12/turn-stale-cake-into-a-seasonal-trifle-recipe-waste-not-tom-hunt
- ↑ http://www.the350degreeoven.com/2013/08/cake/what-to-do-with-leftover-cake-or-cake-crumbs/
- ↑ https://www.dallasnews.com/food/cooking/2019/09/11/extra-cake-or-pie-dough-here-s-how-dallas-pastry-chefs-turn-it-into-something-even-better/
- ↑ https://www.dallasnews.com/food/cooking/2019/09/11/extra-cake-or-pie-dough-here-s-how-dallas-pastry-chefs-turn-it-into-something-even-better/
- ↑ https://www.myrecipes.com/extracrispy/birthday-cake-french-toast
About This Article