This article was co-authored by wikiHow Staff. Our trained team of editors and researchers validate articles for accuracy and comprehensiveness. wikiHow's Content Management Team carefully monitors the work from our editorial staff to ensure that each article is backed by trusted research and meets our high quality standards.
There are 14 references cited in this article, which can be found at the bottom of the page.
The wikiHow Video Team also followed the article's instructions and verified that they work.
This article has been viewed 30,472 times.
Learn more...
Losing a button on a shirt is frustrating, and it can even make the shirt unwearable. Fortunately, you can replace a button in a matter of minutes! Sew a button onto a shirt using a needle and thread for an easy hand-sewing option, or get out your sewing machine for an ultra-quick way to attach a button.
Steps
Sewing a Button By Hand
-
1Thread the needle with a durable matching thread. Cut a piece of general, all-purpose thread that is about 18 in (46 cm) long.[1] Insert the end of the thread through the eye of the needle until the ends are even. Then, tie a knot in the ends of the thread.[2]
- Make sure that your needle will fit easily through the buttonholes in your button. Some needles have larger eyes to make it easier to thread them, but this can also interfere with sewing through small spaces.
Tip: Coat your thread in beeswax to help the thread glide through your stitches and to strengthen it. Rub the thread along the side of a beeswax candle or get some wax on your thumb and forefinger, grasp the thread, and pull it through.[3]
-
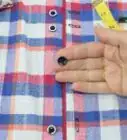
2Position the button on the shirt where you want to sew it on. Check to see if there are any holes left over from the old button, and if so, use these as guidelines. If not, position the button so that it will line up with the buttonhole and any other buttons on the shirt. Hold the button in place with your fingers.[4]
- You may also use a fabric marker or chalk to mark the position where you want to sew on the button, or use a pin to hold the button in place.
Advertisement -
3Insert the needle through the back of the shirt and button. Bring the needle all the way through the shirt fabric and buttonhole. Pull until the thread is taut and the knot is right up against the back of the shirt fabric.[5]
- If you have inserted a pin to hold the button in place, you can remove it now.
- If the back of the needle feels sharp as you push it through the fabric, put a thimble on your thumb to protect it.[6]
-
4Sew over a pin and back down through the opposite hole. Lay a pin across the top of the button. Then, bring the needle and thread across the pin and down through the opposite hole. Pull the thread taut so that it is holding the pin in place.[7]
- Sewing across the pin will provide slack in the thread, which will allow the button to move slightly and make it easier to fasten.
-
5Repeat the stitch to secure the button. Go back through the same 2 buttonholes to secure a 2-hole button. For a 4-hole button, come back up through a different hole and stitch back down through that hole’s opposite. Then, return to the first buttonhole and sew through that one’s opposite again.[8]
- Repeat the stitch 7 more times to secure your button.
-
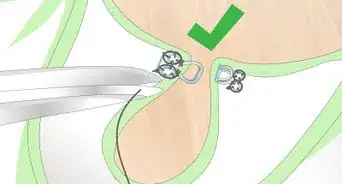
6Cut the excess thread on the backside of the fabric. There is no need to tie another knot in the back of the shirt. Stitching through the buttonholes so many times is enough to hold the button in place. Cut the thread about 0.25 in (0.64 cm) from the shirt fabric when you are finished sewing.[9]
- Your button is attached!

Securing a Button with a Sewing Machine
-
1Remove the presser foot and lower the feed dogs. The feed dogs are the gears under the needle on your sewing machine that pull the fabric through as you sew. Unscrew or unlatch the presser foot to release it and set it aside. Then, locate the feed dog switch on your sewing machine and flip or turn it to lower them. This will prevent the fabric from moving while you sew.[10]
- If your machine does not have a feed dog switch, place a piece of paper over the feed dogs. This will prevent the machine from moving the shirt fabric as you sew, and then you can simply tear it away when you are finished.
- If you have a button presser foot, then install it now. This will help to hold the button in place while you sew. However, a button presser foot is not necessary for using this technique.[11]
Warning: Be very careful to keep your fingers away from the needle as you sew! Sewing without a presser foot exposes the needle and you can seriously hurt yourself if the needle comes down on 1 of your fingers.
-
2Position the shirt and button under the needle. Place the shirt under the needle and position the button on the shirt where you want to attach it. Ensure that the button is aligned with any other buttons on the shirt and that it will connect with the adjacent buttonhole.[12]
- You may want to mark the shirt to indicate the position, especially if you need to sew on multiple buttons. Use a fabric marker or disappearing ink to avoid staining your shirt.[13]
-
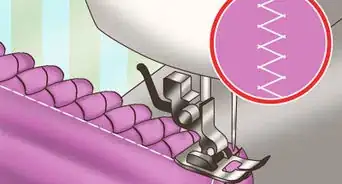
3Select the zigzag stitch setting with a 3.0 length and 0.2 width. You may need to adjust the length, but 3.0 is a good place to start for sewing through buttonholes. Setting the width to its lowest level will ensure that your machine will not sew forward, only back and forth through the buttonholes.[14]
- Even if you are using a button foot, you will still need to use the zigzag setting on your machine to sew it into place.
-
4Turn the manual wheel to check the positioning. Lower the presser foot and then reposition the button and fabric as needed. Make sure that 1 buttonhole is positioned under the needle. Turn the manual wheel (located on the side of the machine) with your hand 2 times to see if the needle will go through the hole and the one next to it.[15]
- If the needle does not go down into both holes, adjust the stitch length by 0.2. Make the stitch length shorter if the needle comes down outside of the hole and longer if the needle comes down next to the hole on the inside of the button.
-
5Apply gentle pressure to the pedal to sew the button in place. Go very slowly until you are sure that the button is positioned properly. Once you are certain that the needle will go down through both holes without hitting the button, hold down the pedal and sew through each of the holes 8 times.[16]
- Keep in mind that there is a risk of the button or needle breaking if the needle comes down on it. For a safer, slower sewing option, only use the hand crank to sew the button into place.
-
6Remove the shirt from the machine and cut the thread behind the button. After you have secured the button to your shirt, raise the needle and pull the shirt away from the machine. Cut the thread about 0.25 in (0.64 cm) from the shirt fabric.[17]
- Your button is secure!

Things You’ll Need
Sewing a Button By Hand
- Button
- Shirt
- Pin
- Needle
- Matching thread
- Scissors
Securing a Button with a Sewing Machine
- Button
- Shirt
- Sewing machine
- Matching thread
- Scissors

References
- ↑ https://www.fabric.com/blog/sewing-101-how-to-sew-a-button/
- ↑ https://www.youtube.com/watch?v=MmcEF2GR584&feature=youtu.be&t=27
- ↑ https://www.fabric.com/blog/sewing-101-how-to-sew-a-button/
- ↑ https://www.youtube.com/watch?v=MmcEF2GR584&feature=youtu.be&t=34
- ↑ https://www.youtube.com/watch?v=MmcEF2GR584&feature=youtu.be&t=48
- ↑ https://www.fabric.com/blog/sewing-101-how-to-sew-a-button/
- ↑ https://www.youtube.com/watch?v=MmcEF2GR584&feature=youtu.be&t=60
- ↑ https://www.youtube.com/watch?v=MmcEF2GR584&feature=youtu.be&t=80
- ↑ https://www.youtube.com/watch?v=MmcEF2GR584&feature=youtu.be&t=94
- ↑ https://www.youtube.com/watch?v=m-ZoGnZ_ZX0&feature=youtu.be&t=35
- ↑ https://www.youtube.com/watch?v=OG8dD7Ga39Q&feature=youtu.be&t=9
- ↑ https://www.youtube.com/watch?v=m-ZoGnZ_ZX0&feature=youtu.be&t=48
- ↑ https://www.fabric.com/blog/sewing-101-how-to-sew-a-button/
- ↑ https://www.youtube.com/watch?v=m-ZoGnZ_ZX0&feature=youtu.be&t=60
- ↑ https://www.youtube.com/watch?v=m-ZoGnZ_ZX0&feature=youtu.be&t=94
- ↑ https://www.youtube.com/watch?v=m-ZoGnZ_ZX0&feature=youtu.be&t=115
- ↑ https://www.youtube.com/watch?v=MmcEF2GR584&feature=youtu.be&t=94
- ↑ https://www.youtube.com/watch?v=MmcEF2GR584&feature=youtu.be&t=24
About This Article