This article was co-authored by wikiHow Staff. Our trained team of editors and researchers validate articles for accuracy and comprehensiveness. wikiHow's Content Management Team carefully monitors the work from our editorial staff to ensure that each article is backed by trusted research and meets our high quality standards.
There are 11 references cited in this article, which can be found at the bottom of the page.
The wikiHow Video Team also followed the article's instructions and verified that they work.
This article has been viewed 121,282 times.
Learn more...
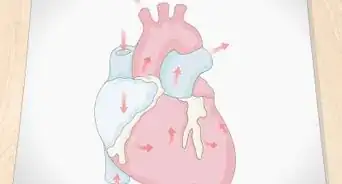
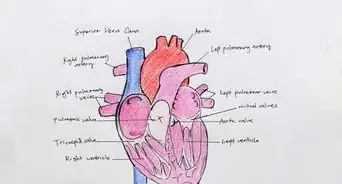
Every heart is made of two pumps: the right receives blood and pumps it to your lungs, while the left receives blood from the lungs and pumps it into the bloodstream. If you want to make a heart model and see this process in action, it's pretty easy! Whether you want to get hands-on with some playdough or get a bit more complicated using a Styrofoam cup or pop bottle model, you'll have fun and learn at the same time.
Steps
Making a Heart with Playdough
-
1Create the heart using red playdough. Start by rolling a small red ball about 1 to 1.5 inches (2.5 to 3.8 cm) wide and thick. Now, lay a finger vertically down the middle and press down gently to create a small indent. Press down firmly on the top to create another more prominent indent as if it were an apple. Finally, press firmly against the bottom-right of the apple shape to create a small, less prominent indent.[1]
- Leave the left side of the top indent (the right ventricle) slightly taller than the right side (the left ventricle).
- Remember that the left side is actually the right ventricle and vice versa. If you get confused, imagine the heart inside your body!
-
2Attach a small tube of red playdough to the top of the right ventricle. Roll a cylindrical piece of red playdough about 2 inches (5.1 cm) long to act as the aorta. Once you're done, attach it to the top of the left bulge (right ventricle). Create a curve in the tube about 0.5 inches (1.3 cm) from the heart that runs down over the right bulge (left ventricle) and tails off to the right.[2]
- Use a playdough knife to make a small incision into the end of the cylindrical piece to represent the center tubing of the aorta.
Advertisement -
3Connect a 1⁄2 inch (1.3 cm) tube vertically to the bottom of the heart. Right now, the top tube is the aorta extending from the top of the heart. Now, make a smaller tube piece about 1⁄2 inch (1.3 cm) long and connect it to the bottom of the heart—this is the bottom of the aorta.
- Make sure the small tube runs directly across from the top tube, as if both of them make one single piece running through the heart.
-
4Attach 3 small 1⁄4 inch (0.64 cm) tubes to the aorta. Roll 3 small tubes to represent the arteries that extend from the aorta. Now, connect them to the top piece of the aorta.[3]
- Create 3 small holes in the tips of the tubes using the tip of your playdough knife or a toothpick. These represent the circular inner tubing of the arteries.
-
5Run a tube of blue playdough right across the aorta. Roll a tube of blue playdough about 1.5 inches (3.8 cm) long—slightly smaller than the aorta tube. This is your heart's left vein. Now, connect one end to the base of the aorta extending from the top of the heart. Run it to the right horizontally over the portion of the aorta that extends to the right.
- If it's easier, break the blue tube into 2 pieces and attach them individually. Start by running one from the bottom of the aorta up to the center of the heart, and the other extending from this point to the right over the remaining section of the aorta.
-
6Attach another tube of blue playdough vertically to the left of the heart. This is the heart's right vein. Start by rolling a tube of blue playdough about 3 inches (7.6 cm) long. Now, attach it to the back-left of the heart (the right ventricle) so that only the top and bottom of the tube are visible. Wrap the top of the tube over the heart and toward you.[4]
- Create a small hole in the top tip of the tube using a playdough knife or toothpick. This represents the center tubing of the vein.
-
7Add an artery to the top of each blue vein. Roll 2 small tubes of blue playdough for each artery. Now, attach them to the top about 1⁄2 inch (1.3 cm) from their tips.
- Create a small hole in each tip of the artery using your knife.
Creating a Styrofoam Cup Model
-
1Fill 1 Styrofoam cup with water. The cup acts as the heart and the water is the blood. The size of the cup isn't too important, as long as it can hold at least 1 cup (240 mL) of water. If you have something larger, go for it! [5]
- You can use a beaker instead of a cup for similar results.
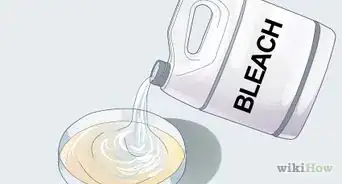
- Add a few drops of red food coloring for a nice effect!
-
2Cut the neck of a large balloon off with scissors. Purchase some large balloons that are 11 to 12 inches (28 to 30 cm) in size when inflated. Take one and cut the neck at the region where it starts to widen into the body. Afterward, set the neck aside for later.[6]
- Keep broken or uninflated balloons away from children under 8 years of age.
-
3Stretch the balloon over the cup's opening. Afterward, pull it down over the cup as tightly as possible. When you're finished, the surface of the balloon should be as flat as possible.[7]
- Discard any broken balloons as soon as possible.
-
4Poke 2 holes into the balloon's surface with a wooden skewer. Gently press down on the surface of the balloon with the sharp end of the skewer to create the holes. Try to make them roughly the size of your straws' diameter or slightly smaller. Be sure to create each hole on opposite edges of the balloon about 1 inch (2.5 cm) apart.
- Purchase wooden skewers from big-box stores and home hardware stores.
-
5Insert the long part of your 2 straws into the holes. Gently insert each one to avoid ripping the balloon. Be sure that the straws fit snugly into the holes so that no air escapes.[8]
- If the holes are too big and air escapes, remove the balloon and repeat the last 3 steps.
-
6Wrap the uncut part of the balloon neck onto a straw. Cover the tip of one of the straws with the neck so that no air can escape. After wrapping it around the straw, tape it to the straw to hold it in place.[9]
- Use Scotch tape for the best results.
-
7Pump the heart into a sink by pressing onto the balloon. Start by aiming the open straw into a sink, which will act as the body. Gently press one of your fingers down onto the center of the balloon, which acts as the heart. Each time you press down, the water—acting as the blood—from the cup is pumped through the straws and into the sink.[10]
- The cut part of the balloon acts as a valve that stops the blood from moving back down the straw into the previous chamber.
-
8Remove the balloon neck from the straw and press down on the balloon. After pumping the heart without a valve, nothing keeps the blood from moving down the straw. This prevents the blood from moving through the heart and into the body!
- Remember that the balloon neck is your heart's valve. This example shows how 1 chamber of your heart works with its valve. But inside your body, there are 4 chambers and 4 valves!
Using Soda Bottles and Straws
-
1Drill 2 holes into a bottle cap with an 11⁄32 inch (0.87 cm) drill bit. Standard straws usually have a diameter of about 0.36 inches (0.91 cm), which is roughly the size of a 11⁄32 inch (0.87 cm) drill bit. Attach the drill bit to your electric drill and create 2 holes in one of the caps about equal distance apart. To create the holes, place the cap onto a flat surface with the top facing upward. Now, aim the drill into the center of the cap and apply downward pressure while squeezing the drill's trigger.[11]
- Each hole should be big enough for your straws to slide through.
- Never use an electric drill without the help of an adult!
-
2Drill 1 hole into another bottle cap with a 6⁄16 inch (0.95 cm) drill bit. The hole in the second cap should be smaller than the first 2 holes. Again, attach your bit and drill down into the cap while applying firm pressure.[12]
- Always place the bottle caps onto a flat surface while drilling.
-
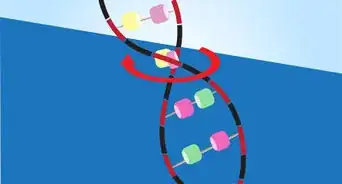
3Mix 1 litre (0.26 US gal) of water and food coloring in your pitcher to create blood. Add a few drops of food coloring into a pitcher of water. Don't worry about using an exact amount of food coloring—as long as you have something that looks bloody![13]
- Stir the food coloring into the pitcher using a straw.
-
4Connect 2 straws and bend them to create two 90 degree angles. Pinch 1 straw at the end of the tip to make it smaller and insert it into the tip of the other straw. Adjust the bendable portion of the straws so each one is 90 degrees. Tape the straws together at the point where they connect.[14]
- Keep the long portions of the straws parallel and facing downward.
- Repeat the above process with the remaining 2 straws.
-
5Fill 2 of your pop bottles about 80 percent full with water. Carefully pour your red water into each of your bottles. Don't worry about filling them exact—just try to leave about 1/3 of each empty.[15]
- Remove the labels from your pop bottles if you haven't already.
-
6Align your 3 bottles in front of you and insert the final straw. Place your 2 bottles with blood in front of you in a straight horizontal line. Now, place the empty bottle to the right of them.
- Place your bottles on a clean, flat surface.
-
7Slide 2 straws through 2 caps and attach them to the bottles with water. Start by sliding the long end of a straw through the bottle with 1 hole in it. Now, take the other long end and slide it through the cap with 2 holes. Attach the cap with 1 hole to the left bottle and the second cap with 2 holes to the middle bottle. Afterward, fasten the caps.[16]
- Leave the third bottle empty.
- Carefully slide the long ends of the straws into each pop bottle before you attach the caps and take care not to bend them.
-
8Attach the final 2 connected straws to the middle and right bottles. Insert one end of the final straw into the remaining hole on the middle bottle's cap. Now, insert the remaining end into the empty bottle with no cap.[17]
- Seal any open space between the holes and the straws with clay.
-
9Label each bottle with masking tape. Attach a piece of tape to each bottle horizontally and label each one with a permanent marker. Mark the left bottle as the atrium of the heart, the second as the ventricle, and the third as the lungs (or body). Your fingers act as the heart's valves.
- You can skip this step if you'd like, but it helps to better understand the function of each part of the model.
-
10Squeeze the middle bottle and pinch the first straw connector. Pinch the left straw connector that runs between the left bottle (heart) and the middle bottle (ventricle). Now, squeeze the ventricle and watch the blood flow into the body! Afterward, let go of the left straw connector and pinch the right straw connector between the ventricle and the body while keeping the ventricle squeezed. Now, watch the blood move from the heart to the ventricle![18]
- Repeat this process to pump blood from the heart into the ventricle, and then distribute it into the body!
- When the blood in the heart is low, remove some from the body and distribute it back to the heart. Now, you can start the process over.


Things You'll Need
Making a Heart with Playdough
- Blue and red playdough
- Playdough tool set
Using a Styrofoam Cup
- Styrofoam cup
- Large balloon
- 2 bendable drinking straws
- Wooden skewer
- Scissors
- Water
- Tape
- Large pan or sink
Using Soda Bottles and Straws
- 3 710 millilitre (0.19 US gal) bottles with caps
- 4 bendable straws
- 1 litre (0.26 US gal) of water
- Food colouring
- Tape
- Modeling clay or playdough
- Electric drill


References
- ↑ https://youtu.be/Sl2w60IBoSM?t=5
- ↑ https://youtu.be/Sl2w60IBoSM?t=14
- ↑ https://youtu.be/Sl2w60IBoSM?t=45
- ↑ https://youtu.be/Sl2w60IBoSM?t=85
- ↑ https://www.homesciencetools.com/article/how-to-make-a-heart-pump-science-project/
- ↑ https://www.homesciencetools.com/article/how-to-make-a-heart-pump-science-project/
- ↑ https://www.homesciencetools.com/article/how-to-make-a-heart-pump-science-project/
- ↑ https://www.homesciencetools.com/article/how-to-make-a-heart-pump-science-project
- ↑ https://www.homesciencetools.com/article/how-to-make-a-heart-pump-science-project
- ↑ https://www.homesciencetools.com/article/how-to-make-a-heart-pump-science-project/
- ↑ https://www.lincolnmachine.com/tap_drill_chart.html
- ↑ https://littlebinsforlittlehands.com/heart-model-project/
- ↑ https://littlebinsforlittlehands.com/heart-model-project/
- ↑ https://littlebinsforlittlehands.com/heart-model-project/
- ↑ https://www.steampoweredfamily.com/activities/heart-model-heart-stem/
- ↑ https://www.steampoweredfamily.com/activities/heart-model-heart-stem/
- ↑ https://www.steampoweredfamily.com/activities/heart-model-heart-stem/
- ↑ https://www.steampoweredfamily.com/activities/heart-model-heart-stem/
About This Article
To make a model of a heart with playdough, find some red playdough and roll it into a ball about 1 to 1.5 inches wide. Use your fingers to mold the ball into the shape of an apple, with a slight indent running down the middle to form two bulges. To make the aorta, roll a tube shape in red playdough about 2 inches long and attach it to the top of left bulge. Use more red playdough to add details like the arteries that extend from the aorta. Then, use blue playdough to make a tube that will be your heart’s left vein, as well as tiny tubes for the arteries. Use a sculpting knife for the little details. To learn how to make a Styrofoam model of the heart or a soda bottle and straws model, keep reading!


Medical Disclaimer
The content of this article is not intended to be a substitute for professional medical advice, examination, diagnosis, or treatment. You should always contact your doctor or other qualified healthcare professional before starting, changing, or stopping any kind of health treatment.
Read More...