This article was co-authored by wikiHow staff writer, Jessica Gibson. Jessica Gibson is a Writer and Editor who's been with wikiHow since 2014. After completing a year of art studies at the Emily Carr University in Vancouver, she graduated from Columbia College with a BA in History. Jessica also completed an MA in History from The University of Oregon in 2013.
There are 10 references cited in this article, which can be found at the bottom of the page.
The wikiHow Video Team also followed the article's instructions and verified that they work.
This article has been viewed 787,514 times.
Learn more...
The brain is one of the most fun parts of the body to draw. You can make it as simple as you like by drawing lots of squiggles and keeping the shape round. If you want more of a challenge, include anatomical parts, such as the brain stem and cerebellum. Once you've drawn the cartoon or realistic brain, you can go back and add color or label the parts.
Steps
Sketching an Easy Cartoon Brain
-
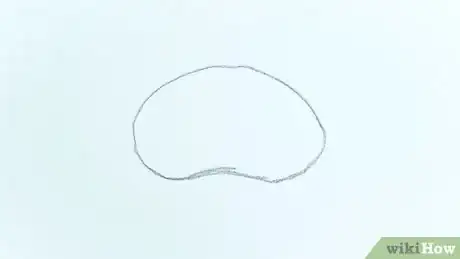
1Draw a large bean shape to make the outline for the brain. Use a pencil to sketch a kidney bean shape on your paper. You can make the outline for the brain any size you like. To make the kidney bean shape, draw a circle that has an indent at the bottom.[1]
- If you prefer, you could draw an oval instead, but make the middle noticeably wider than the ends.
Tip: Use pencil while you're sketching since it's easy to erase mistakes.
-
2Make a half-circle from the bottom that curls into the middle of the brain. To highlight a section of the cartoon brain, place your pencil on the bottom line of the outline near the center where it indents. Draw a half-circle that extends from the bottom into the center so it looks like a curlicue.[2]
- Remember that the brain doesn't need to look realistic since you're making a simple cartoon drawing.
Advertisement -
3Draw 2 to 3 squiggly lines that connect across the brain. The brain is known for looking wrinkly and some of those wrinkles extend across the entire brain. Make a few wiggly lines that move from the outline to the half-circle you just drew or have them touch the opposite side of the brain.[3]
-
4Sketch lots of small squiggles that don't connect. These will look like wrinkles once you've made them over the entire brain. There's no need to make them all connect to each other, so make your squiggles different sizes and lengths.[4]
- Your lines can extend in from the outline of the brain or you can make them disconnected from the outline.
-
5Make the outline thicker to add texture to the brain. Go back and draw over some of the lines you made for the outline to make them bolder and curvy. You can also draw over some of the squiggles so they stand out.[5]
- You can skip this step if you want your cartoon brain to look more 2-dimensional.
Drawing a Realistic Brain
-
1Draw a horizontal oval that juts out along the bottom line. Lightly sketch an oval that's as large as you want the brain to be. Curve the top of the oval in the middle to make the rounded part of the brain. When you're drawing the bottom line, make it bump out near the middle. The bump should be about 1/3 the size of the brain's length.[6]
- Keep your pencil marks light so you can erase mistakes or go over them with a pen.
Tip: If it's easier for you, draw a horizontal oval and make a circle that's about 1/3 of the size of the bottom line. Place the circle on the bottom line of the oval and draw a line connecting the circle to the oval outline. Then, erase the rest of the circle.
-
2Sketch a narrow curve above the top line of the brain. This will give your drawing a sense of dimension. Place your pencil on one end of the oval and draw a line that curves over the top line. It should be about 1⁄2 inch (1.3 cm) above the original outline at its widest point.[7]
- If you don't want to give the brain dimension, you can skip this step.
-
3Make a curve that looks like a C on the bottom bump. Now that you've drawn the basic outline for the brain, you'll start to draw lines that separate the different segments of the brain. Locate the bump you made on the bottom line and draw the base of a C shape so it fits into the bump. Extend the top of the C towards the middle of the brain.[8]
- The area of the bump will be the temporal lobe.
-
4Trace a curved line from the outline to the middle of the line you just made. To make another segment of the brain, lightly draw a line from the original top of the brain. Make it curve slightly so it connects to the middle of the line you just drew.[9]
- This segment that you blocked off will be the frontal lobe.
-
5Draw 2 to 3 long curved lines across each segment of the brain. Use a light touch to make several lines for each part. Try to mimic the shape of the individual segment. For example, the frontal lobe lines should make an arc up toward the line you drew through the brain while the lines near the back and bottom of the brain should curve down toward the base.[10]
- You'll use these faint lines as guidelines so it's easier to make the brain's wrinkles.
-
6Add half-moon shapes along the lines to make them look wrinkled. Instead of leaving the smooth lines, make half-moon curves along the lines. The curves can go in different directions so the brain looks bumpy. Do this for each line to give the brain its distinctive texture.[11]
- Remember to go back along the sliver that you drew on top of the brain. Make small curves along this to make the brain appear bumpy.
-
7Draw a stem and horizontal half-circle at the bottom center of the brain. To make the brain stem (medulla oblongata), sketch a narrow tube that extends from the bottom of the brain at the center. You can make it go down as far as you like. Then, draw a half-circle directly to the right of the stem. Make the half-circle go almost to that end of the brain.[12]
- To make the cerebellum more detailed, you can fill it with thin horizontal lines. Make the lines a little wavy so they look realistic.
-
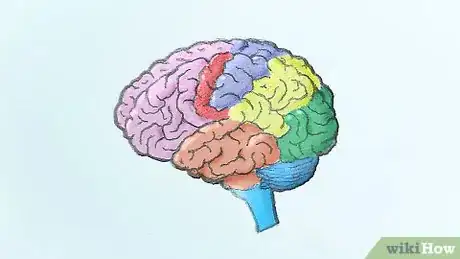
8Use crayons, markers, or colored pencils to add color to your drawing. You can use a single color and shade in the brain to add depth or use several colors to highlight different segments of the brain.
- For example, use 5 or 6 colors if you'll be labeling the parts of the brain. The different colors can help the segments stand out.
-
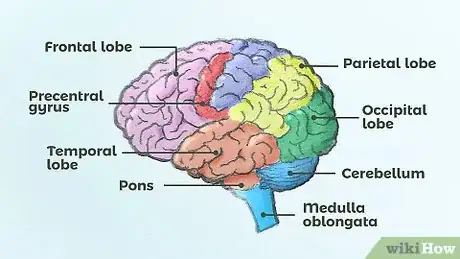
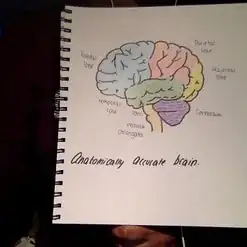
9Label the parts of the brain if you want to use it as an anatomy reference. If you're studying parts of the brain for a class, drawing the brain and labeling it is good practice. Refer to your textbook to label the:
- Frontal lobe
- Parietal lobe
- Temporal lobe
- Occipital lobe
- Medulla oblongata
- Cerebellum
Community Q&A
-
QuestionWhere is a brain tumor in a brain?
 Community AnswerIt could be anywhere. Location of the tumor can affect different things the brain regulates, like speech or movement.
 -
QuestionWhy does the brain look like tubes compacted into one peice?
 Community AnswerBecause it's the way humans evolved to have the most information compacted in a small place and it also helps avoid brain damage.
 -
QuestionIs there really no easier way to draw this?
 Community AnswerNot really, that said, you could try drawing it different ways and maybe something will be easier for you.
Things You'll Need
- Pencils or pens
- Eraser
- Paper
- Colored pencils or markers, optional
References
- ↑ https://howtodrawa.org/brain/
- ↑ https://youtu.be/FP2ibNRrA10?t=37
- ↑ https://youtu.be/FP2ibNRrA10?t=49
- ↑ https://howtodrawa.org/brain/
- ↑ https://youtu.be/FP2ibNRrA10?t=130
- ↑ https://youtu.be/3Abwu2dnLN4?t=43
- ↑ https://youtu.be/3Abwu2dnLN4?t=57
- ↑ https://youtu.be/3Abwu2dnLN4?t=62
- ↑ https://youtu.be/3Abwu2dnLN4?t=65
About This Article
To draw an anatomically accurate brain, draw a curve in the shape of the lengthwise half of a large egg, making the right side more curved. Then, draw a line underneath too, so the shape looks like a stretched out semi-circle. Next, add a small lump underneath for the cerebellum. To include the medulla oblongata and the pons, extend a line from the cerebellum and add another curved line in front of it. Add a long oval at an angle above the cerebellum and extending past it to show the temporal lobe. To learn how to draw a cartoon version of the brain, keep reading!
