wikiHow is a “wiki,” similar to Wikipedia, which means that many of our articles are co-written by multiple authors. To create this article, volunteer authors worked to edit and improve it over time.
This article has been viewed 10,580 times.
Learn more...
If you are looking for an inexpensive, easy-to-learn, and fast way to edit your videos, you might want to consider using Blender. Although it is better known for its modeling and animation capabilities, Blender also has a built-in video editor. Using it to edit your videos is not as intimidating as it might appear at first glance, since most of the tools, settings, and effects are not necessary for simple video editing. This wikiHow article walks you through some of the basic techniques.
Steps
Preparing Blender
-
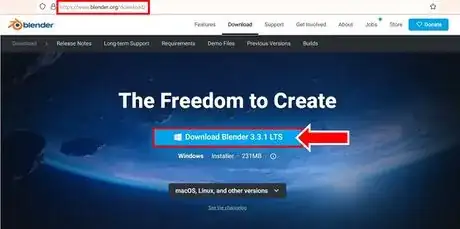
1Download Blender for free from https://www.blender.org/download/, if you do not already have it. After clicking the blue “Download Blender” button, follow the instructions in the Blender wizard to complete the installation. Then open Blender, using its icon on your desktop.
- You may be using a new version of Blender than what is shown here. The functionality is the same, things just may be in a slightly different location.
-
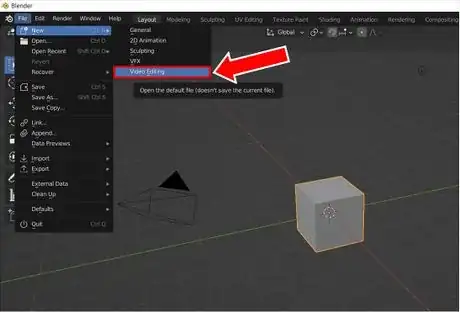
2Open Blender's video editor. From the main screen, find File in the top taskbar. Select File >> New >> Video Editing. This opens the video editor.
- Alternatively, you could select New File >> Video Editing from the splash screen that pops up as soon as you open Blender.
Advertisement -
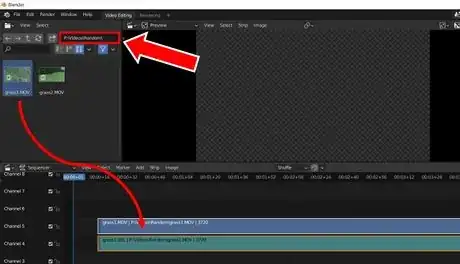
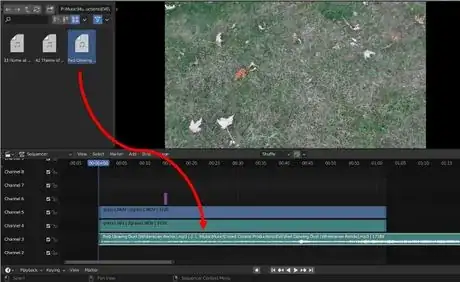
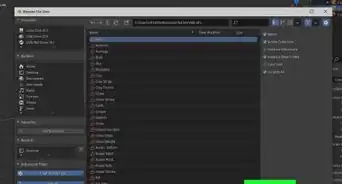
3Import your video file. Using the search box near the top left, enter the file path for the folder that holds your file. Then select your file and drag it into the sequencer at the bottom of the Blender screen.
- The first track (blue) contains the visual footage from the video.
- The second track (green) contains the video’s audio.
- To move both tracks together, select one, press ⇧ Shift, select the other, and then drag them.
-
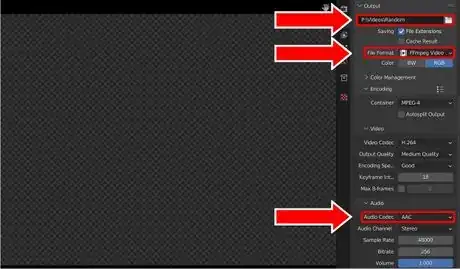
4Modify the save settings, if necessary. Under Output in the top-right menu, make sure that Blender’s automatic save settings are what you need.
- In the first box, enter the file path for where you want your finished video to be saved.
- In the second box, the format should be set to “FFmpeg Video.”
- In the third box, the audio should be set to “AAC.”
- The remaining settings are fine to leave as default, but as you become more comfortable using Blender, you can experiment with them to find what works best for your purposes.
-
5Align your video in the sequencer. In the 'Time' dropdown menu on the right, type “0” for Start for both the visual and the audio tracks. This gives them a set starting value in the sequencer. In the bottom right, there are options for the Start and End of the playback. Type “0” for Start and set the End to the end time of the video tracks, to ensure that playback spans the entirety of your video.
- The blue slider in the sequencer travels along your tracks during playback. You can also drag the slider to navigate to any point in your video.
- To play or pause your video, press the spacebar.
Editing Your Video
-
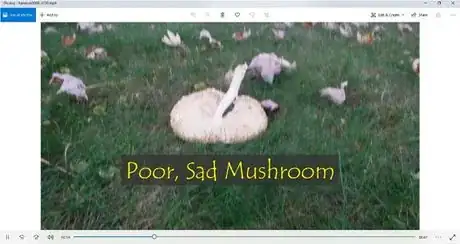
1Add text to your video. From the sequencer’s 'Add' dropdown menu, select 'Text'. This adds a purple text track to the sequencer. On the right, in the text box that appears, change the text settings, as desired.
- Under 'Effect Strip', type the text you want to be displayed in the black box.
- Under 'Style', select the font effects you want. Font settings include style, size, color, bold, and italics.
- Under 'Layout', type the X and Y numbers to designate where you want your text to be displayed. The X is how far away from the left side of your video the text is shown, and the Y is how far away from the top side of your video the text is shown.
- Under 'Time', adjust the 'Start' and 'Duration' numbers based on when you want the text to appear and disappear during the course of the video.
-
2Add a music track to your video. In the search box at the top left, type the file path for the folder where your music is stored. From this folder, select your music file, and drag it into the sequencer. On the right of the sequencer, you can adjust the settings, such as volume and speed, for the music track.
-
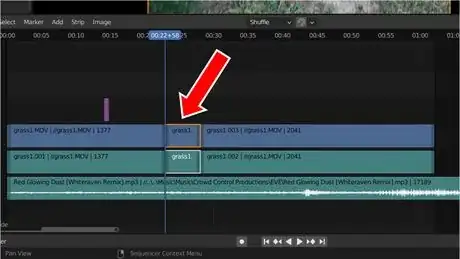
3Split tracks in the sequencer. If you want to remove a portion of any of your tracks, move the blue slider to the spot where you want the split to begin, select the track(s) you want to split, and then press K.[1] Repeat this process for the spot where you want the split to end. Then move or delete the separated track portion(s).
-
4Add images to your video. Find your image using the search box, and then drag it into the sequencer. In the settings on the right, modify the 'Start' and 'Duration' numbers to put the image where you want it in the video and to make it last as long as you want.
- This process also works for adding other videos to your project.
-
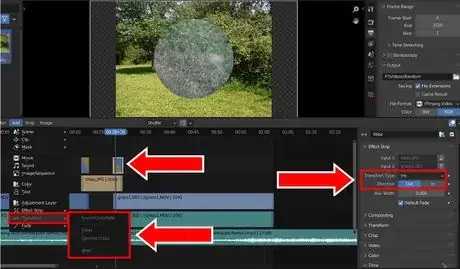
5Add transition effects between tracks. Select two tracks, adjust their size so that they overlap, and select Add >> Transition. Then choose the kind of transition you want and edit its settings in the menu that appears to the right.
-
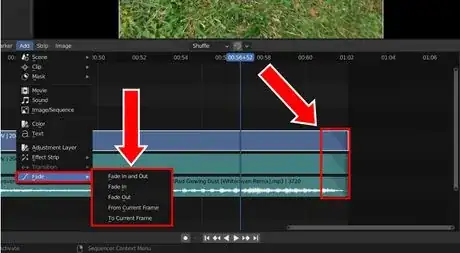
6Add fade effects to your tracks. Fade effects are a good way to begin, end, and transition between both visual and audio tracks. To fade a track, select the track, and select Add >> Fade. Then choose which fade option you want to use.
- Fade In and Out creates fades at the beginning and at the end of selected tracks.
- Fade In creates a fade at the beginning of a track.
- Fade Out creates a fade at the end of a track.
- From Current Frame creates a fade starting at the spot where the blue slider is.
- To Current Frame creates a fade ending at the spot where the blue slider is.[6]
Finalizing Your Video
-
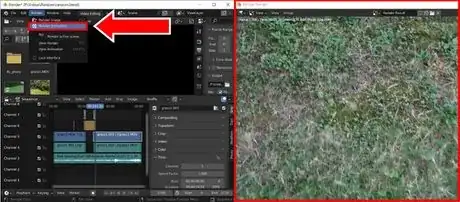
1Render your video. At the top of the Blender screen, select Render >> Render Animation. When a new window appears, let it play through the entire video.
- Rendering allows Blender to synthesize the video into a complete file.
- After rendering is complete, you can find your video in the location you designated in the settings.
- Do not be alarmed if your render does not include audio. Rendering does not play back the audio, but your finished video will.
-
2Play your video. Find your video in the location where you saved it and watch it. Your video is now complete!
Community Q&A
-
QuestionDoes the video have to be a Blender animation, can it be something else?
 Audrick RodanoCommunity AnswerYou can edit any sort of video that is supported with blender. The WikiHow article itself didn't say anything about the video needing to be a Blender animation specifically. Although, if you are referring to exporting the final video, then you just have to worry about exporting the video into an appropriate file format.
Warnings
- Make sure that you save your work frequently, just in case Blender crashes.⧼thumbs_response⧽
References
- ↑ https://docs.blender.org/manual/en/latest/video_editing/edit/montage/editing.html#split
- ↑ https://docs.blender.org/manual/en/latest/video_editing/edit/montage/strips/transitions/sound_crossfade.html
- ↑ https://docs.blender.org/manual/en/latest/video_editing/edit/montage/strips/transitions/cross.html
- ↑ https://docs.blender.org/manual/en/latest/video_editing/edit/montage/strips/transitions/gamma_cross.html
- ↑ https://docs.blender.org/manual/en/latest/video_editing/edit/montage/strips/transitions/wipe.html
- ↑ https://docs.blender.org/manual/en/latest/video_editing/edit/montage/editing.html#fades
