This article was co-authored by Kelly Medford. Kelly Medford is an American painter based in Rome, Italy. She studied classical painting, drawing and printmaking both in the U.S. and in Italy. She works primarily en plein air on the streets of Rome, and also travels for private international collectors on commission. She founded Sketching Rome Tours in 2012 where she teaches sketchbook journaling to visitors of Rome. Kelly is a graduate of the Florence Academy of Art.
This article has been viewed 463,206 times.
3D drawings use optical illusions to make it appear that an image has depth. This technique can make any drawing come to life. It may seem difficult to achieve but it is actually easier than it appears. With a few techniques, you can make 3D drawings of a wide variety of objects.
Steps
Drawing a 3D Box
-
1Draw a square. Creating a 3D box begins by simply drawing a square with your pencil, since some lines may need to be erased. The square can be a variety of sizes, but it should only take up a quarter of the page at most. Center it on the page, so there is room to draw the rest of the box.<
- In the final drawing, this first square will serve as the front of your box.
-
2Draw a second square that intersects with the first square. Place the second square positioned slightly to one side and above the first square. Begin by drawing the bottom line of the second square so its center intersects with the center of the left side of the first square. Then draw the right side of the second square so that its center intersects with the center of the top of the first square. Then finish drawing the top and left side of the second square.
- The second square should be exactly the same size as the first square.
- This second square will be the back of the cube in the final drawing.
Advertisement -
3Add lines to connect the 2 squares. Connect each corner of the first square to its corresponding corner on the second square. For example, draw a line from the upper left-hand corner of the first square to the upper left-hand corner of the second square.
- These lines will create the illusion of the top, bottom, and sides of the cube.
-
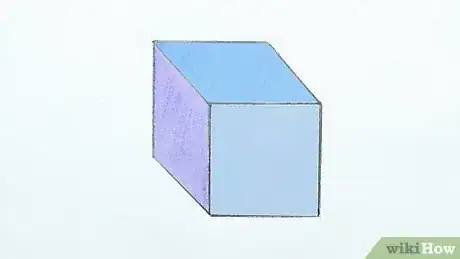
4Erase the lines to make the cube look solid, if necessary. If you are trying to draw a solid cube, as opposed to a transparent one, you need to erase some of the lines you have drawn. Erase any line that you wouldn't be able to see from the angle you have drawn.
- Lines to erase include the bottom right-hand side connecting line, the right-hand side of the second square, and the bottom line of the second square.
- It may seem strange that you needed to draw these lines in the first place, but they helped you draw the cube in the right shape.
-
5Color the sides of the cube if you like. To highlight the 3D perspective of your drawing, you can color each side of the box a different color. This makes it clear that the drawing has depth and that each side of the box is distinctive.
-
6Draw variations of the 3D box. Once you get the hang of drawing the 3D box, you can start drawing other shapes, such as a rectangular box. For a rectangular box, start by drawing a rectangle. Then draw a second rectangle slightly to one side and above the first. Finally connect the corresponding corners of both rectangles together.
- You can do other shapes, such as triangles, stars, or abstract shapes.
Drawing a 3D Optical Illusion
-
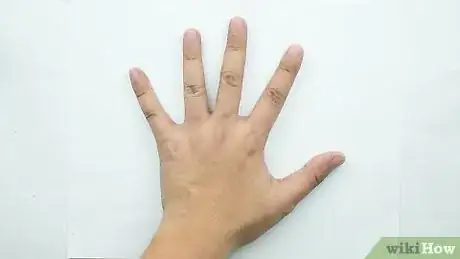
1Choose the object you would like to draw. The object you pick needs to have a clear and simple outline, as this will make it easier to create your 3D drawing. For example, you could draw a hand, a banana, or a doughnut. Each has a simple outline and overall shape.[1]
- Trace the item you want to draw if it is a size that fits on your piece of paper. For instance, you can use your hand, as it will fit on a standard piece of paper and can easily be traced.
-
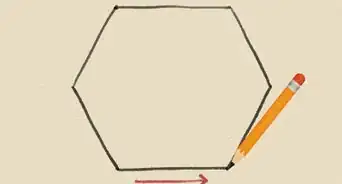
2Make a light preliminary outline of the object with pencil. Either draw or trace the outline of the object you want to draw on your piece of paper. Center the object on the page, although it can touch the top or bottom of the paper if necessary.[2]
- Draw this outline lightly so you can erase any unnecessary pencil marks later in the process.
-
3Draw horizontal, parallel lines across the page. Cover the whole the whole paper with these lines except for inside the shape you have outlined. Make the lines close together, at most 0.25 inches (0.64 cm) apart all the way down the page.[3]
- It's easiest to draw these lines by using a ruler, so that they are completely straight and evenly spaced.
- If you are using lined notebook paper, you could trace over the existing lines
-
4Draw curved lines inside the shape outline. Start each of these curved lines where one of the straight parallel lines touches the outline. Draw the curve across the entire outline and then come back down, connecting at the end to the corresponding straight line on the opposite side of your outline.[4]
- Each curved line will complete a horizontal line that goes all the way across the page.
- The curved lines should mimic the general shape of the item you are drawing. If the shape varies, the lines should gradually transition to follow the object's shape.
-
5Trace over the completed horizontal lines. To make the 3D effect really pop, define the lines you have drawn. Trace the entire length of all of these lines, including the straight sections and the curved sections. You can use a pen, colored pencils, or marker to trace the lines.[5]
- The ink can be done in any one color or in a variety of colors.
-
6Erase the pencil outline. After the ink has dried, erase the initial outline that you made. This will add to the 3D effect of your drawing and make the object pop off the page.[6]
Using Perspective
-
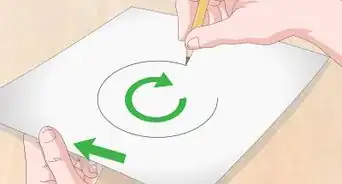
1Study your subject. If you want to draw something in 3D that you have in real life, it can be help to look at its details. By looking at it, you can begin to understand how you will translate real world depth on to a flat surface.
- For example, if you want to draw a bowl of fruit sitting on a table, you should study how all the elements of your composition relate to each other. How much of the fruit, bowl, and table can you see? Where does each part intersect with the others? Where are shadows located and where does the light hit your objects?
EXPERT TIPKelly Medford is an American painter based in Rome, Italy. She studied classical painting, drawing and printmaking both in the U.S. and in Italy. She works primarily en plein air on the streets of Rome, and also travels for private international collectors on commission. She founded Sketching Rome Tours in 2012 where she teaches sketchbook journaling to visitors of Rome. Kelly is a graduate of the Florence Academy of Art.Professional Artist
 Kelly Medford
Professional ArtistTry different exercises to train your eye. Kelly Medford, a plein air painter, says: “One way to learn to draw in 3D is to do blind contour drawings. Look at the object that you’re drawing and never look at your paper. It forces your eyes to go slowly around the object with your hand following your eye on the paper. You start seeing objects without preconceptions.”
-
2Start a drawing with a horizon line. For drawings that aim to show a great distance, it's important to create a horizon line where the sky meets the land. This line creates a point that is the furthest away from the viewer. It should usually be located between a third and half of the way up your page and span the entire page.[7]
- This is a great way to start a landscape drawing. Once you draw the horizon line, you can begin drawing the foreground below it and the sky or large objects in the landscape above it.
-
3Incorporate a vanishing point in to a drawing. A vanishing point is the spot where items in the distance disappear. In practical terms, it is the spot where parallel lines that go from the front of the image to the back of the image come together on the page. Marking this spot at the center of your horizon line allows you to have a spot to end items that are moving into the distance.[8]
- For instance, if you are looking straight down a road, there is a point in the distance where you can no longer see the road. While the road will be wide at the bottom of your drawing, which is the spot closest to the viewer, the sides of the road will come together and end at the vanishing point.
EXPERT TIPKelly Medford is an American painter based in Rome, Italy. She studied classical painting, drawing and printmaking both in the U.S. and in Italy. She works primarily en plein air on the streets of Rome, and also travels for private international collectors on commission. She founded Sketching Rome Tours in 2012 where she teaches sketchbook journaling to visitors of Rome. Kelly is a graduate of the Florence Academy of Art.Professional Artist
 Kelly Medford
Professional ArtistUse transparent sheets to learn perspective. Kelly Medford, a plein air painter, says: “To learn perspective and foreshortening, use plexiglass or transparent sheets. Take photographs of buildings that are in perspective and trace over them with tracing paper. You start to understand how angles go back in space and are not flat.”
Community Q&A
-
QuestionHow can I draw in 3D?
 Community AnswerFirst, you make your horizon line. After that, you determine your vanishing point. You may draw a line there if you would like. After that, draw your shape/picture/letter. Then, draw lines from the edges of your shape to the vanishing point. Do not draw from the edges that will pierce the object. Then, once all of the lines that aren’t piercing the object are connected to the vanishing point, cut the lines to however long you wish the width to be. Erase the rest. Then, shade the opposite to where the sun would be. This will make it appear 3-D.
 -
QuestionHow do I know when and where to shade something?
 JustCallMe AshleyCommunity AnswerIt simply depends on lighting. If the object you wish to draw is right in front of you, just study where the light hits the surface of the object and where the shadows correspond with the light. Most shadows are in the corners or on the side where the light isn't reflecting off the surface of the object. Now the question of when? Well, first you must know where the lights hit the surface, Then you shade opposite of the lighted surface.
 -
QuestionHow can I draw a 3D table?
 Community AnswerStart by drawing a rectangle as the tabletop. If it helps when drawing the 3D aspects, think of the rectangle as a long, stretched out cube. Then, draw four cylinders or 3D poles coming from each of the four sides. You can look online for images of 3D tables and copy those if that's easier.
Things You'll Need
- Paper
- Pencil
- Pen, colored pencils, markers or other colouring options
- Eraser
- Ruler
- The object you want to draw or a picture of it (Optional)
- Stencil to make perfect shapes (Optional)
References
- ↑ https://www.youtube.com/watch?v=4pabS7JpDPo
- ↑ https://mydrawingtutorials.com/how-to-draw-a-3d-hole-optical-illusion/
- ↑ https://www.youtube.com/watch?v=4pabS7JpDPo
- ↑ https://www.youtube.com/watch?v=4pabS7JpDPo
- ↑ https://www.craftsy.com/art/article/how-to-draw-optical-illusions/
- ↑ https://www.craftsy.com/art/article/how-to-draw-optical-illusions/
- ↑ https://www.artistsnetwork.com/art-mediums/drawing/learn-to-draw-perspective/
- ↑ https://www.artistsnetwork.com/art-mediums/drawing/learn-to-draw-perspective/
About This Article
To draw a simple box in 3D, start by drawing a square in the center of a piece of paper. Next, draw an identical square slightly to one side and above the first square so the two squares intersect. Then, add lines that connect each corner of the first square to its corresponding corner on the second square to complete the 3D box. Using this same technique, experiment by drawing other simple 3D shapes, such as triangles or stars! For tips on making your 3D objects look solid rather than transparent, read on!


