wikiHow is a “wiki,” similar to Wikipedia, which means that many of our articles are co-written by multiple authors. To create this article, 58 people, some anonymous, worked to edit and improve it over time.
There are 7 references cited in this article, which can be found at the bottom of the page.
wikiHow marks an article as reader-approved once it receives enough positive feedback. This article has 13 testimonials from our readers, earning it our reader-approved status.
This article has been viewed 454,215 times.
Learn more...
An equilateral triangle has three sides of equal length, connected by three angles of equal width. It can be challenging to draw a perfectly equilateral triangle by hand. However, you can use a circular object to mark out the angles. Make sure to use a ruler to get the lines straight! Continue reading to learn how to draw one.
Steps
Using a Compass
-
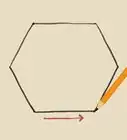
1Draw a straight line. Lay your ruler on the paper, then trace a pencil along the straight edge. This line segment will form one side of your equilateral triangle, which means that you will need to draw two more lines of exactly the same length, each reaching toward a point at a 60° angle from the first line. Make sure that you have plenty of room to draw all three sides![1]
-
2Span the segment with your compass. Slide a pencil into your compass, and make sure that it's sharp! Put the point of your compass at one end of the segment, and set the pencil point at the other.Advertisement
-
3Trace a quarter-circle arc. Do not adjust the point of the compass, and do not change the set "width" of the tool from the compass point to the pencil point. Swing the pencil-point of the compass in a quarter-circle up and away from the line segment.[2]
-
4Switch the compass around. Without changing the width of the compass spread, move the point of the compass to the other end.
-
5Draw a second arc. Carefully swing the pencil-point of the compass so that the new arc crosses over the first arc that you drew.[3]
-
6Mark the point where the two arcs cross. This is the apex (the "top" point) of your triangle. It should lie at the exact center of the line segment that you've drawn. You can now draw two straight lines leading to this point: one from each end of the "bottom" line segment.[4]
-
7Finish the triangle. Use a ruler to draw two more straight line segments: the remaining sides of the triangle. Connect each end of the original line segment to the point at which the arcs cross. Make sure that the lines are straight. To finish the job, erase the arcs that you drew so that only the triangle remains![5]
- Consider tracing this triangle onto another page. This way, you can start fresh with a clean shape.
- If you need a bigger or a smaller triangle, repeat the process but adjust the length of the original line segment. The longer the sides, the bigger the triangle!


Using an Object with a Circular Base
If you don't have access to a compass or a protractor, you can use an object with a circular base to trace out an arc instead. This method is essentially the same as using a compass, but you will need to be smart about it!
-
1Choose your circular object. Use almost any cylindrical object with a circular base, like a bottle or a soup can. Try using a circular roll of tape or a CD. If you are going to substitute the arc of this object for the arc of a compass tracer, you'll need to choose an object of the right size. In this method, each side of the equilateral triangle will be as long as the radius (half the diameter) of the circular object.
- If you use a CD as your object: imagine an equilateral triangle that fits into the top-right quadrant of a CD.
-
2Draw the first side. It should be exactly as long as the radius of the circular object – the distance halfway across. Make sure that it is perfectly straight!
- If you have a ruler: simply measure the diameter of the object and draw a line that is half as long.
- If you don't have a ruler: place the circular object onto a sheet of paper, then carefully trace the circumference with your pencil. Remove the object, and you should have a perfect circle. Use a straight edge to draw a line across the exact center of the circle: the point that is completely equidistant from any point around the circumference of the circle.
-
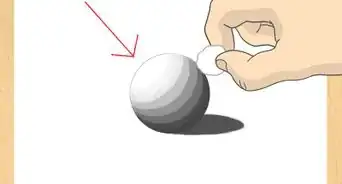
3Use the circular object to trace an arc. Place the object over the line segment, with the edge of the circle resting at one end of the line. For accuracy, make sure that the line cleaves through the exact center of the circle. Use your pencil to trace an arc: roughly one-quarter of the way around the perimeter of the circle.[6]
-
4Trace another arc. Now, shift the circular object so that the edge touches the other end of the line segment. Make sure that the line segment runs through the exact center of the circle. Draw another quarter-arc that crosses the first arc at a point directly above the line segment. This point is the apex of your triangle.
-
5Complete the triangle. Draw the remaining sides of the triangle: two more straight lines will connect the apex with the two open ends of the line segment. Now, you should have a perfectly equilateral triangle!


Using a Protractor
-
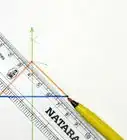
1Draw the first side. Use a ruler or the straight edge of your protractor to trace a straight line segment of an appropriate length. This line segment will become the first side of your triangle, and each of the other sides will be just as long – so make sure that it's the right size![7]
-
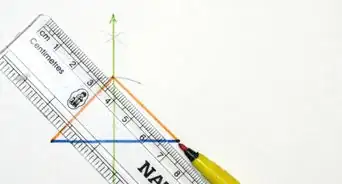
2Use a protractor to measure a 60° angle at one end.[8]
-
3Trace the second side. Measure out a new line segment that is equal in length to the first. Start it at one end of the original line segment, where you measured the 60° angle. Start from the vertex (the point) of the angle, and trace the straight edge of the protractor until you reach the next "point."[9]
-
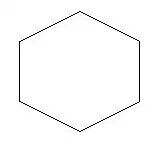
4Finish the triangle. Use the straight edge of your protractor to trace out the final side of the triangle. Connect the point at the end of the second line segment to the unattached end of the first line segment. You should now have an equilateral triangle.


Community Q&A
-
QuestionHow would I draw an equilateral triangle with three lines in it forming six right angles?
 DonaganTop AnswererAssuming you know the length of each of the three given lines (and all three lines are of equal length), this is not a difficult construction. First draw any line, then draw a line segment perpendicular to the first line. On that line segment, measure off the given line length. At the end of the line segment, use a protractor to form 30° angles on either side of the line segment. Extend the new lines to intersect the first line you drew. This will complete an equilateral triangle. (Each of the other two given lines will bisect one of the other angles and be perpendicular to the opposite side.)
 -
QuestionHow do I construct a trapezoid?DonaganTop AnswererDraw two parallel lines. Draw a third line intersecting the first two lines. Draw a fourth line also intersecting the first two lines, but not intersecting the third line between the two lines and not parallel to the third line.
-
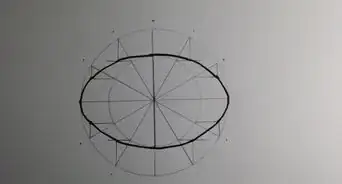
QuestionHow do I construct an equilateral triangle inscribed in a circle?DonaganTop AnswererThe easiest way is to use a protractor to draw three 120° angles around the center of the circle, and then connect the three points on the circle where the three angles intersect the circumference. That will result in an inscribed equilateral triangle.
Warnings
- Don't mark the surface beneath the paper.⧼thumbs_response⧽
Things You'll Need
- A pair of compasses (the type used for mathematical constructions, not the North/South type)
- Something to put under the compass so the point doesn't slip
- A ruler
- A pencil (try not to use mechanical pencils, they may not fit into the pencil holder on the compass). Also make sure it is sharp, not blunt.


References
- ↑ https://www.mathsisfun.com/geometry/construct-equitriangle.html
- ↑ http://www.basic-mathematics.com/constructing-an-equilateral-triangle.html
- ↑ https://www.mathsisfun.com/geometry/construct-equitriangle.html
- ↑ http://www.mathopenref.com/constequilateral.html
- ↑ http://mathbitsnotebook.com/Geometry/Constructions/CCconstructionEqui.html
- ↑ https://www.khanacademy.org/math/geometry/geometric-constructions/polygons-inscribed-in-circles/v/constructing-equilateral-triangle-inscribed-in-circle
- ↑ https://sciencing.com/what-are-coterminal-angles-13712262.html
- ↑ https://my.homecampus.com.sg/Learn/Primary-Grade-5/Geometry/Drawing-Triangles-Using-geometrical-instruments-part-1
- ↑ https://my.homecampus.com.sg/Learn/Primary-Grade-5/Geometry/Drawing-Triangles-Using-geometrical-instruments-part-1
About This Article
To draw an equilateral triangle, start by laying a ruler on a piece of paper and drawing a straight line. Next, insert a compass at an end of the line you've just drawn and put a pencil at the other. Trace a quarter circle with the pencil end of the compass moving upwards, then switch the ends of the compass around. To form the apex, draw a second arc with the pencil so it crosses over the first arc. Finish by drawing 2 straight lines up to the apex for the triangle's sides and erasing the arcs so only the triangle can be seen. For tips on how to draw an equilateral triangle using a protractor, keep reading!