This article was co-authored by wikiHow Staff. Our trained team of editors and researchers validate articles for accuracy and comprehensiveness. wikiHow's Content Management Team carefully monitors the work from our editorial staff to ensure that each article is backed by trusted research and meets our high quality standards.
There are 8 references cited in this article, which can be found at the bottom of the page.
This article has been viewed 8,549 times.
Learn more...
Decorating a glass vase is fun and simple due to how many options there are for you to choose from. Attach things like tissue paper, ribbon, or glitter to the vase for a textured look. Consider using a stencil or painter's tape to create designs using paint on the vase, or fill the vase with things like sea glass or flowers for a quick decoration idea.
Steps
Attaching Decorations to the Vase
-
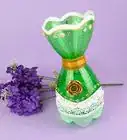
1Apply tissue paper to the vase for a textured look. Pick out which colors of tissue paper you’d like to use, and cut them up into shapes. Apply a layer of mod podge to the vase using a craft foam brush, and place the tissue paper shapes on the vase so they stick to the adhesive. Dab the vase with a final layer of mod podge to ensure the tissue paper stays in place.[1]
- For example, cut green, blue, and purple tissue paper into squares and create a mosaic pattern on the vase.
- Cut the tissue paper into circles made up of many different colors and adhere them to the vase randomly for a dotted vase.
-
2Tie ribbon or twine around the vase for a simple decoration. Select a ribbon in a color and thickness of your preference. Tie the ribbon around the vase in a bow, or cut the ribbon so it’s just long enough to fit around the vase and glue it in place in a single stripe. To use twine, wrap several layers of twine around the vase and tie it off in a simple bow.[2]
- Tie a large gold ribbon around the vase, or cut several strands of white, yellow, and orange ribbon to glue them around a vase in parallel lines.
Advertisement -
3Cover the vase in glitter for a sparkly effect. Either apply a clear craft glue to the entire vase, or tape off a section of the vase using painter’s tape before applying the glue. Spread the glue in a thin even layer using a foam craft brush, and sprinkle the glitter onto the glue in a thick layer. Gently shake the excess glitter off to reveal your glittered vase.[3]
- Cover an entire vase in silver glitter, or place a piece of painter’s tape around the middle of the vase and apply glitter to the bottom half.
- Create a design using glue before sprinkling the glitter onto the vase for a more intricate design.
-
4Attach adhesive paper to the vase for a quick pattern. Purchase patterned paper in a sticker form at a local craft store or online, making it easy to attach it to a vase. Cut out the shapes you’d like from the paper, remove the adhesive backing, and press the paper onto the vase.[4]
- For example, cut out flowers or leaves from the adhesive paper and stick them onto your vase.
- Cut adhesive paper into strips to create a striped pattern on your vase.
-
5Decorate the vase using lace for a delicate look. Apply a layer of mod podge to the vase using a craft foam brush. Place the lace on the vase, pressing down on it so it adheres to the mod podge. Add a final layer of mod podge over the lace if needed.[5]
- Doilies will also work well as a less expensive option.
- Consider spraying the vase with a sealant that won't be as visible as the mod podge.


Painting a Glass Vase
-
1Use a stencil to paint a design on a glass vase. Pick out a stencil you’d like to use on your vase, such as a floral pattern or a stencil of an object like a butterfly, feather, or tree. Hold the stencil flat on the vase and use a flat foam brush to dab the paint onto the stencil. Cover the areas of the stencil you want on your vase before carefully lifting the stencil off of the vase to reveal your decoration.[6]
- Tape the stencil in place onto the vase using painter’s tape if you’re worried about it moving.
- Apply red paint to a stencil of a rose, or create a design using white paint to cover an entire vase using a patterned stencil.
-
2Place painter’s tape along the vase to create geometric shapes with paint. Cut off strips of painter’s tape and place them on the vase, pressing down firmly to make sure the paint won’t get up under the tape. Paint each section of the taped off vase a different color using acrylic paint to create a geometric design.[7]
- Cut the painter’s tape into thinner strips if you want smaller divisions between the colors.
- Wait for the paint to begin drying before peeling off the tape.
-
3Apply chalkboard paint to the vase to turn it into a chalkboard. Purchase a chalkboard paint from your local craft or big box store. Either paint the entire vase using the chalkboard paint, use painter’s tape to create sections for you to paint, or freehand paint the vase to create a more intricate chalkboard design.[8]
- Use a craft foam brush to apply the chalkboard paint to the vase.
- You may need to do several coats of the chalkboard paint to make it thick enough to use.
-
4Create an ombre pattern on the vase for a chic look. Decide what your darkest color will be and paint this onto the vase going around the very bottom. Tint the dark color with a bit of white, and apply a ring of this paint right on top of the bottom ring on the vase. Keep tinting the color lighter and applying another ring to create an ombre look on the vase.[9]
- For example, your vase might start off with a navy blue ring around the bottom of the vase, and then continue with colors such as royal blue, sky blue, and light blue.
-
5Paint flowers or other objects on the vase for a freehand option. Do this using a small paintbrush and acrylic paint, or use paint pens designed for glass. Decide what kind of design you want to paint on your vase, such as flowers, geometric shapes, or intricate line patterns. Go slowly as you paint to avoid making mistakes.[10]
- You might paint tulips along the outside of the vase using paint pens, or you could paint leaves on the vase using a paintbrush and green, yellow, and orange paint.


Filling the Vase with Items
-
1Pick out seashells to fill the vase. Use seashells from a recent trip to the beach, or purchase shells from a craft store or online. Gently place the shells in the vase, stacking them on top of one another until they reach your desired height.[11]
- Pick out enough shells to fill the entire vase, if desired.
- Fill the bottom section of the vase with sand for a soft bottom layer.
-
2Place photos in the vase to use them as a picture frame. This works well if your glass vase has a wide opening. Gently place the photo in the vase so the image is facing out of the vase. Bend the photo slightly so that it fits against the curve of the vase.[12]
- Place a black and white 4 in × 6 in (10 cm × 15 cm) photo in a short wide vase, or stack colored photos on top of one another in a tall vase.
-
3Turn the vase into a terrarium by filling it with soil and plants. Place soil at the bottom of the vase, adding a thicker layer of soil if your vase is tall. Place small succulents, real or fake, in the soil to use the vase as a display for your plants.[13]
- This works especially well for wider vases.
- If you use real plants, place the vase near sunlight and remember to water it occasionally.
-
4Fill the vase with large leaves or flowers for a floral arrangement. Pick out fabric or plastic plants from a craft store, or opt for real leaves or flowers to put in your vase. Place leaves in the vase so their shiny side is facing outwards, and situate any flowers in the vase so their petals are visible.[14]
- Fill the vase with synthetic daisies, or pick out large leaves from a plant in your garden to display in the vase.
-
5Use colored stones or sea glass to create patterns in the vase. Fill a glass vase one-fourth of the way full with blue sea glass, or layer colored stones on top of one another to create a multi-colored pattern. Pour the stones into the vase and use your hands to spread them out in an even layer.[15]
- Look for colored stones or sea glass at your local craft store or big box store.
- If you can’t reach the stones to spread them out in the vase, gently shake the vase to distribute the stones evenly.
- For example, create layers of pink, orange, and yellow sea glass in the vase.
-
6Stack grapevine balls in a glass vase for a quick decoration. Pick out small grapevine balls to fill the vase with lots of them, or select 3 or 4 larger balls to place in your vase. Stack the grapevine balls on top of one another in the vase for a simple and easy decorated vase.[16]
- String lights through the balls to add light to your vase, or consider spray painting the grapevine balls to make them a certain color.


References
- ↑ https://modpodgerocksblog.com/decorate-a-vase/
- ↑ https://www.goodhousekeeping.com/home/craft-ideas/how-to/g597/diy-vase-upgrades/
- ↑ https://www.goodhousekeeping.com/home/craft-ideas/how-to/g597/diy-vase-upgrades/
- ↑ https://www.youtube.com/watch?v=5Bm3TX1XJSA
- ↑ https://modpodgerocksblog.com/decorate-a-vase/
- ↑ https://modpodgerocksblog.com/decorate-a-vase/
- ↑ https://www.goodhousekeeping.com/home/craft-ideas/how-to/g597/diy-vase-upgrades/
- ↑ https://www.goodhousekeeping.com/home/craft-ideas/how-to/g597/diy-vase-upgrades/
- ↑ https://www.goodhousekeeping.com/home/craft-ideas/how-to/g597/diy-vase-upgrades/
- ↑ https://www.youtube.com/watch?v=QP8jio1oXXQ
- ↑ https://decoratedlife.com/home-decorating-ideas-on-a-budget-5-things-you-can-do-with-one-clear-glass-vase/
- ↑ https://decoratedlife.com/home-decorating-ideas-on-a-budget-5-things-you-can-do-with-one-clear-glass-vase/
- ↑ https://decoratedlife.com/home-decorating-ideas-on-a-budget-5-things-you-can-do-with-one-clear-glass-vase/
- ↑ https://www.youtube.com/watch?v=cuAwRn5_zOY#t=58s
- ↑ https://www.youtube.com/watch?v=cuAwRn5_zOY#t=32s
- ↑ https://www.youtube.com/watch?v=cuAwRn5_zOY#t=1m45s
About This Article