This article was co-authored by wikiHow Staff. Our trained team of editors and researchers validate articles for accuracy and comprehensiveness. wikiHow's Content Management Team carefully monitors the work from our editorial staff to ensure that each article is backed by trusted research and meets our high quality standards.
There are 9 references cited in this article, which can be found at the bottom of the page.
The wikiHow Video Team also followed the article's instructions and verified that they work.
This article has been viewed 197,473 times.
Learn more...
If you have an oversized shirt that you wish looked different, don't throw it away! There are lots of ways to convert a baggy, oversized T shirt into something trendy and new. With a little bit of cutting and DIY, you can transform the shirt into a chic racerback shirt or a trendy tied shirt. You can also mix-and-match different ways of cutting the collar, sleeves, and hem to create a totally new look!
Steps
Creating a Racerback Tank
-
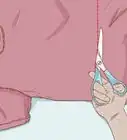
1Cut the collar off at the stitching. Begin cutting the collar at the front-left side, and work your way towards the right side. Continue cutting along the back of the collar until you are back where you started.
- Use the stitching line as a guide. It's best to cut just below the seam.
- Do not cut through both layers of fabric at once, or the back of the collar will be too low.
-
2Snip the cut-off collar apart to make a long strip. Take the collar that you just cut off from your shirt. Cut it apart to make a long strip of fabric, then set it aside for later. You will use this to bind the racerback in the end.Advertisement
-
3Cut the front of the collar lower if you want a more feminine touch. Fold the front of the shirt in half lengthwise so that the back is still loose. Make sure that the cut edges of the front collar are lined up. Begin cutting about 1 inch (2.5 cm) below the cut edge of the collar, and finish cutting at the side edge. Unfold the shirt when you are done.
- Follow the curve of the collar as much as possible.
- You are cutting more of the collar off in the beginning and less towards the ends.
-
4Cut the sleeves off, starting a least 1 inch (2.5 cm) below the armpit. Begin cutting the sleeve off 1 inch (2.5 cm) below the armpit and finish cutting at the shoulder seam, right where the sleeve connects to the shirt. Do the left sleeve first, then fold the shirt in half, and use the cut edge as a guide for the right sleeve.
- You can start cutting the armpits as low as you want. The lower you cut, the more revealing the top will be.
- If you want narrower shoulders, finish cutting closer to the collar.
-
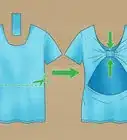
5Pinch the back of the shirt to create a racerback shape. Keep the shirt with the back facing you. Slide your fingers through 1 armhole and your thumb through the other. Close your hand to gather the fabric between the 2 armholes together.
-
6Wrap the cut-off collar around the pinched fabric at armpit-level. Take the end of your cut-off collar strip, and place it against your gathered fabric. Make sure that it is level with the armpits of your shirt, then begin wrapping it tightly.
- The more you overlap the collar strip, the narrower the binding will be.
-
7Secure the end of the collar strip. Once you reach the end of the collar strip, you'll need to secure it somehow. There are a few ways that you can do this:
- Glue the end of the strip to the inside of the shirt with fabric glue, then let it dry.
- Hand sew the end of the strip to the inside of the shirt with a few simple stitches.
- Thread the end of the strip under the wrapped strip to secure it.
-
8Try on your shirt. If you want to step things up a little, you can cut the bottom hem off to complete the cut-off look. For an even nicer finish, gently pull along all of your cut edges. This will cause the fabric to curl and conceal any jaggedness.

Creating a Shirt with Knotted Sides
-
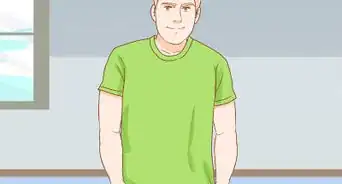
1Get a T shirt that is a few sizes too big for you. The length of the shirt does not matter because you will be cutting it. The shirt should fit you well in the shoulders, but it needs to be loose in the waist and hips.
-
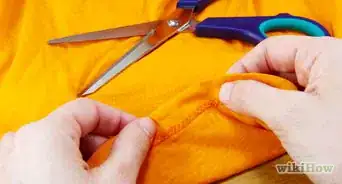
2Cut off the collar. If you want a larger collar, cut through both layers of fabric, using the front collar's seam as a guide. If you don't want a larger collar, then cut all the way around the collar from left shoulder to right, then back to the left again.[1]
-
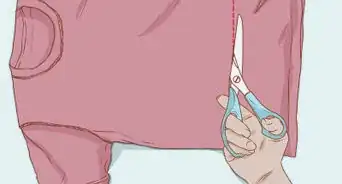
3Cut the bottom hem off. Spread the shirt out on a flat surface, then cut straight across the bottom. Cut right above the stitching on the hem if you like the length. If you want to make the shirt shorter, then cut it shorter.[2]
-
4Figure out how tight you want the shirt to be. Measure around your waist, then divide that number by 2. Add 3 inches (7.6 cm) to this new number to make the ties. This will be the new width of your shirt. For example, if you measure your waist and get 28 inches (71 cm):
- 28 inches (71 cm) divided by 2 = 14 inches (36 cm).[3]
- 14 inches (36 cm) plus 3 inches (7.6 cm) = 17 inches (43 cm).
- 17 inches (43 cm) = your new shirt width.
-
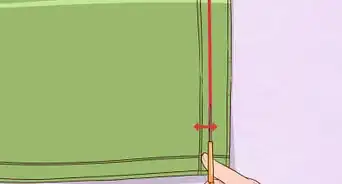
5Transfer the new width measurement to your shirt. Mark the new measurement on your measuring tape with your finger. Place the measuring tape on your shirt at about waist-level. Make sure that the tape is centered, then make a mark at each end with a pen or a piece of chalk.[4]
- Make the first mark at the beginning of the measuring tape.
- Make the second mark at the measuring tape where your finger is.
-
6Cut the sides of the shirt from shoulder-to-hem. Begin cutting at the bottom corner of the left hem, right next to the side seam, and finish cutting at the shoulder seam. Curve the line inward as you cut so that it touches the first mark that you made. Once you finish the left side, repeat the process for the right.[5]
- If you want your shirt to have some sleeves, finish cutting 1 to 2 inches (2.5 to 5.1 cm) away from the shoulder seam, on the actual sleeve part.
- You can also fold the shirt in half after cutting the left side, then use the cut edge as a guide for cutting the right side.
-
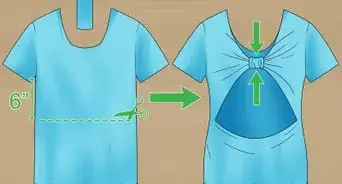
7Cut evenly-spaced slits into the side of the shirt, from hem to armpit. Make these slits about 1⁄2 to 1 inch (1.3 to 2.5 cm) wide. If you want the shirt to be super tight, make the slits 3 inches (7.6 cm) long. If you want the shirt to be fitted but somewhat loose, make the slits 1 1⁄2 inches (3.8 cm) long instead.[6]
-
8Tie the strands in the front of the shirt to the strands in the back. If you want the tassels to be visible, keep the shirt turned right-side-out. If you don't want the tassels to be visible, turn the shirt inside-out first. Tie the strands in the front of the shirt to the matching strands in the back in a tight, double-knot.[7]
-
9Trim the tassels if you tied them inside the shirt. You don't have to do this, but it will help the shirt lay smoother. You also don't have to worry about them tickling your sides. Simply cut them as close as possible to the knots. Turn the shirt right-side-out when you are done.[8]
- Skip this step if you tied the strands on the outside of the shirt.


Changing Up the Sleeves
-
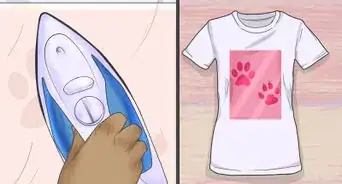
1Cut the hem off the sleeves to complete a cut-off look. If you cut the collar and/or bottom hem off, you might want to cut the hem off of the sleeves as well. This won't change the length of the sleeves by much, but it will help make them look more consistent with any other alternations that you did to your shirt.
-
2Create a cap-sleeve look by cutting the sleeves off at an angle. Begin cutting 1 to 2 inches (2.5 to 5.1 cm) from the top of the shoulder seam, and finish cutting 1⁄4 to 1 inch (0.64 to 2.54 cm) from the armpit seam. Fold the shirt in half so that the shoulders match up, then use the cut sleeve as a guide for cutting the second sleeve.[9]
- Do not cut into the shirt. You only want to cut the sleeve.
- Pull along the cut edges of the sleeves to make the fabric curl inward. This will hide any unevenness.
-
3Cut the sleeves off at the seam for a sleeveless look. If you cut just inside the seam, toward the body of the shirt, the fabric will curl inward when you pull on it. If you cut just outside the seam, the fabric will fray a little instead. This is great if you want an edgier look. Do 1 sleeve first, then the other.[10]
-
4Extend the cut below the armpits for a trendy look. Begin cutting the shirt just inside the shoulder seam and finish cutting a few inches/centimeters below the armpit. Fold the shirt in half, then use the cut edge as a guide for cutting the other side.[11]
- How far down you cut is up to you. If you finish cutting a few inches/centimeters from the bottom hem, pair the shirt with a tank top or bandeau.
-
5Pull on the cut edges to curl them in and hide any jaggedness. T shirt material does not fray, so you don't have to hem it. The cut edges can look uneven, but you can fix that by gently tugging apart the cut edges. This will cause the fabric to curl inward and give you a cleaner look.
Altering the Collar and Hem
-
1Cut the collar off at the seam to complete any cut-off look. If you like the size of the collar, but want it to match your cut-off sleeves and hems, all you have to do is cut it off. Begin cutting at the left side of the collar, then work your way around the front towards the right. Continue cutting along the back of the collar until you're back where you started.
-
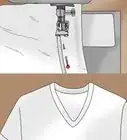
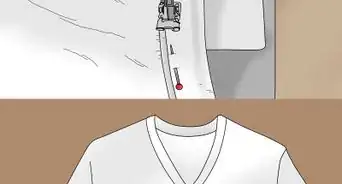
2Create a scoop neck by cutting the front collar lower. Cut the entire collar off first. Next, fold front of the shirt in half lengthwise so that the back is still loose. Begin cutting about 1 to 2 inches (2.5 to 5.1 cm) below the collar, and finish cutting at the top edge of the collar.[12]
- Don't lay the shirt flat and cut the collar through both layers of fabric. If you do that, the back will be too low.
- Follow the curve of the collar for a traditional scoop neck. Cut in a straight line for a V-neck.
-
3Extend the collar towards one shoulder for an off-the-shoulder look. Cut the entire collar off first. Choose a shoulder that you want to expose. Find the center of your collar, then cut towards that shoulder seam. Make sure that you cut through both layers of fabric.[13]
- Remember, your left shoulder will be the shirt's right shoulder, and vice-versa.
-
4Cut the bottom hem off to finish any cut-off look. Spread your shirt on a flat surface. Make sure that the bottom hems in the front and back match up. Cut the hem off just above the stitching. Start cutting on one side of the shirt and finish on the other.
- If you want a crop top, then decide how short you want the shirt to be, and cut the hem off at that point. Belly-button level is ideal.
-
5Cut the front of the shirt shorter than the back to create a high-low look. Flatten the shirt so that 1 of the side seams is visible, and you have a fold along the front-center and back-center of the shirt. Begin cutting along the back folded edge at an upward angle towards the front folded edge.
- How high up the front folded edge you cut depends on how short you want the shirt to be in the front.
- Begin cutting about 1 inch (2.5 cm) above the back hem. This way, you won't retain any of the original stitching and create a more consistent look.
-
6Cut the hem shorter along the side seams for a scooped look. Cut the entire bottom hem off first, then fold your shirt in half so that the side seams match up. Begin cutting at the side seam, about 2 to 3 inches (5.1 to 7.6 cm) from the bottom hem. Cut in a curve towards the folded edge, stopping at the hem. Open up your shirt to reveal a rounded hem that's longer in the middle and shorter on the sides.
-
7Pull along the cut edges to make the fabric curl inward. You don't have to do this at all, but it will hide any unevenness and give you a nicer finish. Simply tug apart the fabric along the cut edges to make the fabric to curl inwards.
Things You'll Need
Creating a Racerback Tank
- Large T shirt
- Measuring tape
- Fabric scissors
- Needle and thread or fabric glue
Creating a Shirt with Knotted Sides
- Large T shirt
- Measuring tape
- Chalk or pen
- Fabric scissors
Changing Up the Sleeves
- Large T shirt
- Measuring tape
- Fabric scissors
Altering the Collar and Hem
- Large T shirt
- Measuring tape
- Fabric scissors
References
- ↑ https://www.youtube.com/watch?v=r81KLGqdVoI&feature=youtu.be&t=42s
- ↑ https://www.youtube.com/watch?v=r81KLGqdVoI&feature=youtu.be&t=52s
- ↑ https://www.youtube.com/watch?v=r81KLGqdVoI&feature=youtu.be&t=55s
- ↑ https://www.youtube.com/watch?v=r81KLGqdVoI&feature=youtu.be&t=1m20s
- ↑ https://www.youtube.com/watch?v=r81KLGqdVoI&feature=youtu.be&t=1m30s
- ↑ https://www.youtube.com/watch?v=r81KLGqdVoI&feature=youtu.be&t=1m45s
- ↑ https://www.youtube.com/watch?v=r81KLGqdVoI&feature=youtu.be&t=2m35s
- ↑ https://www.youtube.com/watch?v=r81KLGqdVoI&feature=youtu.be&t=3m45s
- ↑ https://www.autostraddle.com/cut-up-your-t-shirt-59606/
About This Article

To cut an oversized T-shirt, try turning it into a racerback tank. Cut off the collar and sleeves, then pinch the back to form the racerback shape. Tie the collar around the back of the shirt to hold it in place. You can also cut the sleeves and collar off the T-shirt for a casual look. Alternatively, cut the whole sleeve off at the seam to create a sleeveless shirt. Another option you can try is cutting the front hem off the T-shirt at an angle to give yourself a longer back. For tips on how to make a shirt with knotted sides from an oversized T-shirt, keep reading!