This article was co-authored by wikiHow staff writer, Megaera Lorenz, PhD. Megaera Lorenz is an Egyptologist and Writer with over 20 years of experience in public education. In 2017, she graduated with her PhD in Egyptology from The University of Chicago, where she served for several years as a content advisor and program facilitator for the Oriental Institute Museum’s Public Education office. She has also developed and taught Egyptology courses at The University of Chicago and Loyola University Chicago.
There are 7 references cited in this article, which can be found at the bottom of the page.
The wikiHow Tech Team also followed the article's instructions and verified that they work.
This article has been viewed 87,115 times.
Learn more...
If you need to convert the video files on a DVD to the more versatile MP4 format, there are several easy ways to do it. VTS stands for Video Title Set and it is the format used for videos on DVDs. In the DVD's file structure, they are typically found in the VIDEO_TS folder as .VOB files. In this article, we’ll talk you through how to convert VTS to MP4 with a variety of free and subscription-based apps for Mac or Windows computers, as well as a web-based service that you can use to convert VTS files to MP4 in your favorite browser.
Things You Should Know
- You can convert VTS to MP4 for free with open-source apps like VLC or HandBrake.
- Use CloudConvert for quick and easy browser-based conversion.
- For faster and more user-friendly conversion options, try a subscription-based app like UniConverter.
Steps
VLC Media Player
-
1Open VLC. It's the app resembles an orange traffic cone with two white stripes.
- If you don't have VLC on your computer, you can download and install VLC Media Player by visiting https://www.videolan.org in a web browser.
-
2Click Media. It's in the top-left corner of the VLC window.
- On Mac, click the File menu instead. It's on the top-left side of your Mac's screen.
Advertisement -
3Click Convert/Save. It's near the bottom of the drop-down menu.
- On Mac, this option is labeled Convert/Stream instead.
-
4Click Add. It's in the "File" tab on the right side of the Open Media window.
- On Mac, click Open media in the Convert & Stream popup window instead. You can also drag and drop the file(s) you want to open into the Drop media here box.
-
5Select the VTS file you want to convert and click Open. Navigate to the folder with your VTS file, select it, and then click Open.
- VTS video files are often found in the "VIDEO_TS" folder of DVDs and usually end in the .VOB file extension.
-
6Click Convert / Save (Windows Only). It's at the bottom-right of the window.
-
7Choose Video - H.264 + MP3 (MP4) in the drop-down menu. In the "Profile" section, select the MP4 option.
-
8Select Keep original audio track in the Tools menu. On a Windows PC, click the button that looks like a crossed wrench and screwdriver next to the dropdown menu in the Profile section. On a Mac, click the Customize… button in the same section. Once the menu opens:
- Click the Audio codec tab.
- Make sure both Audio and Keep original audio track are checked.
- If you still have issues with the audio, check the audio codec on the original VTS files and make sure the settings in the Audio codec tab match. To do this, open the original file(s) and select Codec Information from the Tools menu (Windows) or under Window => Media Information (Mac).
- Click Apply or Save to close the Tools/Customize… menu when you’re done.
-
9Click Browse. It's near the bottom-right of the window.
- On Mac, click Save as File and then click Browse instead.
-
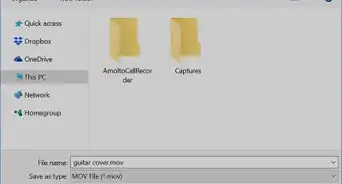
10Enter a name and select a location to save the video file. On Windows, select a location in the left-hand pane and type a file name in the "File name" field. On Mac, type a new filename at the top and select a location in the "Where" drop-down box, or, you can click ˅ to pick more locations.
-
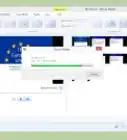
11Click Save and Start. This saves your output settings and starts the video conversion.
- On Mac, click Save and then click Save again.
-
12Wait for the video to render. The timeline slider will start to move across the video timeline as VLC converts the video. When it reaches the end, your VTS file will be converted to MP4 format and you can play the converted video file.
- Depending on the size and quality of your VTS file, the conversion can take quite some time.


CloudConvert
-
1Navigate to https://cloudconvert.com/vob-to-mp4 in your web browser. CloudConvert is a simple web-based video converter tool. To convert VTS files in CloudConvert, you’ll need to choose the option to convert from .VOB (the file extension used for VTS files) to MP4.[1]
- You can go directly to the VOB to MP4 page or select VOB to MP4 from the VOB converter page: https://cloudconvert.com/vob-converter.
- CloudConvert is free for up to 25 file conversions per day. If you want to convert more files in a day or access other additional features, you’ll need to buy a subscription or pay for a package that includes a certain number of minutes.[2]
-
2Click Select File. Locate the red Select File button at the top of the page. Click it to open a File Explorer or Finder window, or click the down arrow on the right side of the button to open a dropdown menu of other options.
- You can upload a file from your computer or import one from a URL, Google Drive, Dropbox, or OneDrive.
-
3Make any adjustments you like in the Options menu. You can either convert the movie using the defaults listed on the page, or adjust any of the options in the Options menu below the Select File button. For instance, among other things, you can:
- Change the resolution, compatibility profile, or scale of the video in the Video section.
- Adjust the audio codec, bitrate, or channels in the Audio section.
- Trim the start or end of the video in the Trim section.
- Add or copy subtitles.
- Add a watermark.
-
4Click Convert. When you have the settings the way you like them, click the Convert button.[3] Wait for your file to convert to MP4.
-
5Download the converted file(s) to your computer. When the conversion is finished, you’ll see a Download button. Click it to save the new MP4 file(s) to your computer.[4]


HandBrake
-
1Launch HandBrake. HandBrake is a popular open-source video transcoder app for MacOS, Windows, and Linux. To get started converting VTS to MP4 with HandBrake, launch the app on your computer. The icon looks like a cocktail with a pineapple next to it.
- If you don’t already have the app on your computer, you can download it here: https://handbrake.fr/downloads.php.
-
2Select Open Source. In the top left corner of the main HandBrake window, click the Open Source icon. It looks like a filmmaker’s clapperboard. This will open a dialog box where you can browse your computer for video files.[5]
- You can also drag and drop the files you want to convert into the main HandBrake window.
-
3Choose the VTS file you want to convert. Select your VTS file from the dialog and click Open. If HandBrake successfully scans the source file, the file name, a preview image, and other information about the file will appear in the main window.[6]
-
4Select clips from the Title menu. Typically, a DVD’s VTS file will contain multiple clips, or “titles,” instead of just one video file. Choose whichever clips you want to convert to MP4 from the dropdown Title menu.[7]
- If you want to convert all the titles in the file at once, you can do so using the Queue tool. See the HandBrake support documentation page for detailed instructions on how to process multiple titles at once: https://handbrake.fr/docs/en/latest/advanced/queue.html
-
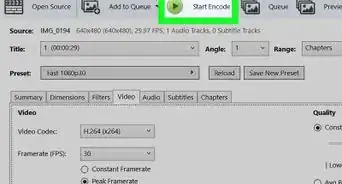
5Click Presets and choose your resolution and device. Once your source is open, click the drop-down Presets menu. In this menu, you can select your video’s output resolution, or choose a preset that’s designed for compatibility with a specific device.[8]
- For instance, if you plan to watch your MP4 on a Roku or Xbox, you can find presets for those devices in the Devices section of the Presets menu.
- The default preset of Fast 1080p30 works well on most devices.
- If you like, click the Video tab in the main window to make adjustments to the quality of your selected preset.[9]
-
6Open the Summary tab. Once you’ve selected your desired presets, click the Summary tab in the main window. This is where you’ll choose the output format for your video.
-
7Select MP4 in the Format menu. In the Summary tab, click the dropdown menu next to the word Format. Select MP4 from the list of formats.
- The format may already be set to MP4 by default.
- If you like, you can preview your video with your selected settings by clicking the Preview button in the toolbar at the top of the main HandBrake window.
-
8Pick a name and destination for your file. At the bottom of the main HandBrake window, enter the title you want for your new MP4 file in the Save As text box. The default destination for your video will be displayed next to the word To:, which is to the right of the Save As box. If you want to change the save destination, click the Browse… button at the bottom right corner of the window.[10]
-
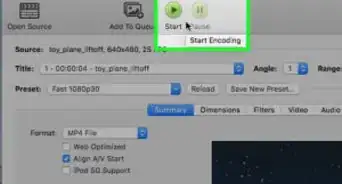
9Click Start. When you’re satisfied with all your settings, click the green Start button at the top of the HandBrake window to begin encoding your video. A progress bar will appear at the bottom of the screen so you can track the encoding process.[11]
- When the video finishes encoding, it will appear in the destination file you selected.


-
1Download and launch the UniConverter app. UniConverter is a versatile video conversion app. To get it, visit https://videoconverter.wondershare.com/ and click Try It Free, or click Pricing and select one of the subscription options.
- Once you’ve downloaded the install file, follow the instructions to install UniConverter on your computer and launch the app.
- While UniConverter is faster and more user-friendly than some of the other options out there, you will need to buy a subscription to use all of its features. There is a free trial option if you want to try it before you commit.
-
2Click Add Files to import VTS files. Once you’ve launched the app, click the Add Files button at the top of the main UniConverter window to browse for VTS files on your computer. You can add files individually or open the dropdown menu and select Add Folder to import an entire folder at once.
- Make sure you have the Video Converter tab on the left side of the window selected.
- You can also click the Load DVD button to the right of the Add Files button to import files directly from a DVD.
- If you prefer, you can drag and drop files from your computer into the main UniConverter window.
-
3Select MP4 as your output format. Once your files are loaded, select Output Format at the bottom of the UniConverter window. Make sure you’re in the Video tab at the top of the dialog box that pops up, then select MP4 from the list of formats.
- Click Create to close the dialog box.
-
4Click Convert next to the file. Once you’ve chosen your output format, click Convert to start the process. You can also convert multiple files at once by clicking Start All at the bottom of the window.
- Unless you select a different destination, the files will automatically be saved to the WonderShare Converted folder.


Community Q&A
-
QuestionI tried this and the video converted without sound.
 Gaurangi_iyerCommunity AnswerUse The Televzr app for PC. Alternatively, you can use the MeddleMonkey Chrome Extension.
 -
QuestionAfter converting the video, can you play it on Android phones?
 Community AnswerYou certainly can, as long as you save it as MP4. All Android phones should be able to play MP4 as it is probably the most popular video format.


References
- ↑ https://cloudconvert.com/vob-to-mp4
- ↑ https://cloudconvert.com/pricing
- ↑ https://arapahoelibraries.org/blogs/post/using-cloudconvert-for-file-conversion/
- ↑ https://arapahoelibraries.org/blogs/post/using-cloudconvert-for-file-conversion/
- ↑ https://handbrake.fr/docs/en/latest/workflow/open-video-source.html
- ↑ https://handbrake.fr/docs/en/latest/workflow/open-video-source.html
- ↑ https://handbrake.fr/docs/en/latest/workflow/open-video-source.html
- ↑ https://handbrake.fr/docs/en/latest/workflow/select-preset.html
- ↑ https://handbrake.fr/docs/en/latest/workflow/adjust-quality.html
About This Article