X
This article was co-authored by wikiHow staff writer, Travis Boylls. Travis Boylls is a Technology Writer and Editor for wikiHow. Travis has experience writing technology-related articles, providing software customer service, and in graphic design. He specializes in Windows, macOS, Android, iOS, and Linux platforms. He studied graphic design at Pikes Peak Community College.
This article has been viewed 132,202 times.
Learn more...
Want to add color to shapes and other vector objects in Adobe Illustrator? This tutorial will teach you how to use Illustrator's palette, color picker, and eyedropper tool to fill objects with color.
Steps
Method 1
Method 1 of 4:
Using the Color Picker
-
1Open Illustrator. Illustrator has a yellow icon that says "Ai" in the middle. Click the icon on your desktop, Windows Start menu, or Applications folder (on Mac) to open Adobe Illustrator.
-
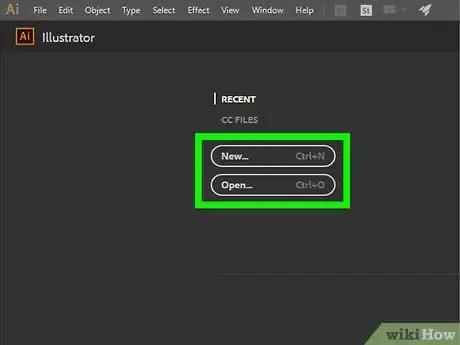
2Open or create a new document. To open an existing document, click Open on the launch screen and select a file you want to open. To create a new document, click New on the launch screen. Then enter your document height and width. Then select your document profile and click Ok.
- You can open or create a new document at any time in Illustrator by clicking File in the menu bar at the top, followed by New or Open.
- There are a variety of document profiles you can choose from. These include "Web," "Print", "Video and Film", "Mobile Devices" and more. This determines what color mode your document uses. Digital display graphics, like video, web, and mobile devices use an "RGB" color mode for Red, Green, and Blue. Print documents use a CMYK color mode for Cyan, Magenta, Yellow, and Black.
Advertisement -
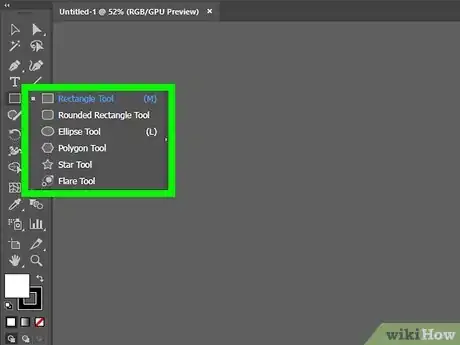
3Create shapes. You can create shapes using a variety of tools in Illustrator. You can select the different tools in the Tools panel, which is to the left by default. The following are a few tools you can use:
- The Shape Tools: The shape tools allows you to create specific shapes, such as rectangles, ellipses, polygons, and stars. You can find the Rectangle tool in the tool panel to the left by default. Click and hold the rectangle tool in the Tools panel to display all available shape tools.[1]
- The Pen Tool: The pen tool allows you to create custom shapes with precise curves. It has an icon that resembles a fountain pen tip. With the pen tool selected, click to place a vector point. Click another spot to create a straight line from one vector point to another. Click and drag to create a curved line from one vector point to another. Click the original vector point to close the shape.
- The Pencil Tool: The pencil tool allows you to create free-form shapes marks as if you were drawing with a pencil on paper. This is most useful for quick sketches and creating a hand-drawn look.
- The Paintbrush Tool: The paintbrush tool allows you to create free-form shapes and marks that have stylized outlines and paths. This is most useful for creating a painted look.
-
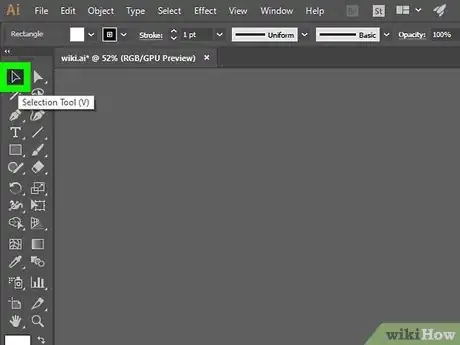
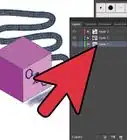
4Select the shape you want to color. If you have multiple shapes in your Illustrator project, you will need to select the shape you want to color. To do so, click the icon that resembles a black mouse cursor in the Tools panel (or press "V" on the keyboard) to select the Select tool. Then click the shape you want to color.
-
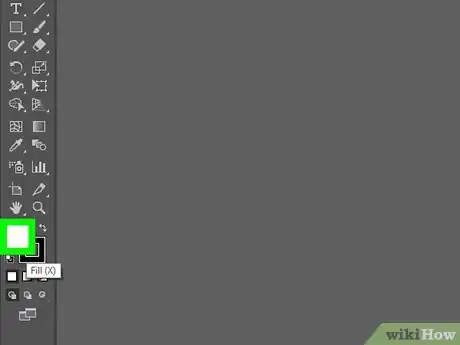
5Double-click the colored box in the Tools panel. It's at the bottom of the Tools panel to the left. It is colored black by default. The box that is completely filled in is the "Fill" color. This is the color of the shape. The box that resembles a colored border next to the "Fill" color box is the "Stroke" color. This is the color of the outline around the shape. Double-clicking either opens the color picker.
-
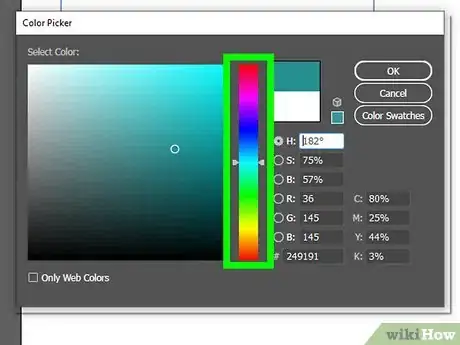
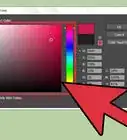
6Select a color hue. Click a color in the rainbow-colored strip to select a color hue.
-
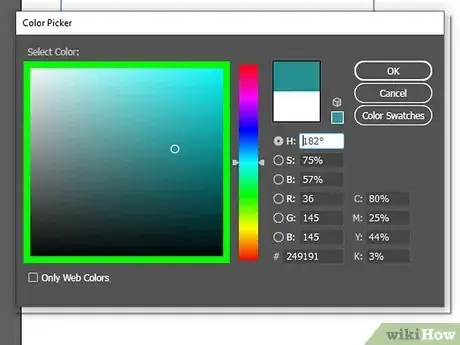
7Select a color shade. With a color hue selected, click a shade in the large box next to the rainbow-colored strip to select a color shade.
-
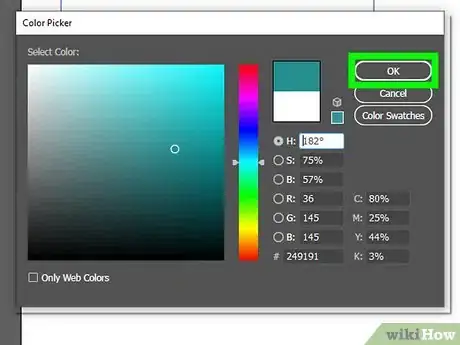
8Click Ok. This confirms the color you selected and changes the color of the shape.
Advertisement
Method 2
Method 2 of 4:
Using Swatches
-
1Open Illustrator. Illustrator has a yellow icon that says "Ai" in the middle. Click the icon on your desktop, Windows Start menu, or Applications folder (on Mac) to open Adobe Illustrator.
-
2Open or create a new document. To open an existing document, click Open on the launch screen and select a file you want to open. To create a new document, click New on the launch screen. Then enter your document height and width. Then select your document profile and click Ok.
- You can open or create a new document at any time in Illustrator by clicking File in the menu bar at the top, followed by New or Open.
- There are a variety of document profiles you can choose from. These include "Web," "Print", "Video and Film", "Mobile Devices" and more. This determines what color mode your document uses. Digital display graphics, like video, web, and mobile devices use an "RGB" color mode for Red, Green, and Blue. Print documents use a CMYK color mode for Cyan, Magenta, Yellow, and Black.
-
3Create shapes. You can create shapes using a variety of tools in Illustrator. You can select the different tools in the Tools panel, which is to the left by default. The following are a few tools you can use:
- The Shape Tools: The shape tools allows you to create specific shapes, such as rectangles, ellipses, polygons, and stars. You can find the Rectangle tool in the tool panel to the left by default. Click and hold the rectangle tool in the Tools panel to display all available shape tools.[2]
- The Pen Tool: The pen tool allows you to create custom shapes with precise curves. It has an icon that resembles a fountain pen tip. With the pen tool selected, click to place a vector point. Click another spot to create a straight line from one vector point to another. Click and drag to create a curved line from one vector point to another. Click the original vector point to close the shape.
- The Pencil Tool: The pencil tool allows you to create free-form shapes marks as if you were drawing with a pencil on paper. This is most useful for quick sketches and creating a hand-drawn look.
- The Paintbrush Tool: The paintbrush tool allows you to create free-form shapes and marks that have stylized outlines and paths. This is most useful for creating a painted look.
-
4Select the shape you want to color. If you have multiple shapes in your Illustrator project, you will need to select the shape you want to color. To do so, click the icon that resembles a black mouse cursor in the Tools panel (or press "V" on the keyboard) to select the Select tool. Then click the shape you want to color.
-
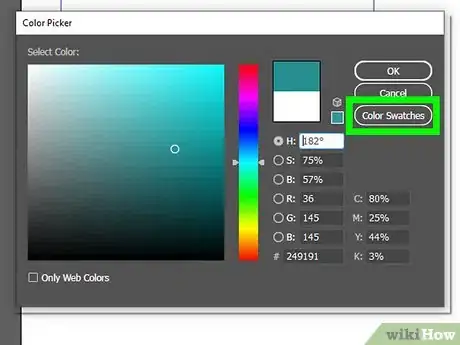
5Click the colored box at the top of the screen. It is colored black by default. It's below the menu bar at the top. The box that is completely filled in is the "Fill" color. This is the color of the shape. The box that resembles a colored border next to the "Fill" color box is the "Stroke" color. This is the color of the outline around the shape. Clicking either of these boxes displays a list of colored swatches.
-
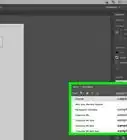
6Click a swatch. This instantly changes the color of the shape. There are only a few basic colors in the default swatch menu. You can use these to get an idea of what color you want to use and use them as a jumping-off-point.
- To view more swatches, click the icon that resembles books (or folders on older versions of Illustrator) to open the swatch library. It's in the lower-left corner of the swatch menu. Select one of the categories in the swatch library to open a new window with swatches from that category.
-
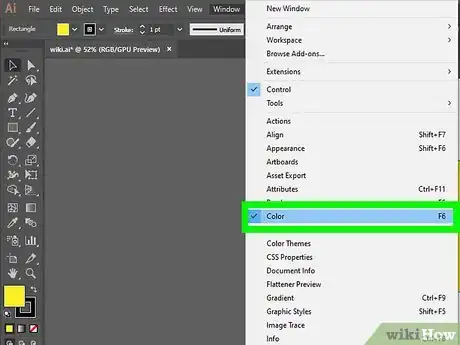
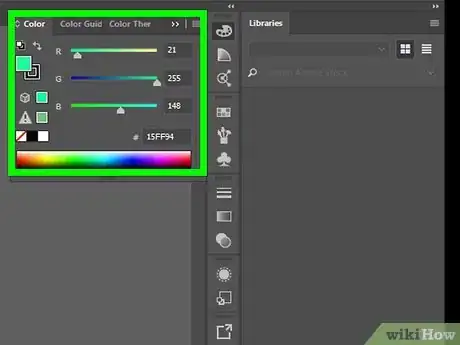
7Open the color panel. It has an icon that resembles a painter's palette. It's in the panel to the right, by default. Click this icon to open the color panel.
- If you don't see the Color icon, click Window in the menu bar at the top. Then click Color to open the color panel.
-
8Use the slider bars to adjust the color. There are three slider bars labeled "R," "G," and "B." Use these slider bars to adjust the amount of red, green, and blue are in the color. This changes the hue and shade of the color.
- If you are working on a document for print, the slider bars will be labeled "C," "M," "Y," and "K" for cyan, magenta, yellow, and black.
Advertisement
Method 3
Method 3 of 4:
Using the Eyedropper Tool
-
1Open Illustrator. Illustrator has a yellow icon that says "Ai" in the middle. Click the icon on your desktop, Windows Start menu, or Applications folder (on Mac) to open Adobe Illustrator.
-
2Open or create a new document. To open an existing document, click Open on the launch screen and select a file you want to open. To create a new document, click New on the launch screen. Then enter your document height and width. Then select your document profile and click Ok.
- You can open or create a new document at any time in Illustrator by clicking File in the menu bar at the top, followed by New or Open.
- There are a variety of document profiles you can choose from. These include "Web," "Print", "Video and Film", "Mobile Devices" and more. This determines what color mode your document uses. Digital display graphics, like video, web, and mobile devices use an "RGB" color mode for Red, Green, and Blue. Print documents use a CMYK color mode for Cyan, Magenta, Yellow, and Black.
-
3Create shapes. You can create shapes using a variety of tools in Illustrator. You can select the different tools in the Tools panel, which is to the left by default. The following are a few tools you can use:
- The Shape Tools: The shape tools allows you to create specific shapes, such as rectangles, ellipses, polygons, and stars. You can find the Rectangle tool in the tool panel to the left by default. Click and hold the rectangle tool in the Tools panel to display all available shape tools.[3]
- The Pen Tool: The pen tool allows you to create custom shapes with precise curves. It has an icon that resembles a fountain pen tip. With the pen tool selected, click to place a vector point. Click another spot to create a straight line from one vector point to another. Click and drag to create a curved line from one vector point to another. Click the original vector point to close the shape.
- The Pencil Tool: The pencil tool allows you to create free-form shapes marks as if you were drawing with a pencil on paper. This is most useful for quick sketches and creating a hand-drawn look.
- The Paintbrush Tool: The paintbrush tool allows you to create free-form shapes and marks that have stylized outlines and paths. This is most useful for creating a painted look.
-
4Select the shape you want to color. If you have multiple shapes in your Illustrator project, you will need to select the shape you want to color. To do so, click the icon that resembles a black mouse cursor in the Tools panel (or press "V" on the keyboard) to select the Select tool. Then click the shape you want to color.
-
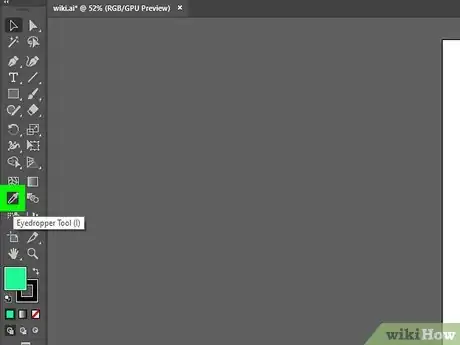
5Press I or select the Eyedropper tool. The Eyedropper tool has an icon that resembles an eyedropper. Click the icon in the Tools panel to the left, or press "I" on your keyboard to select the Eyedropper tool.
-
6Click a color in your project. This instantly changes the color of the shape to the color you clicked. The Eyedropper tool is useful for quickly selecting colors you have already used in your project.
Advertisement
Method 4
Method 4 of 4:
Creating a Gradient Blend of Colors
-
1Open Illustrator. Illustrator has a yellow icon that says "Ai" in the middle. Click the icon on your desktop, Windows Start menu, or Applications folder (on Mac) to open Adobe Illustrator.
-
2Open or create a new document. To open an existing document, click Open on the launch screen and select a file you want to open. To create a new document, click New on the launch screen. Then enter your document height and width. Then select your document profile and click Ok.
- You can open or create a new document at any time in Illustrator by clicking File in the menu bar at the top, followed by New or Open.
- There are a variety of document profiles you can choose from. These include "Web," "Print", "Video and Film", "Mobile Devices" and more. This determines what color mode your document uses. Digital display graphics, like video, web, and mobile devices use an "RGB" color mode for Red, Green, and Blue. Print documents use a CMYK color mode for Cyan, Magenta, Yellow, and Black.
-
3Create shapes. You can create shapes using a variety of tools in Illustrator. The following are a few tools you can use:
- The Shape Tools: The shape tools allows you to create specific shapes, such as rectangles, ellipses, polygons, and stars. You can find the Rectangle tool in the tool panel to the left by default. Click and hold the rectangle tool in the tools panel to display all available shape tools.[4]
- The Pen Tool: The pen tool allows you to create custom shapes with precise curves. It has an icon that resembles a fountain pen tip. It's in the tools panel to the left. With the pen tool selected, click to place a vector point. Click another spot to create a straight line from one vector point to another. Click and drag to create a curved line from one vector point to another. Click the original vector point to close the shape.
- The Pencil Tool: The pencil tool allows you to create free-form shapes marks as if you were drawing with a pencil on paper. This is most useful for quick sketches and creating a hand-drawn look.
- The Paintbrush Tool: The paintbrush tool allows you to create free-form shapes and marks that have stylized outlines and paths. This is most useful for creating a painted look.
-
4Open the Gradient panel. Gradients are two or more colors that blend together. To open the Gradient panel, click the icon that resembles a rectangle with a black and white blend. It's in the panel to the right, by default.
- If you don't see the Gradient panel icon on screen, click Window in the menu bar at the top. Then click Gradient to open the Gradient panel.
-
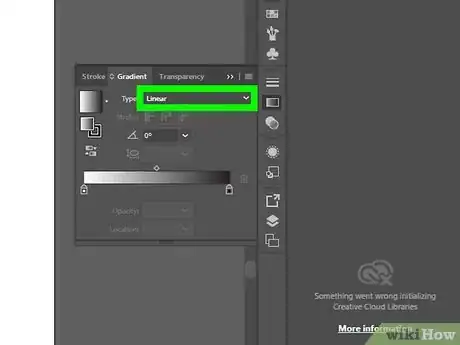
5Select a gradient type. You can select a linear gradient or a radial gradient. Click one of the two icons next to "Type" in the Gradient panel to select a gradient type.
- Linear gradients blend from one color to another in a straight line.
- Radial gradients blend from one color to another in a circular fashion.
-
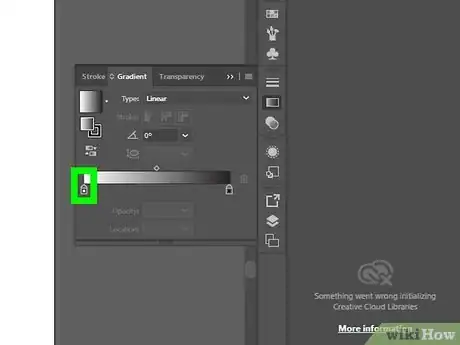
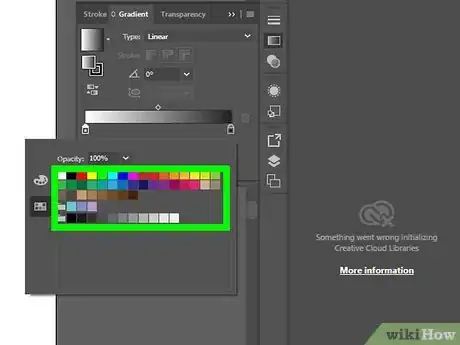
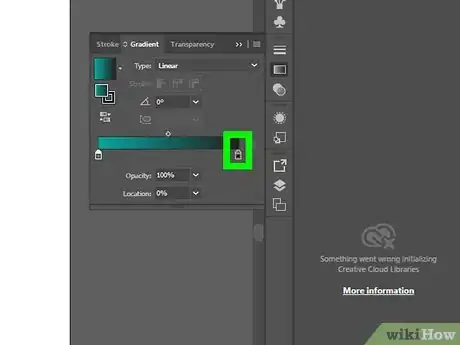
6Double-click one of the gradient's stops. The gradient stops are the two colored-rectangle notches at the bottom of the gradient strip in the Gradient panel. By default, there is a black and white stop. Double-clicking them opens the swatch menu.
-
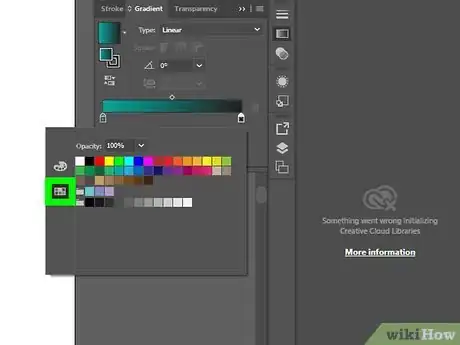
7Select a color. Click one of the colors in the swatch menu to change the color of the stop.
- Alternatively, you can drag and drop a swatch from an open swatch library menu onto one of the stops.
-
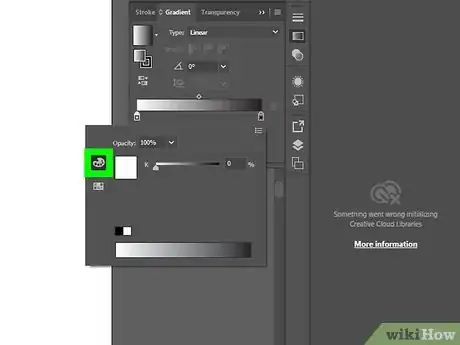
8Select the color panel. It's the icon that resembles a painter's palette next to the swatch library below the gradient stop.[5]
-
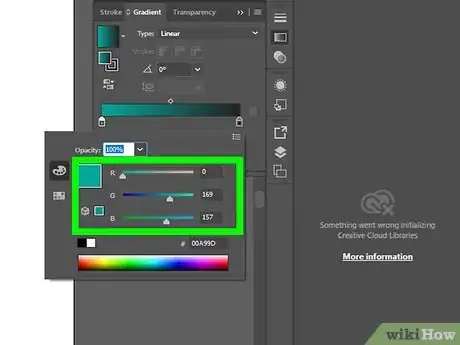
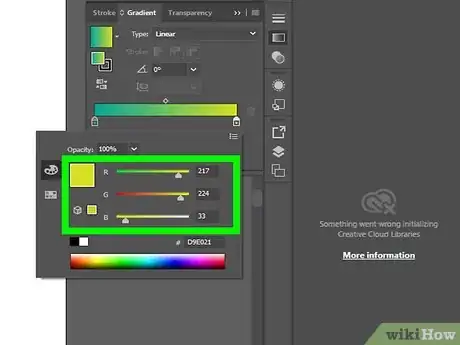
9Adjust the shade of the color. Use the RGB (or CMYK) slider bars to adjust the shade and color of the swatch.
- You can also select a new hue by clicking a color in the rainbow-colored bar at the bottom.
-
10Double-click the other gradient stop. It's the gradient stop on the other side of the gradient blend bar in the Gradient panel. Double-click it to open the swatch menu.
- You can add more stops to the blend by clicking where you want to add a stop below the gradient blend bar in the Gradient panel. To remove a stop, click and drag it down to remove it from the gradient blend bar.
-
11Select a color for the stop. Click one of the swatches in the swatch menu to select a color for the stop.
-
12Adjust the color and shade. To do so, click painter's palette icon next to the swatch menu and use the RGB (or CMYK) slider bars to adjust the color and shade.
- If you are using CMYK, and there is some grey in between a colored and a black stop, select the black stop and add more of the color you are transitioning from under the black. For example, if you are transitioning from red to black, and it appears grey in the middle. Select the black stop and increase the amount of red in the black stop. This creates a smoother blend.
- You can adjust the position of the stops by clicking and dragging them left and right. You can also click and drag the notch at the top of the gradient blend bar to adjust the blend.
-
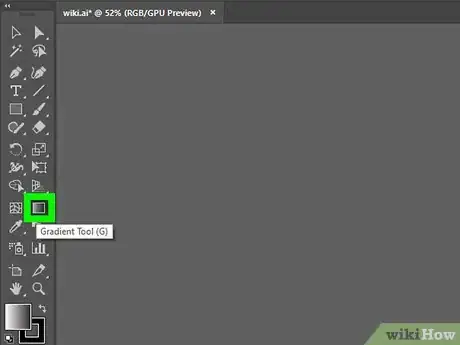
13Select the Gradient tool. It's the icon that resembles a rectangle with a black and white gradient blend. It's in the Tools panel to the left, by default.
-
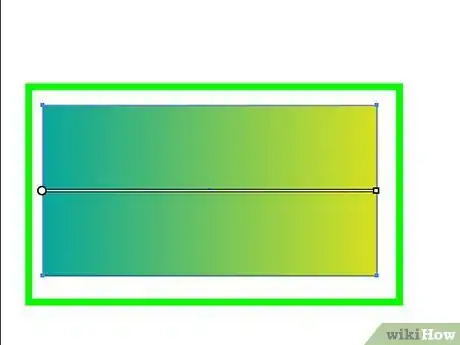
14Double-click the shape you want to apply a gradient blend to. This applies the gradient to the shape.
-
15Adjust the direction of the blend. To do so, have the Gradient tool selected and click and drag in the direction you want to apply the blend over the shape.
Advertisement
Community Q&A
-
QuestionWhy would I want to use Illustrator?
 Community AnswerAdobe Illustrator is a vector-based art program, so you can scale the created image to any desired size without losing quality. It also has intuitive design, especially if you have tried other graphics software or other Adobe products. If you are new, the icons are still exactly what they look like. Powerful tools such as the color harmonizer and mesh tool allow for almost any kind of art to be designed. This application concentrates more on the shape and color of your vector art than fancy effects, but includes methods for both from the wide set of tools. As you become more familiar with the application, you can make any digital art you want.
 -
QuestionHow many colors are in Adobe Illustrator?
 Community AnswerGrayscale, RGB, HSB, CMYK and web-safe RGB swatches are all available in Adobe Illustrator. They can be accessed from the icon with four horizontal lines in the top-left corner of the Colour tab in the Colour window.
Advertisement
Things You'll Need
- Mouse
- Adobe Creative Suite
- Illustrator document
References
- ↑ https://community.adobe.com/t5/illustrator-discussions/pencil-tool-vs-paint-brush-tool-illustrator-cc-2018/td-p/10060513
- ↑ https://community.adobe.com/t5/illustrator-discussions/pencil-tool-vs-paint-brush-tool-illustrator-cc-2018/td-p/10060513
- ↑ https://community.adobe.com/t5/illustrator-discussions/pencil-tool-vs-paint-brush-tool-illustrator-cc-2018/td-p/10060513
- ↑ https://community.adobe.com/t5/illustrator-discussions/pencil-tool-vs-paint-brush-tool-illustrator-cc-2018/td-p/10060513
- ↑ https://www.youtube.com/watch?v=aASA2n9HPf0
About This Article
Advertisement


